ⓘ
When it comes to comforting bakes, I like to turn to my Eastern European roots. My kitchen’s always full of kolaches around the holidays. and poppy seed loaves for special occasions. I’ve made them so often, I practically know them by heart. I figured, then, that it was time I tackled a new, slightly more challenging European recipe: babka.
This beautiful twisted bread is found in many Eastern European and Jewish bakeries. Most babkas are flavored with a bit of citrus zest and filled with cinnamon, almond paste or chocolate (though there are lots of variations). Since babkas aren’t overly sweet, they make for a fabulous breakfast or afternoon snack. While the swirls and fillings might make this bread look like something too tough to tackle, I’m here to assure you that making babka from scratch is a worthwhile and manageable task. Plus, all your friends and family will be so impressed by the appearance and the flavor (mine were!). So let’s get into baking!
Homemade Chocolate Babka Recipe
This is one of my favorite recipes of all time, right from my very own kitchen. Here’s what you’ll need for the bread’s three components: dough, filling and glaze.
For the dough:
- 4-1/2 cups flour
- 1/2 cup sugar
- 2-1/2 teaspoons instant yeast
- Zest of one orange
- 3 eggs + 1 yolk
- 2/3 cups butter, softened
- 3/4 teaspoons salt
- 1/2 cup water
For the filling:
- 5 ounces dark chocolate
- 1/2 cup butter
- 1/2 cup confectioners’ sugar
- 1/3 cup cocoa powder
- 1/2 teaspoon cinnamon
- 1/4 teaspoon salt
For the glaze:
- 1/4 cup water
- 1/4 cup sugar
Step 1: Making the babka dough
 Lisa Kaminski/Taste of Home
This bread is a bit different than most homemade bread for two reasons: 1) You don’t have to proof the yeast here (though we’ll show you how for all your favorite recipes), and 2) this bread proofs overnight in the fridge.
To make the dough, start by stirring together the flour, sugar, yeast and orange zest in the bowl of your stand mixer. Be sure you’re measuring your flour the right way—it makes a huge difference. Then using the dough hook attachment, mix in your eggs, yolk and water until incorporated with your dry ingredients. If the mix doesn’t come together and looks very dry and crumbly, add an additional tablespoon or two of water and mix.
Your stand mixer and dough hook are really going to come in handy during this next part—this is not a recipe to tackle using just elbow grease and a wooden spoon. With the mixer on low speed, sprinkle in your salt and then add your butter into the mix a tablespoon at a time. Once you’re finished adding the butter and it looks fairly well incorporated, crank up the speed to medium and let the dough hook knead the bread for 10 minutes.
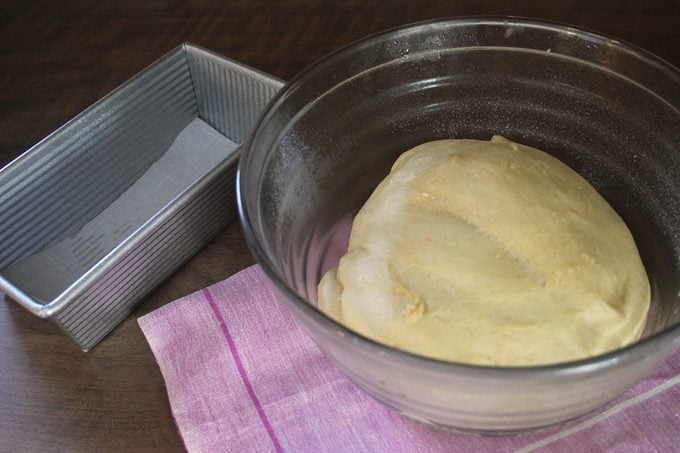
When this is done, turn your dough out into a greased bowl, cover it and place it in the fridge to rise overnight. When you’re really craving good bread, this might seem like a long time to wait. But think of it this way: no babysitting your bread while it proofs. To me, that’s a nice advantage; I can whip this up on a Saturday afternoon and have fresh babka Sunday morning.
Step 2: Make the chocolate babka filling
Before you take the dough out of the fridge, whip up an easy chocolate filling for this babka. In a medium-sized mixing bowl, whisk together the powdered sugar, cocoa powder and cinnamon. Then in a small saucepan, melt the stick of butter and five ounces of chocolate together. Once smooth, pour over the dry ingredients and stir together. No need to break out the mixer for this one; this filling comes together easily with just a wooden spoon or spatula.
Step 3: Roll out the dough
 Lisa Kaminski/Taste of Home
After that extra-long proof, it’s finally time to take the dough out of the fridge. Don’t worry if it hasn’t exactly doubled in size—sweet doughs don’t rise the same way as traditional bread doughs. Start by dividing the bread in half. Turn one half out onto a well-floured surface. The other half can hang out in the fridge.
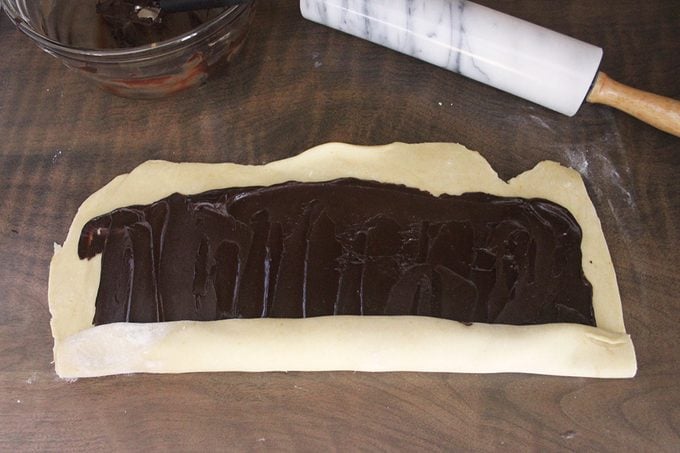
Roll out your dough to a rectangle approximately 10 inches by 12 inches. The dough should be fairly thin but not translucent. Then spread half the chocolate filling across the dough leaving a half-inch border. Then roll up the dough tightly starting at one of the 12-inch sides. Seal the roll with a bit of water. This technique is pretty similar to making a potica—another Eastern European favorite.
 Lisa Kaminski/Taste of Home
Stash this roll in the fridge or freezer while you repeat the process with the other portion of dough and filling. Having it slightly firm for the next step will be helpful.
Step 4: Twisting the bread
 Lisa Kaminski/Taste of Home
Take your chilled roll out of the fridge (let the other just-rolled one take its place for now). Using a sharp knife, slice off the very ends of the roll—just about a half-inch. Then slice down the center of the roll the long way, dividing the roll in half. It might seem like a shame to split a pretty spiral, but it’s going to be worth it!
 Lisa Kaminski/Taste of Home
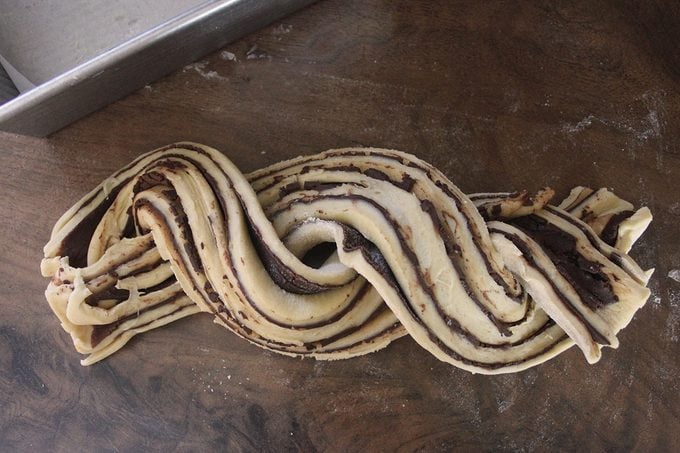
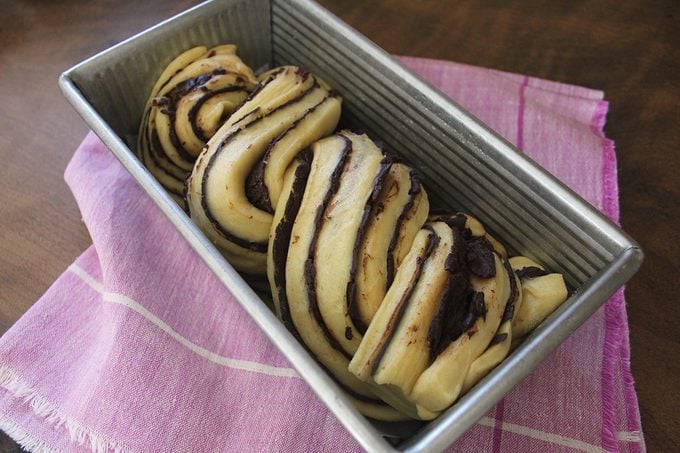
Then, with the filling sides up, twist the pieces together like a rope. Place into the bottom of a 9×4″ loaf pan that’s been greased and lined with parchment on the bottom. You can fiddle with it a bit so the bread fills the pan more evenly. It should look like a rope or twist. Repeat the process with the second loaf and allow them to rise again for about an hour and 45 minutes at room temperature. Cover them with a damp tea towel so they don’t dry out.
Editor tip: Bread proofs best at around 80ºF, so getting a good rise is more challenging in the cold months. I’ve got some tricks on how to get that lift even when it’s chilly outside (and inside).
Step 5: Baking
 Lisa Kaminski/Taste of Home
After their second rise, the babkas should be slightly larger. Again, the enriched dough here won’t allow them to grow significantly, but they should look slightly more puffed up than when you started.
Pop the loaves onto the middle rack of your oven (it’s the best place for almost any bake) and bake for 30 minutes at 375ºF. You can tent them with foil halfway through the bake if you find they are getting too brown.
While the babkas are in the oven, it’s a good time to whip up a quick simple syrup. Just heat equal parts sugar and water together until the sugar is dissolved.
Step 6: Glazing the babka
 Lisa Kaminkski/Taste of Home
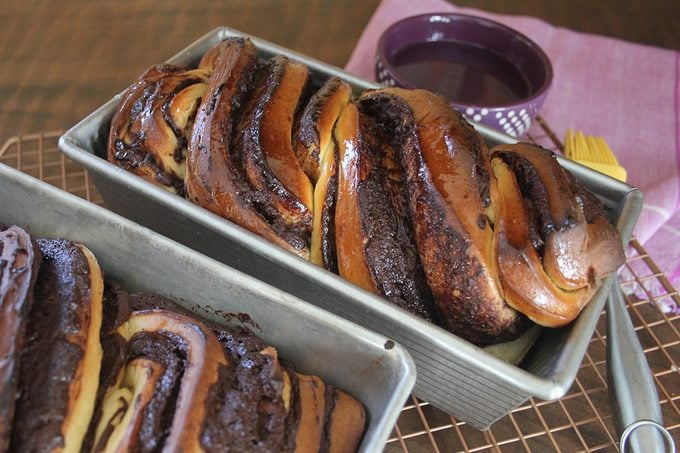
As soon as the babkas come out of the oven, brush them with the simple syrup. (Here’s how to make it.) This will give the loaves a fabulous shine plus add a bit of sweetness.
Allow the loaves to cool for about 15 minutes or so before removing from the pan. Cool them the rest of the way on a wire rack. I don’t blame you if you want to slice into them warm (they look so good and smell even better), but a cooled babka is a bit easier to slice. The choice is yours! Also, since this recipe makes two babkas, it’s good to know that they freeze very well. Pop one in the freezer and be sure to eat the other within a few days. Next, add this gorgeous swirled cinnamon babka to your baking bucket list.
 Lisa Kaminski/Taste of Home
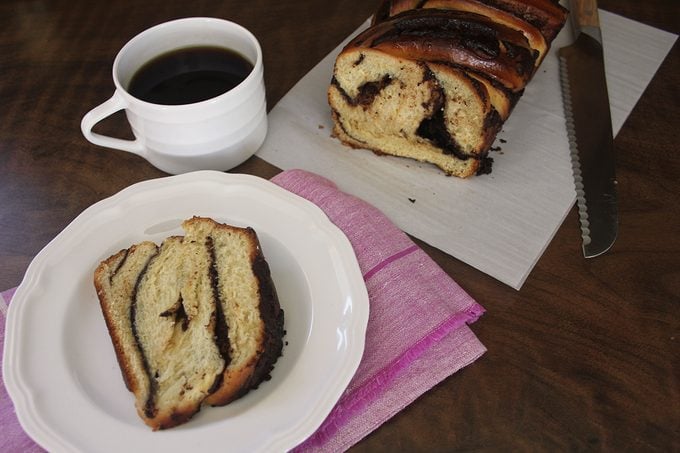
The result is a sweet-but-not-too-sweet showstopper that combines feel-good flavors like chocolate, cinnamon and just a hint of orange. I like a generous slice alongside my morning cuppa (and then another slice after dinner as dessert). It takes some extra time, but it’s a great special occasion alternative to go-to coffee cakes.
Try other homemade breads!
Basic Homemade Bread
If you'd like to learn how to bake bread, here's a wonderful place to start. This easy white bread bakes up deliciously golden brown. There's nothing like the homemade aroma wafting through my kitchen as it bakes. —Sandra Anderson, New York, New York
Go to Recipe
French BreadMy kids love to help me make this delicious bread recipe. It's quite easy, and they enjoy the fact that they can be eating fresh bread in less than two hours! —Denise Boutin, Grand Isle, Vermont
Psst! Make bread a breeze with these essential
bread-making tools.
Sunflower Seed & Honey Wheat BreadI've tried other bread recipes, but this one is a staple in our home. I won $50 in a bake-off with a loaf that I had stored in the freezer. —Mickey Turner, Grants Pass, Oregon
Want a bread baking refresher? Check out our
bread baking guide and get all of your questions answered (or just get some reassurance).
Pumpkin BreadI keep my freezer stocked for our harvest crew with home-baked goodies like this deliciously spicy, easy pumpkin bread recipe. —Joyce Jackson, Bridgetown, Nova Scotia
(Find more
easy quick bread recipes like this one!)
Banana Bread Our best ever banana bread is soft, moist and filled with a caramelized banana flavor. It’s easy to see why bakers love this recipe!
Baker's Dozen Yeast RollsA yummy honey-garlic topping turns these easy dinner rolls into something extra special. Try ’em with soups and chili. —Taste of Home Test Kitchen
CornbreadGolden squares of buttery cornbread pair perfectly with any comfort meal. This cornbread is crisp on the outside with a soft, crumbly interior.
Have you ever ended up with
undercooked bread? Learn what to do about it and ensure it never happens again.
Oatmeal Dinner RollsThese fluffy rolls go perfectly with any meal. They have a delicious homemade flavor that's irresistible. I like them because they're not hard to make and they bake up nice and high. —Patricia Staudt, Marble Rock, Iowa
Cinnamon Raisin Quick BreadCinnamon and raisins bring heartwarming flavor to this mildly sweet bread. It's ideal for an on-the-go breakfast or a quick snack before dinner. —Flo Burtnett, Gage, Oklahoma
Take a look at these
cranberry bread recipes.
Golden Honey Pan RollsA cousin in North Carolina gave me the recipe for these delicious honey-glazed rolls. Using my bread machine to make the dough saves me about 2 hours compared to the traditional method. The rich buttery taste of these rolls is so popular with family and friends that I usually make two batches so I have enough! —Sara Wing, Philadelphia, Pennsylvania
Lemon Blueberry BreadBake up some sunshine with our incredibly moist, tender and flavorful lemon blueberry bread. Loaded with zesty citrus, juicy blueberries and crunchy nuts, this will easily become your favorite take on this classic quick bread.
Icebox ButterhornsThese beautiful golden rolls just melt in your mouth! People will be impressed when these appear on your table. —Judy Clark, Elkhart, Indiana
Pear Bread RecipeThis pear bread recipe needs to be at the forefront of your next fall baking affair. It makes two warmly spiced and pear-studded bread loaves that just taste like a crisp autumn day.
Italian BreadA basket of Italian bread complements any meal. Make your own loaves at home with our simple, straightforward recipe, then use them for sandwiches or just for sopping up some sauce.
Apple Zucchini BreadThis quick apple zucchini bread spotlights late-summer produce. It's easy to bake and absolutely delicious.
For more, check out our collection of
zucchini bread recipes and also learn
how to make zucchini bread.
Crusty BreadThis easy crusty bread recipe proves that you absolutely can make a bakery-quality loaf at home—no kneading required. Once you've mastered the basic recipe, try variations with cheddar, herbs and more.
Apple BreadI got this apple quick bread recipe a long time ago and with a few changes it's become one of our favorites. Everyone who's ever tasted this apple bread has asked for the recipe! —Phyllis Herlocker, Farlington, Kansas
Honey CornbreadNix the box mix for this homemade honey cornbread recipe. It’s comforting and complements savory dishes effortlessly.
Country White BreadAnytime is the right time for a comforting slice of homemade bread. These loaves are especially nice since the crust stays so tender. This white bread recipe is my husband Nick's favorite. He makes most of the bread at our house. —Joanne Shew Chuk, St. Benedict, Saskatchewan
Pillow-Soft Dinner RollsThe dough for these rolls has a nice texture and is simple to shape. The recipe came from an old church cookbook. —Norma Harder, Weyakwin, Saskatchewan
Buttermilk BiscuitsYou can make biscuits any day of the week with this simple 3-ingredient buttermilk biscuits recipe.
Pull-Apart Garlic BreadPeople go wild over this golden, garlicky loaf whenever I serve it. There’s intense flavor in every bite. —Carol Shields, Summerville, Pennsylvania
Angel BiscuitsI first received a sample of these light, wonderful angel biscuits, along with the recipe, from an elderly gentleman friend. I now bake them often as a Saturday-morning treat, served with butter and honey. They're perfect with sausage gravy, too! —Faye Hintz, Springfield, Missouri
Pumpkin Knot RollsThese rolls are the lightest, most delicious ones I've ever tasted—and everyone else seems to agree. The pumpkin gives them mild flavor, moist texture and a pretty golden color. At our house, it wouldn't be the holidays without them. —Dianna Shimizu, Issaquah, Washington
Buttery Bubble BreadHomemade bread can be time-consuming, difficult and tricky to make. But this fun-to-eat monkey bread, baked in a fluted tube pan, is easy and almost foolproof. If I'm serving it for breakfast, I add some cinnamon and drizzle it with icing. —Pat Stevens, Granbury, Texas
Praline-Topped Apple BreadApples, toasted pecans and a praline glaze make this bread perfect for a holiday celebration—or anytime. We like it better than our go-to coffee cake. —Sonja Blow, Nixa, Missouri
English Muffin Bread LoafMany years ago, a good friend gave me her mother's recipe for this delightful bread, and I've made it ever since. Toast it up for breakfast and don't forget to slather on your favorite jam. —Jane Zielinski, Rotterdam Junction, New York
Easy Potato RollsAfter I discovered this recipe, it became a mainstay for me. I make the dough ahead of time when company is coming, and I try to keep some in the refrigerator to bake for our ranch hands. Leftover mashed potatoes are almost sure to go into these rolls. —Jeanette McKinney, Belleview, Missouri
Blueberry Quick Bread with Vanilla SauceThis loaf is chock-full of blueberries—two whole cups! When you pour the vanilla sauce over the bread, it makes it moist--almost like a pudding. I suggest serving a robust cup of coffee with this delicious treat. —Sue Davis, Wausau, Wisconsin
Garlic-Cheese Crescent RollsUpgrade your basic crescent roll recipe! Here's a recipe that just couldn't be much quicker or easier and is sure to add a nice touch to any dinner. The garlic and Parmesan flavors really come through. Enjoy! —Lori Abad, East Haven, Connecticut
Milk-and-Honey White BreadMy dad has been a wheat farmer all his life and my state is the wheat capital, so this recipe represents my region and my family well. This bread never lasts too long at our house. —Kathy McCreary, Goddard, Kansas
Honey-Oat Pan RollsThese tender rolls are relatively quick to make. Whole wheat flour and oats make them nutritious, too.—Arlene Butler, Ogden, Utah
Pull-Apart Bacon BreadI stumbled across this recipe while looking for something different to take to a brunch. Boy, am I glad I did! Everyone asked for the recipe and was surprised it called for only five ingredients. It's the perfect treat to bake for an informal get-together. —Traci Collins, Cheyenne, Wyoming
Make-Ahead ButterhornsMom loved to make these lightly sweet, golden rolls. They're beautiful and impressive and have a homemade taste that makes them memorable. —Bernice Morris, Marshfield, Missouri
Parmesan Sweet Cream BiscuitsSweet cream biscuits were the first kind I mastered. Since the ingredients are so simple, I can scale the recipe up or down. In fact, I've actually memorized it! —Helen Nelander, Boulder Creek, California
Sweet Potato BreadOne slice of this warm, tender sweet potato bread and you’ll see why it’s one of our favorite sweet potato fall desserts.
Potluck Pan RollsThe appealing homemade yeast-bread flavor of these golden rolls is unbeatable. Soft and light, they're great alongside any entree. Folks are disappointed if I don't bring them to potluck dinners. —Carol Mead, Los Alamos, New Mexico
Buttermilk CornbreadThis buttermilk cornbread recipe is tangy, fluffy and filled with sweet flavor. It's an easy side dish to pair with barbecue or hearty meats, and it can be ready and on the table in just 30 minutes.
Sesame French Bread Homemade French bread isn’t at all difficult to make, and it’s perfect alongside Italian foods. If you’re not serving a large group, freeze one loaf to enjoy later. —Peggy Van Arsdale, Trenton, New Jersey
Hawaiian Dinner RollsPineapple and coconut give a subtle sweetness to these golden homemade rolls. If there are any leftovers, they're great for sandwiches. —Kathy Kurtz, Glendora, California
Tomato-Herb FocacciaWith its medley of herbs and tomatoes, this rustic bread will liven up any occasion, whether it’s a family dinner or a game-day get-together. It never lasts long! —Janet Miller, Indianapolis, Indiana
Sesame Wheat BraidsWhen I started making this bread, my husband and our six children liked it so much that I was baking every day! I was thrilled when the judges at our county fair gave these braids both a blue ribbon and a best of show award! —Nancy Montgomery, Hartville, Ohio
Honey-Squash Dinner RollsPuffy dinner rolls take on rich color when you add squash to the dough. Any squash variety works—I've even used cooked carrots. —Marcia Whitney, Gainesville, Florida
Celebration BraidDuring the holidays, I sometimes make a couple of these golden loaves a day to give as gifts. Everyone in our family loves them any time of year. The recipe originated with one for Jewish challah, which I began making over a decade ago.
—Marcia Vermaire
Fruitport, Michigan
Confetti CornbreadMy grandmother Virginia always served Southwest cornbread. To honor her, I created a recipe that cuts down on the chopping but never skimps on flavor. —Angie Price, Bradford, Tennessee
Garlic Herb Bubble LoafI adapted an old sour cream bread recipe for this deliciously different pull-apart loaf that smells heavenly while baking. It has a light crust, tender interior and lots of herb and butter flavor. We think it's wonderful with a hot bowl of potato soup. —Katie Crill, Priest River, Idaho
Gluten-Free Flour MixI make this recipe in two-quart batches and store them in airtight jars. My son and I both have celiac disease and love that we can use this mix to still enjoy traditional dishes. —Bernice Fenskie, Wexford, Pennsylvania
Rustic Rye BreadThis gorgeous rye bread has just a touch of sweetness and the perfect amount of caraway seeds. With a crusty top and firm texture, it holds up well to sandwiches, but a pat of butter will do the job, too. —Holly Wade, Harrisonburg, Virginia
Flaky Cheddar-Chive BiscuitsThese wonderful, buttery biscuits complement any dinner. —Betsy King, Duluth, Minnesota
Autumn Pear BreadPears give these little loaves delicious flavor and help keep them nice and moist. They make lovely gifts to share, too. —Mary Lynn Wilson, Linden, Texas
Flavorful Herb BreadThis bread is one of my favorites. It has a wonderful texture and slices beautifully, and the flavor of the herbs really comes through. (
Psst—If you don't have a bread machine on hand, learn
how to make bread without one!) —Gerri Hamilton, Kingsville, Ontario
Herbed Oatmeal Pan BreadThis beautiful, golden pan bread is especially good with a steaming bowl of homemade soup. The oats give it a distinctive flavor, and we really like the herb and Parmesan cheese topping.—Karen Bourne, Magrath, Alberta
Soft Sesame BreadsticksI've been making these tasty breadsticks that go with almost any meal for years. Since they use ingredients like flour, sugar, baking powder and milk, it's convenient and inexpensive to mix up a batch. —Nancy Johnson, Connersville, Indiana
Vegetable & Cheese FocacciaMy family eats this flavorful bread as fast as I can make it. Sometimes I add different herbs, red onion or crumbled bacon. It's one of my best recipes!
—Mary Cass, Baltimore, Maryland
Home-Style Yeast BreadEveryone likes the tender texture and slightly sweet taste of this homemade bread. When I'm in the mood to bake, I usually double the recipe and share loaves with friends. The dough also makes lovely rolls.
-Launa Shoemaker, Landrum, South Carolina
Cornmeal Pan RollsThese delightful golden rolls are always requested at Thanksgiving and Christmas. The recipe is one we’ve enjoyed for years. —Vivian Eccles, Gridley, Kansas. Try making
kugelhopf this holiday season.
Caraway Seed Rye BreadMy parents were immigrants from Czechoslovakia and my mother would pull out this rye bread recipe when guests came over for dinner. Every time I bake it, I get nostalgic for those days. —Millie Feather, Baroda, Michigan
Butternut Squash Dinner RollsThese wholesome rolls are a pleasant addition to any entree. I get so many requests for them at holiday time. I make about 100 dozen in December! —Ula Kessler, Liberty Center, Ohio
Butter and Herb LoafThis is one of my family's favorite bread recipes. They love it with a warm bowl of soup during autumn.— Lillian Hatcher, Plainfield, Illinois
Oat Pan RollsI've made so many of these delicious rolls that I think I could make them blindfolded! I always take about 200 of them to the senior citizens dinner at our church. After shaping the rolls, you can freeze them, then just thaw and bake when you need them. —Debbie Johnson, Centertown, Missouri
No-Knead Casserole BreadYou'll love this cheddar bread made in a casserole dish. It is one of the easiest yeast breads to make. And since it calls for rapid-rise yeast, you don't have to wait long to enjoy it! —Peggy Key, Grant, Alabama
Handy Sausage BiscuitsThese are similar to old-fashioned biscuits made from scratch, but they're even better thanks to the tasty sausage throughout. It's almost impossible to stop eating them. I like to serve these biscuits with an egg dish or soup. —Nancy Parker, Seguin, Texas
Sour Cream Chive BreadThis savory loaf mildly flavored with chives is delicious when served warm with a meal, soup, salad or stew. It also tastes wonderful toasted the next day for breakfast. —Deborah Plank, West Salem, Ohio
Honey Spice BreadThe texture of this bread is almost like a cake, so I usually serve slices of it for dessert. The loaf looks so festive with the pretty glaze drizzled on top. —Gaye O'Dell, Binghamton, New York
Yogurt CornbreadMy husband doesn't like traditional Texas cornbread, so I came up with this recipe. This is the only kind he'll eat. Yogurt makes this variation different from most. —Amanda Andrews of Mansfield, Texas
Herb Quick BreadThis simple bread is especially good with soups and stews, but slices are also tasty alongside fresh green salads. The herbs make it a flavorful treat any time of the year. —Donna Roberts, Manhattan, Kansas
Mom's Buttermilk BiscuitsThese fluffy buttermilk biscuits are so tasty slathered with butter or used to mop up every last drop of gravy off your plate. I can still see Mom pulling these tender gems out of the oven. —Vera Reid, Laramie, Wyoming
Whole Wheat French BreadThe first time I made this recipe my husband asked it if was homemade or store-bought. When he reached for a second piece, I knew I had a winning recipe. —Roseann Loker, Colon, Michigan
Date Pecan Tea BreadPacked with dates and pecans, this sweet bread is excellent on its own and even better topped with the chunky cream cheese spread. We enjoy it during the holiday season, but also for after-school and late-night snacks. —Carole Resnick, Cleveland, Ohio
Cinnamon BreadOur homemade cinnamon bread recipe makes a loaf fit for magazine covers: tall and golden brown with soft, sweet dough and swirls of cinnamon sugar. Here's how to make it.
Wholesome Wheat BreadMy sister and I were in 4-H, and Mom was our breads project leader for years. Because of that early training, fresh homemade bread like this is a staple in my own kitchen.
-Karen Wingate, Coldwater, Kansas
Homemade Egg BreadPeople rave about this tender, delicate bread every time I serve it. The braided look is just beautiful and is actually quite easy to do. —June Mullins, Livonia, Missouri
Dilly RollsThese versatile rolls are so welcome served warm alongside any dinner. I always make a big batch since my family enjoys them after they're cool, too, stuffed with a filling like egg salad or ham salad. —Mary Bickel, Terre Haute, Indiana
No-Knead Knot RollsMy mom, Velma Perkins, loved to serve these light, golden rolls when I was growing up on our Iowa farm. They're extra nice since they require no kneading. The dough rises in the refrigerator overnight, so there's little last-minute fuss to serve fresh hot rolls with any meal. —Toni Hilscher, Omaha, Nebraska
Buttermilk RollsThese buttermilk rolls are squishy, buttery and irresistible, especially when pulled straight from the oven.
Honey Whole Wheat RollsMost of the farmers in our area grow wheat, so this recipe definitely represents my region. I bake these rolls often, especially when I'm making soup or stew. —Celecia Stoup, Hobart, Oklahoma
Wonderful English MuffinsWhen I was growing up on a farm, my mom always seemed to be making homemade bread...nothing tasted so good! Now I like to make these simple yet delicious muffins for my own family. —Linda Rasmussen, Twin Falls, Idaho
How to Make Homemade Bagels, Step by StepOnce you learn how to make homemade bagels, you'll never want anything else for breakfast.
Sour Cream Fan RollsI received this recipe from an email pen pal in Canada. The dough is so easy to work with, and it makes the lightest yeast rolls. I haven't used another white bread recipe since I started making this one.
-Carrie Ormsby, West Jordan, Utah
Rosemary Orange BreadMeet the Cook: Of all the herbs, rosemary is my favorite. This bread goes great with a roast, chicken or pasta with red sauce. It's especially festive to serve at holiday time.
My husband and I have three young children - ages 6, 3 and 1.
-Deidre Fallavollita, Vienna, Virginia
Italian Pinwheel RollsParmesan cheese, garlic and oregano make these rolls hard to resist. My family gets hungry when they smell them baking and can't wait for them to be done. —Patricia FitzGerald, Candor, New York
Feather-Light BiscuitsI usually used a glass as a cutter so the biscuits are bigger than average size, and I always baked some extras to send home with the kids. They liked to split them and fill them with cheese or peanut butter and strawberry jam. —Eleanore Hill, Fresno, California
Apple Raisin BreadI've been making this bread for many years. It smells so good in the oven and tastes even better. I make bread almost every Saturday, and it doesn't stay around long with our sons home from college in the summer. —Perlene Hoekema, Lynden, Washington
Overnight Yeast RollsIt's easy to make light and flavorful rolls with this no-fuss recipe. The dough can also be used for cinnamon rolls, herb bread or coffee cake. —Trisha Kruse, Eagle, Idaho
Skillet Herb BreadWe had a lot of family get-togethers while I was growing up. My grandmother, aunts and mom were all good cooks, and each had her own specialty when it came to bread. Mom's was my favorite—she created this recipe more than 40 years ago. The flavors call to mind the taste of cornbread stuffing! —Shirley Smith, Yorba Linda, California
Evelyn's Sour Cream Twists"Evelyn" is my mother-in-law, who always keeps some of these terrific flaky twists in her freezer to serve in a pinch. They go quickly around our house— especially during the holidays.
Herb Buttermilk Dinner RollsWhen I couldn't find a recipe for dinner rolls, I created my own using a variety of herbs for extra flavor. —Sue Friesen, Thorold, Ontario
Extra Quick Yeast RollsMaking homemade rolls usually takes a lot of ingredients and time, but this recipe makes it so simple. The rolls come together quickly and freeze well too.—Eleanor Paine, Junction City, Oregon
Italian FlatbreadsPairs wedges of this chewy flatbread with a tomato-based soup and start dunking! —Cynthia M. Bent, Newark, DE
Cardamom Braid BreadI came across this recipe in 1983 and have been making it for the holidays ever since. One year I gave away 20 loaves! —Rita Bergman, Olympia, Washington
Cornmeal Parker House RollsMy mom deserves the credit for making this recipe a family tradition. These sweet, tender rolls have been on every holiday table at her house for as long as I can remember. —Lisa D. Brenner, Harrisburg, Nebraska
Pepperoni Cheese BreadAs a stay-at-home mother of two little girls, I pack a lot of activity into my days. The bread machine makes it a snap to turn out this attractive loaf that gets its zip from cayenne pepper, pepperoni and Mexican cheese. —Dusti Christensen, Goodridge, Minnesota
Scottish Oatmeal RollsMy family likes rolls that can hold up to scooping gravies, sauces and more. This recipe is a favorite. The oatmeal in the dough gives it a Scottish touch. —Peggy Goodrich, Enid, Oklahoma
Cardamom TwistThis golden bread has a soft, tender texture and the perfect amount of cardamom flavor in every bite. Slices are especially good with a cream cheese spread or fresh honey butter. —Carla Miller, Pasco, Washington
Tender Whole Wheat RollsEven though these are whole wheat rolls they have a light texture and are soft and tender. This recipe reminds me of lots of happy meals with my family.—Wilma Orlano, Carroll, Iowa
Muenster BreadMany years ago my sister and I won blue ribbons in 4-H with this bread. The recipe makes a beautiful golden loaf with cheese peeking out of every slice. —Melanie Mero, Ida, Michigan
Wild Rice Bread with Sunflower SeedsI loved skipping the boring school cafeteria meals and going to my grandma’s house for lunch. She spent most of her life in northeastern Minnesota, which is reflected in this bread's ingredients. Now my family uses this for our holiday stuffing. —Crystal Schlueter, Northglenn, Colorado
Up Next: The Best Bread Recipes of 2023