ⓘ
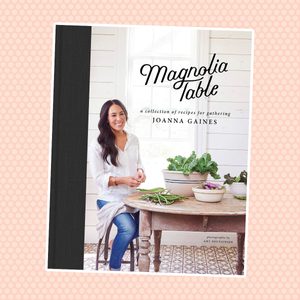
Every year, I love to try a few new apple recipes to celebrate fall. Apple crisp, apple bread, applesauce for serving up alongside savory dishes—I can’t get enough! This year, picking out a new apple recipe wasn’t too difficult. After loving Joanna Gaines’ biscuit recipe, I had a pretty good feeling about one of her other recipes from Magnolia Table: dulce de leche apple pie.
This recipe had everything I could want from fall: apples, brown sugar, cinnamon, nutmeg and plenty of butter. It also contained a less common ingredient—dulce de leche. This ingredient is a lot like caramel. It’s made by slowly heating up sweetened condensed milk until it’s thick, sticky and sweet.
I figured that combining apples with a caramel-like ingredient had to be a recipe for success. Here’s how it went!
How to Make Joanna Gaines’ Dulce de Leche Apple Pie Recipe
 Taste of Home
This pie recipe doesn’t require any special ingredients other than the dulce de leche (more on that later). After your next trip to the apple orchard, you should be all set to start on this baking project.
For the crust you’ll need:
Makes two nine-inch crusts.
And for the filling:
- 5 pounds (about 12 cups) apples, peeled and thinly sliced
- ½ cup brown sugar
- ¼ cup granulated sugar
- 1 teaspoon cinnamon
- ¼ teaspoon nutmeg
- ¼ teaspoon allspice
- ¼ cup flour
- ¼ cup dulce de leche, plus more for serving
- 1 tablespoon milk
- 1 tablespoon coarse sugar for topping, optional
Tools for Baking a Dulce de Leche Apple Pie
- Magnolia Table: We’ve got you covered with this dulce de leche apple pie here, but this cookbook is full of delicious recipes from our favorite home flipper. Snag a copy for yourself (and pick up Magnolia Table: Volume 2 while you’re at it).
- Apple peeler/corer: Peeling five pounds of apples is quite the task. Pick up this gadget that peels, cores and slices all in one go. If this isn’t for you, check out our Test Kitchen’s other go-to apple peelers.
- Pie plate: Make sure you’ve got a pretty pie plate on hand for serving up this dulce de leche apple pie—and plenty of other fall pies too.
Directions
Step 1: Make the Dulce de Leche
The good news here is that you can skip step one entirely if you have dulce de leche on hand. You can find canned dulce de leche at most grocery stores in either the baking or international foods sections or online. If you can’t find it or the store is out of stock (that’s what happened to me), don’t worry: Making your own is easy.
All you need to make dulce de leche is a can of sweetened condensed milk. Peel the label off the can and submerge it in water in a small pot. Place on the stove, cover and let simmer (making sure the water line never dips below the top of the can) for three hours. Be sure to wait for it to reach room temperature before opening.
This is a bit time-consuming, but it’s mostly hands-off. Plus the flavor is great! I stirred a little into my coffee the next morning—heaven!
Step 2: Make the Crust
 Taste of Home
The start of any good pie is the crust, so that’s where I started with this recipe. Joanna writes that you can either make your own pie crust or use premade. As much as I love her cooking shortcuts, I decided I’d make the pie pastry from scratch. To make the process go just a bit faster, I broke out my food processor to mix up the pie pastry.
To make the dough, I blended the flour and salt. Then I pulsed in cold, cubed butter until the butter was broken down into pea-sized pieces.
Last step: Add in a quarter cup of ice-cold water until the dough comes together. I used my food processor here. I have a Cuisinart model that I love—and the Taste of Home Test Kitchen approves of it too.
Once the dough came together, I turned it out onto a board, pressed it together, divided the dough in half and wrapped each up in a sheet of Bee’s Wrap (trust me, you’ll love it). I let them chill in the fridge for two hours.
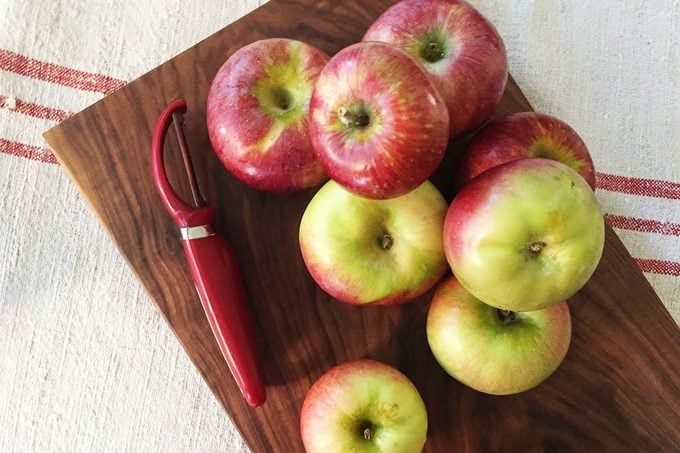
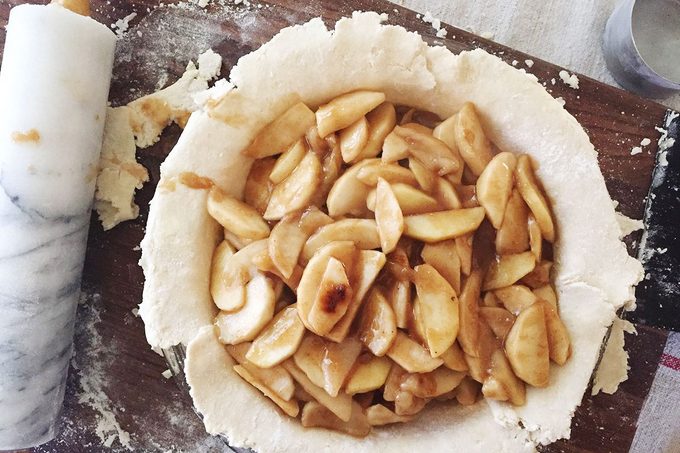
Step 3: Prep the Apple Filling
 Taste of Home
I love a good apple pie (and apple bread, apple tarts, apple muffins…), so every fall I pick tons of apples. This year, my husband and I brought home 22 pounds! I was thrilled to use up some of this harvest on the filling which calls for a whopping 12 cups of sliced apples! I used Cortland apples since I love how sweet and crisp they are, but use any heirloom variety you choose for this recipe.
To make the filling, I started by peeling, coring and slicing my apples. I do this by hand, but you can use one of those apple-peeling gadgets or even a spiralizer to do the work for you. In total, I peeled about 15 medium-sized apples.
What’s different about Joanna’s recipe, compared to the apple pie I made growing up, is that she cooks the apples ahead of time. Joanna writes, apple pie used to drive her crazy: “even if I made the pie the same way every time when I’d cut into it sometimes there wasn’t much liquid and other times it was like the apples were swimming in the deep end of a pool.” I feel that. Cooking the apples prior helps release some of that soggy bottom-inducing moisture.
But you don’t cook the apples alone. Her recipe specifies that you should melt four tablespoons of butter along with a half cup of brown sugar, a quarter cup white sugar, a teaspoon of cinnamon and a quarter teaspoon each of nutmeg and allspice. Then, once those are melted together, you stir in the apples.
Bring the little bit of liquid up to a boil, stir in a quarter cup of flour and let simmer on top of the stove for about ten minutes—until the apples are tender but not cooked through.
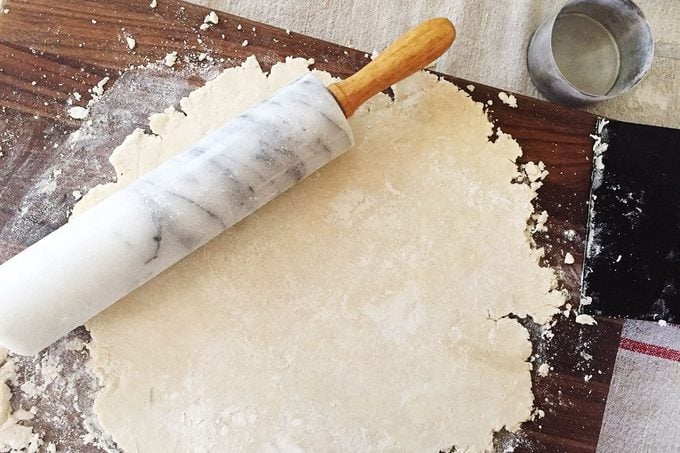
Step 4: Roll Out the Crust
 Taste of Home
While the apples cooled a bit, I moved onto rolling out my crust. You know how to do this: Turn it out onto a well-floured surface and roll, roll, roll until it’s the size you need to fit in your pie pan—in this instance a nine-inch pan. I turned one crust into the pan, trimming the edges a bit, and kept the other one flat.
Learn our secrets to the perfect apple pie crust!
Step 5: Fill the Pie
 Taste of Home
Once the crust was all set in my pie plate, it was time to fill the pie. Joanna recommends spooning the apples in using a slotted spoon, just to get rid of any excess moisture—you know, the moisture that gives you a runny, soggy pie. I found that the Cortland apples I used didn’t release too much water, but as Joanna says, you can never know.
The only part I was unsure of with this step was that by straining out all the liquid, you’re also not getting the full experience of all the spices that were added to the mix! But I kept going as the recipe instructed.
Step 5: Add the Dulce de Leche to the Pie
Then, you top this all off with a quarter cup of dulce de leche. To get it to drizzling consistency, you can pop it in the microwave for 20 to 30 seconds. I’m living a microwave-free life right now, so I just popped the can over the stove in a small pan of water—a few minutes later it was perfectly gooey.
Joanna recommends spooning over about a quarter cup of this sticky, caramel topping, but sticky stuff is hard to measure! I might have added a bit extra. Oops.
Step 6: Crimp
 Taste of Home
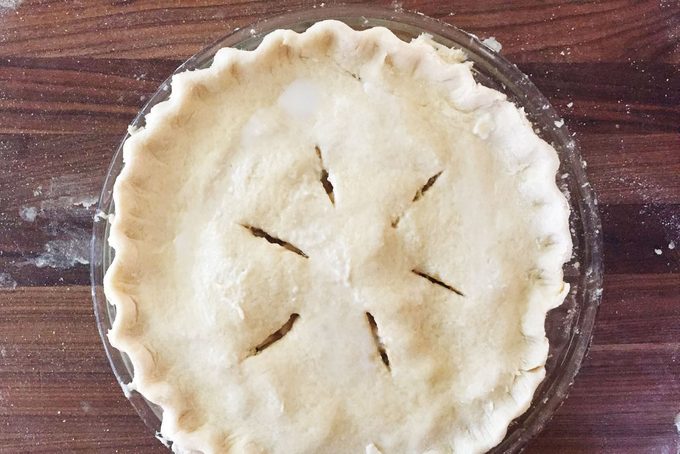
Once the apples and dulce de leche were in place, I popped the top crust on top. I sealed the top crust to the bottom with just a bit of milk then pinched the edges. You can finish off your pie in a fancier way if you choose, but I wanted to let the flavors—not the fancy finish—be the star of this show.
Then I cut six slits in the crust to let the steam vent out and then gave it a quick wash with milk (just a tablespoon should do).
Step 7: Bake
 Taste of Home
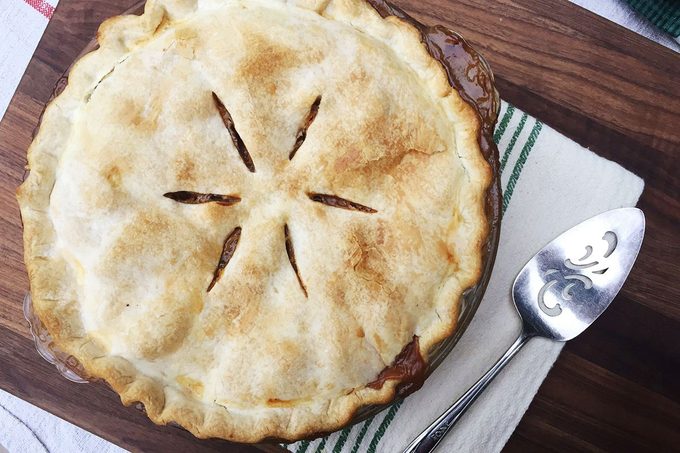
Once the pie was ready, I popped it in a 425ºF oven. After 25 minutes, reduce the heat to 325º and bake for another 45 minutes.
Pulling this pie out of the oven, I have to say, it looked pretty darn good! The milk wash helped create a nice, golden crust and you could just see a bit of the dulce de leche bubbling out of the sides.
Editor’s Tip: Put a cookie sheet on the shelf beneath your pie. It might leak dulce de leche and make a mess of your oven. In case you make a mess, here’s how to clean your oven when self-clean just doesn’t cut it.
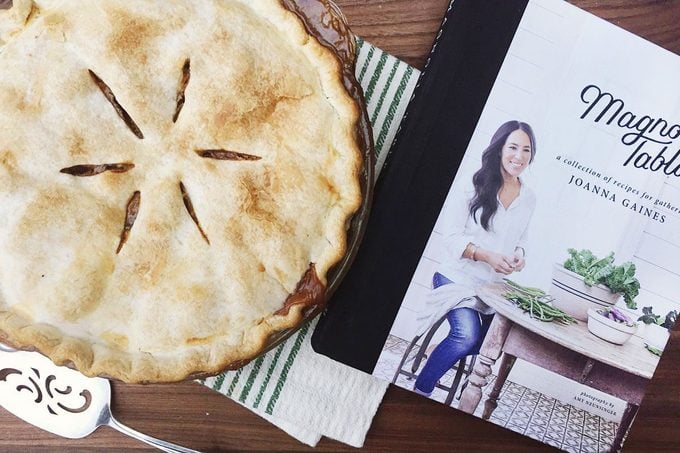
How the Dulce de Leche Apple Pie Turned Out
 Taste of Home
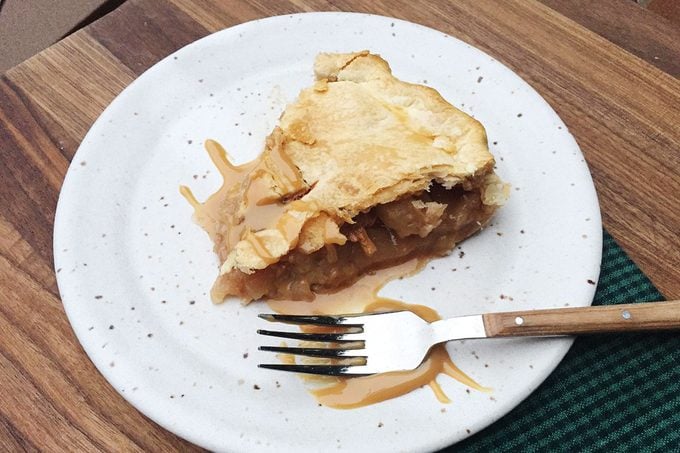
I could hardly wait to slice into this pie after it came from the oven. I mean it. After only 30 minutes, I cut myself a generous slice because who doesn’t love warm apple pie?
Everyone knows the first slice is the hardest to prise out of the pan, and it was no different with this Joanna Gaines recipe. That first slice came out steamy and delicious, but slightly watery. I wondered if cooking the apples ahead of time did any good at all. Until I came back for another slice in the morning.
Once the pie cooled, it was a much neater affair. The filling had set a bit, meaning the second (and third) slice weren’t nearly as messy. On that extra slice, I took a tip from Joanna and served it up with some extra dulce de leche. That was pretty divine! The effect was almost like a caramel apple—one of my favorite combos.
In the end, I have to say that the dulce de leche put a nice, sweet twist on the classic apple pie. Am I about to replace my favorite apple pie recipe with Joanna’s, though? I’m not so sure. But if I ever get a craving for a caramel apple treat, you bet this will be on the menu. If you enjoyed this recipe, then you must try apple pie with cheese.
In the mood for pie? You gotta try these!
Chocolate Chess PieThe rich, chocolaty version of this classic southern pie tastes even better with a generous dollop of
homemade whipped cream on top. If you don't have time to make the crust from scratch, a
store-bought pie crust works too.
Apple PieWe recommend Granny Smith, Braeburn, Golden Delicious or Jonagold apples for this winning apple pie recipe. To keep the bottom of the pie from getting soggy, preheat the oven with a baking sheet already inside, then bake the pie on the warm baking sheet.
Easy Coconut Cream PieThanks to a refrigerated pie crust, this delicious coconut cream pie takes only half an hour to whip up before it needs to chill. If you like the sound of this, try more of our favorite
coconut dessert recipes.
The Best Pecan PieLook up pecan pie in the dictionary and you'll find a photo of this beauty. The whiskey or bourbon is optional, but it adds a depth of flavor you won't want to miss.
Creamy Pina Colada PieIf you like pina coladas, then it's time to try the tropical classic in pie form. Serve it cold out of the freezer, or let it sit on the counter for a few minutes for a softer texture.
Peach PieWhen peaches are in season, you can find us making—and devouring—this summertime classic. Add a scoop of
homemade vanilla ice cream for an extra special touch.
Peanut Butter Cream PieQuick! You have last-minute guests coming over tomorrow, but nothing for dessert. Luckily, this lightning-fast recipe is ready in just 10 minutes, plus overnight chilling time.
French Silk PieFor extra credit, make your own pie dough from scratch, then pour in the creamy chocolate filling after parbaking. We love this quick and easy
classic butter pie crust recipe.
Possum PieIf you haven't heard of it, possum pie is an Arkansas favorite that combines chocolate, cream cheese and pecans. This version uses instant vanilla and chocolate pudding mix as a clever shortcut.
Easy Confetti PieIt doesn't get more fun—or foolproof—than this creamy and colorful pie. Kids and adults alike will love the sugar cone crust. To avoid lumps, be sure the gelatin is fully dissolved and the cream cheese is at room temperature before making the filling.
Favorite Banana Cream PieCream pies contain dairy and eggs, so make sure you refrigerate any leftovers. Cover with foil and enjoy the remaining slices within four days.
Strawberry Pretzel PieThis sweet and salty flavor combination is irresistible! Save this no-bake dessert for a hot summer day.
Cherry Cream Cheese PieIf you're a cheesecake fan but don't want to deal with water baths and fussy directions, try this much more straightforward cream cheese pie. You'll only need nine ingredients to pull it off.
Traditional Pumpkin PieIf your pumpkin pies tend to crack, try taking them out a few minutes earlier. The filling should still be slightly jiggly in the center when you remove it from the oven. Try more of our
favorite pumpkin recipes if you end up with leftover canned pumpkin.
Easy Fresh Strawberry PieBehold, our favorite way to use our summer farmers market haul. Each pie has four cups of fresh strawberries inside.
Coconut Pistachio PieWith just six ingredients, most of which you probably already have in your kitchen, you can whip up this creamy no-bake dessert. Discover more of our favorite
cream pie recipes if you prefer them over fruit pies.
Citrus Cranberry PieIf you're new to pies,
making a lattice pie crust might feel intimidating. But with a little patience and practice, your friends will think you're ready to open your own bakery.
Crumb-Topped Apple PieDon't skimp on the homemade crumb topping, which features a crunchy combo of flour, white sugar, brown sugar and butter. We recommend using Granny Smith apples in this pie because they're tart and firm, and they keep their shape. See our
comprehensive guide to apples for other options if you can't find Granny Smiths at the store.
Strawberry Rhubarb PieWhen springtime rolls around, we always make sure to grab a bunch of rhubarb from the farmers market. This pie, which also features three cups of fresh strawberries, is our favorite way to celebrate the flavors of the season.
Sugar Cream PieThis velvety pie requires only seven ingredients, thanks to store-bought pie dough. Switch up the texture by baking the filling in a
crumb crust instead.
Shoofly PieThis classic Pennsylvania Dutch dessert features molasses, brown sugar and egg yolks, with a brown sugar topping. While it's not the actual reason the pie has this name, it certainly has enough sugar in it that you'd have to shoo flies away from whatever picnic you bring it to.
Praline Pumpkin Pecan PieTraditional pumpkin pie is tasty, but when you really want to stand out, it's time to pull out all the stops. This sweet and crunchy version features a crumb crust made of sweet and spicy gingerbread cookies.
Macaroon Cherry PieYou can find tart cherries at the farmers market for a few weeks every summer. If you see them, stock up to make this irresistibly delicious pie. The coconut and almond topping gives it a wonderful crunch.
Sour Cream Rhubarb PieLook for thin, red rhubarb stalks, then slice them into small pieces to use in this winning pie. If you've frozen some of your rhubarb to last into the winter, you can use that stash in this recipe.
Key Lime Cream PieThis tangy and tart pie is said to have originated in Key West, Florida. With one bite, you'll be transported to the city's sunny shores. For bakery-quality results, pile the whipped topping high, sprinkle it with toasted coconut and dot it with thin lime slices.
Spiced Plum PieIn late summer and early fall, plums will be at their tastiest. Take advantage with this double-crust pie, which is filled with orange zest, spices and heaps of the seasonal fruit.
Contest-Winning Fresh Blueberry PieSeven basic pantry ingredients plus five cups of fresh blueberries yield a seriously easy summer pie in just 15 minutes. Thanks to a sheet of refrigerated pie crust, all you have to do is unroll the dough, bake it in the oven, heat up the blueberry filling on the stove and pour it into the pie crust.
Shaker Lemon PieYou'll want to use a sharp knife or mandoline slicer (these are our Test Kitchen's
favorite mandolines) to get your lemon slices extra thin and even. If you have a few that aren't perfect, don't worry! As long as most of the slices are uniform in shape, it won't affect the final product.
Fluffy Key Lime PieIt doesn't get much easier than this low-fat, four-ingredient key lime pie. Thanks to sugar-free lime gelatin and fat-free whipped topping, there's only 3 grams of fat per slice.
Honey PieWith some brown sugar, honey and a bit of vanilla and almond extract, you can create a restaurant-quality dessert in your own kitchen. Sprinkle flaky sea salt on top to make it extra fancy.
Dark Chocolate-Caramel Macchiato PieBelieve it or not, you can make a pie crust out of biscotti! This decadent dessert also contains coffee, so don't feel guilty if you want to eat a slice for breakfast.
Contest-Winning Raspberry Cream PieThis pie is tasty when made with fresh or frozen strawberries. If you decide to go the frozen route, use them right from the freezer to avoid discoloring the batter.
Blueberry Cream PieWhile we love a traditional blueberry pie, this cream pie adds an extra layer of silky decadence between the crust and the fruit filling. Vanilla wafer crumbs make a uniquely delicious crumb crust.
Buckeye PieThere's no better combination than peanut butter and jelly…well, except peanut butter and
chocolate. This pie combines our two favorite flavors in every delightful bite.
Mixed Berry PieIf you don't have fresh berries on hand, you can also
make this pie with frozen berries. They may even provide a better depth of flavor. You don't need to thaw them—just let the berries sit for a few minutes on the counter.
Amish Vanilla PieThis sweet and crunchy pie is based on a classic Amish recipe. You'll need dark corn syrup, cream of tartar and nutmeg to pull it off, plus a scoop of
vanilla ice cream to make it extra special.
Peanut Butter Pudding PieThis recipe calls for store-bought whipped topping, but you can also make your own
sweetened whipped cream from scratch. If you love this one, try more
pies that start with pudding mix.
Old-Time Buttermilk PieWhile buttermilk pie is a southern classic, its origins may trace back to the United Kingdom. The filling, made with buttermilk, vanilla extract and lemon juice, was often mixed up when there was no fruit on hand.
Spiced Upside-Down Apple PieWhile it might seem like common sense to wait until the pie cools down before inverting it onto a serving pan, don't wait too long. A cold pie will become difficult to remove from the pan.
Chocolate Cream PieCalling all chocolate lovers: It's time to bust out your finest baking cocoa. Serve with a dollop of whipped cream and a sprinkle of extra
baking cocoa for a professional finishing touch.
Cookie Butter PieCookie butter is sort of like peanut butter's sweet cousin. Instead of peanuts, it's made of mashed-up cookies. Served in a graham cracker crust and topped with whipped cream, this pie is heavenly.
Lemon Chess PieFor a light, tangy and refreshing dessert, we turn to this nine-ingredient chess pie, which features ingredients you probably already have in your kitchen. Get extra fancy and top it with
candied orange slices.
Huckleberry Cheese PieFresh huckleberries are an Idaho treat, but even if you don't live in the Gem State, you might be able to find them frozen at your local grocery store. If not, blueberries make a delicious swap in this recipe.
Rhubarb Cherry PieIf cherries and rhubarb aren't in season, frozen rhubarb and canned cherries work just as well for this tasty treat. Thanks to quick-cooking tapioca, this recipe requires only 10 minutes of prep time.
Pumpkin Cheesecake PieIt's like pumpkin pie and cheesecake had a delicious baby. Don't skimp on the sour cream topping—it adds an extra tang that really brings the dessert together.
Oatmeal PieWhile it might be tempting to leave the leftovers on the counter overnight, it's best to put this pie in the fridge after it's been sitting at room temperature for about two hours. Be sure to eat the remaining slices within four days.
Peach Blueberry PieWhen peaches are in season, whip out the recipe for this sweet summer dessert. Frozen blueberries work just as well as fresh. In fact, you don't even have to thaw them!
Tangy Lemon Chiffon PieUnflavored gelatin, egg yolks and whipping cream make the pie filling ultra velvety. Combine semisweet chocolate chips and shortening to make a smooth chocolate drizzle that's optional, but encouraged.
Butterscotch PieMeringue is one of those techniques that looks tricky, but it's actually pretty simple once you get the hang of it. Combine egg whites, cream of tartar and sugar, then beat on medium speed until stiff peaks form. Practice making it with these tasty
meringue dessert recipes.
If butterscotch is your favorite flavor
, you must also try the Dolly Parton butterscotch pie recipe.
World's Best Lemon PieTo prevent the meringue from "weeping" into the rest of the pie, be sure the filling is still warm when adding the meringue on top. Find more
tips on how to master meringue.