ⓘ
Cake bakers are an adventurous sort. Who else would dare to transform dessert into a unicorn, stack layer upon layer or bare it all with a naked cake? With bakes like that under their belts, we know cake bakers won’t shy away from a new challenge: a vertical cake roll.
This showstopping bake is similar to a cake roll or jelly roll, but instead of rolling the sponge into a log, you roll thinner sheets of cake into a shorter, squatter form. It might look like a daunting project, but we know that intrepid bakers are up to the challenge.
For more baking challenges, be sure to check out Bakeable, our baking community.
What to Know About Making Vertical Cakes
 Taste of Home
I consulted with Mark Neufang in the Taste of Home Test Kitchen about vertical cakes. Mark is an absolute whiz with desserts and created this recipe for a jaw-droppingly gorgeous vertical carrot cake.
While developing this carrot cake, Mark became an absolute pro at vertical cake rolls. I can attest to his skills and the decadence of this particular cake. However, you don’t need to limit yourself to this specific recipe (though Mark and I both encourage you to try it!).
For the sponge, Mark recommends a sponge cake. That means you should skip any recipes for flourless cakes, pound cakes or any other dense desserts. Mark says, “Sponge cakes are best as they are a bit more pliant and springy.”
If you have a hard time knowing where to start, opt for a cake roll recipe as a base. These cakes are designed to be rolled up and filled. As for the filling, buttercreams and cream cheese frostings are ideal. They’ll hold their shape and are easy to work with. For best results, steer clear of whipped cream frostings. These won’t hold up to the rolling.
Tools for Making a Vertical Cake
- Jelly roll pans: Cakes like these require thin layers. Jelly roll pans (that’s a 15x10x1-inch pan) will do the trick.
- Tea towels: To train the cake to roll into that perfect spiral, you’ll roll a warm sponge up in clean towels. Pick thin tea towels or flour sack towels for this task.
- Offset spatula: To get an even layer of frosting on this cake (or any cake), be sure to use an offset spatula. They come in all sorts of sizes. Keep a large one and a smaller option on hand.
- Cake turntable: While a turntable isn’t strictly necessary for making a vertical cake, it is an incredibly handy tool to have on hand for frosting cakes of all kinds. It also makes a great gift for cake bakers!
How to Assemble a Vertical Cake
Step 1: Bake and Roll the Cakes
To get the right thickness for a vertical cake roll, bake the cakes in a jelly roll pan (that’s a 15x10x1-inch pan). Make sure the pans are greased and lined with parchment paper.
When the cakes are fully baked, turn them out onto tea towels dusted with confectioners’ sugar. Then carefully peel away the parchment paper. “If the cake seems to stick,” Mark says, “use an offset spatula to gently coax the cake from the paper as you go.”
Once the parchment is gone, roll the cakes, starting with the short side, into the tea towel. It should look like a jelly roll but with a towel in lieu of filling. Be sure to do this when the cake is still warm, according to Mark. If the cakes are cool, they won’t roll as well and are liable to crack.
Leave the cakes to cool in the towels. If you plan on prepping the cake more than a few hours in advance, wrap the cakes in plastic or pop them in an air-tight container to prevent them from drying out.
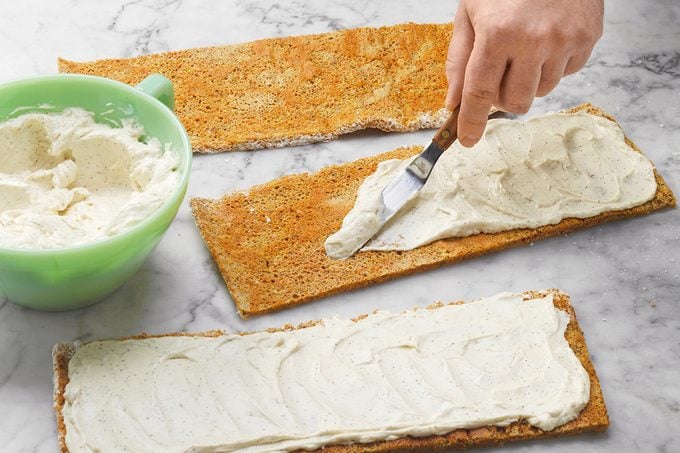
Step 2: Slice and Frost
 Taste of Home
When you’re ready to assemble, unroll the cakes carefully and slice them into 15×5-inch strips (that’s in half the long way).
Then break out that offset spatula and frost each section of the cake leaving a bit of unfrosted sponge around the edge. Each section will require about a cup of frosting. Mark explains that any more than that will make your cake a bit more slippery when you turn it upright later.
Pop the cakes into the fridge until the frosting firms up—15 minutes or so. This will prevent the frosting from oozing out of the cake as you roll.
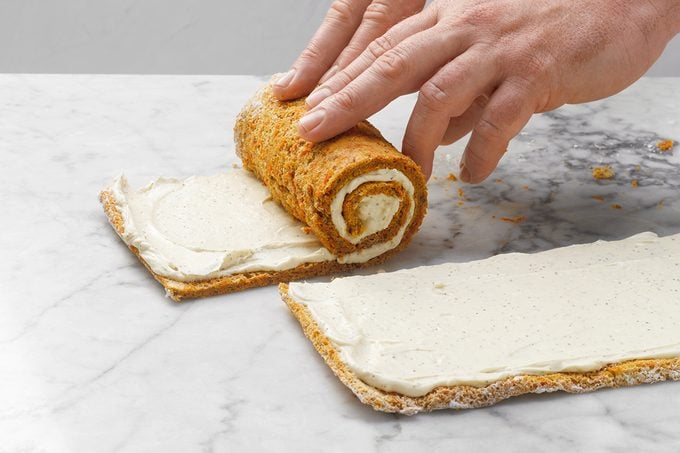
Step 3: Start Rolling
 Taste of Home
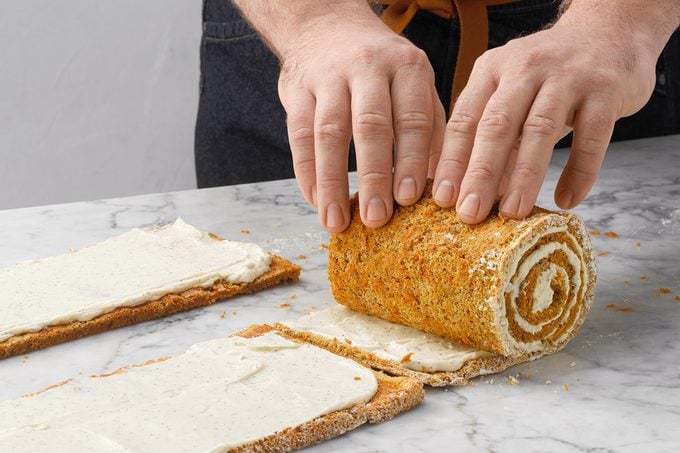
When the frosting has firmed up a bit, it’s time to get rolling. Start by rolling up one section of the cake from the short edge.
“Don’t worry if the cake starts to crack a little bit,” says Mark. “Unlike a traditional jelly roll cake, the sides will be covered up inside and by a layer of frosting.”
However, if the cake is cracking into pieces (versus small hairline cracks), Mark says you may have let the cake chill too long. If that’s the case, take a quick break and let the cake warm up a bit at room temperature.
Step 4: Piece the Cake Together
 Taste of Home
When that first section is almost completely spiraled, get ready to piece in the next portion of the cake. Carefully align the next section and pinch the seams together as best you can to keep the cake smooth.
Then keep the cake rolling and continue to work it into a spiral with each section.
There will be an uneven edge on the cake where the last section of the sponge ends, but Mark says don’t fret! This will all be covered up with frosting in the next step.
Step 5: Flip the Cake Upright and Frost
 Taste of Home
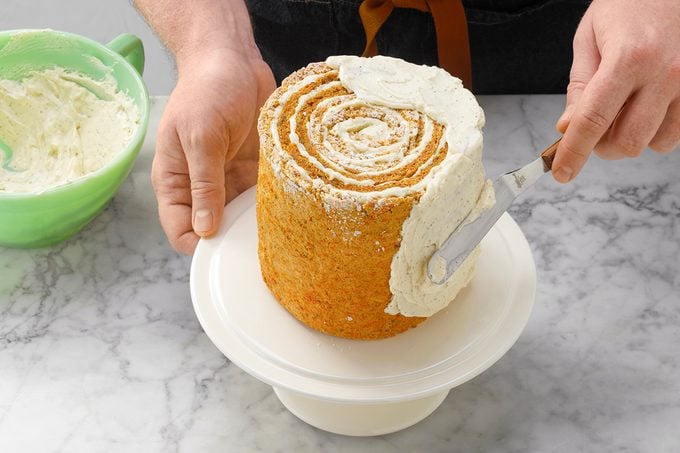
With your cake perfectly spiraled, it’s time to turn it on its end. Take a deep breath and have your cake stand or turntable at the ready. Carefully grip the cake and flip it on its spiraled end.
If the cake doesn’t look perfectly even, Mark says don’t worry. “Feel free to gently shape it into more of a cylinder,” he explains. Be sure to use both hands to keep the cake as symmetrical as possible.
Once the cake is sitting pretty on your cake plate, use a bit of buttercream to paste the edge of the cake into place. Then frost the exterior like you would for any other layer cake. An offset spatula and turntable will make getting a smooth finish effortless.
When you’re done frosting the sides and top, refrigerate the cake for at least two hours (overnight is even better!). When you’re ready to serve, let the cake stand for 15 minutes at room temperature and then slice. Each slice will reveal layers upon layers of cake and frosting. Get ready for all the oohs and aahs!
Bake More Gorgeous Cakes
Minted Chocolate TorteOur family has enjoyed this remarkable layered cake for years. It's a favorite for many occasions. —Barbara Humiston, Tampa, Florida
Ginger-Glazed Lemon BundtTangy ginger, tart lemon and puckery cranberries make this melt-in-your-mouth cake as crisp—and gorgeous—as autumn. —Taste of Home Test Kitchen
Unicorn CakeThis magical unicorn cake tastes as good as it looks. Baking in smaller pans creates impressive height, and a few simple decorating tricks turn it into a showstopping dessert. —Lauren Knoelke, Des Moines, Iowa
Malted Chocolate & Stout Layer CakeIf you want a dessert that will take the cake at a St. Patrick's Day celebration, look no further! The rich chocolate cake is incredibly moist and has a nice malt flavor that's perfectly complemented by the Irish cream frosting. —Jennifer Wayland, Morris Plains, New Jersey
Chocolate Hazelnut TorteMost cake recipes feed a crowd. So we came up with this elegant little cake that serves six. That's enough for two…with just the right amount of leftovers! —Taste of Home Test Kitchen
Mama's Spice CakeWhenever I get a craving for a tasty old-fashioned treat, I make this cake. Great cooks in my family have been baking it for generations, and their families have been enjoying the wonderful spice flavor and rich frosting.
—Nancy Duty, Jacksonville, Florida
Confetti Cake with Brown Sugar ButtercreamThis simple and tender cake has been celebrated in my family for years. Dressed up with tinted frosting and confetti, it becomes pure party fun. — Karen Berner, New Canaan, Connecticut
Rich Chocolate Peanut Butter CakeThe combination of mocha and peanut butter will satisfy every sweet tooth at your table. The garnish is a little extra work, but what are special occasions for? —Tammy Bollman, Minatare, Nebraska
Grandma's Strawberry ShortcakeI can still taste the juicy berries piled over warm biscuits and topped with a dollop of fresh whipped cream. My father added even more indulgence to the dessert by first buttering his biscuits. —Shirley Joan Helfenbein, Lapeer, Michigan
Ganache-Topped Chocolate CakeTo say this cake is elegant would be an understatement. It’s worthy of special occasions, but once you learn
how to make chocolate ganache, it's so easy to whip together that you can enjoy it any day of the week. —Taste of Home Test Kitchen
Pina Colada Tube CakeWe named this a “pina colada” cake because it has coconut, pineapple and rum. It’s a soothing finish at the end of a big spread. —Debra Keil, Owasso, Oklahoma
Citrus Cornmeal CakeCornmeal adds a rustic quality to this delicate dessert flavored with citrus and almond. It makes a great holiday party hostess gift and is sure to be a staple in your recipe collection. —Roxanne Chan, Albany, California
Lemon Ricotta CakeThis lemon ricotta cake recipe is a family gem that was passed down from my grandmother and mother. Garnished with shaved lemon zest, the moist four-layer cake is the perfect dessert when you want to impress. —Nanette Slaughter, Sammamish, Washington
Rainbow Cake with CloudsSome cakes stand on their own without icing. For this bright Rainbow Cake, use a little whipped cream to make fluffy clouds. —Janet Tigchelaar, Jerseyville, Ontario
Chocolate Swirl DelightI made a few updates to a great recipe and ended up with an impressive dessert. Everyone loves its light texture and chocolaty flavor. —Lynne Bargar, Saegertown, Pennyslvania
Brown Sugar Pound CakeThis tender pound cake is the first one I mastered. You'll want to eat the browned butter icing by the spoonful. It tastes like pralines. —Shawn Barto, Winter Garden, Florida
Cranberry Layer CakeI adapted a Bundt cake recipe to create this layer cake. Cranberries, walnuts and homemade frosting make it taste so delicious that you'd never guess it starts with a convenient cake mix. —Sandy Burkett, Galena, Ohio
Chocolate Carrot CakeFinely shredding the carrots gives this cake an extra-nice texture. The walnuts sprinkled on top add crunch, but you can leave them off if you prefer. —Pamela Brown, Williamsburg, Michigan
Lemon Chiffon CakeThis moist, airy lemon chiffon cake was my dad's favorite. Mom revamped the original recipe to include lemons. I'm not much of a baker, but whenever I make this dessert my family is thrilled! —Trisha Kammers, Clarkston, Washington
Double-Chocolate Toffee Icebox CakeMy mother-in-law taught me that anything tastes good if you use enough chocolate or cream. This no-bake dessert proves she was right. Sometimes I use chocolate graham crackers and stack up the layers in a 9-inch square pan. —Bee Engelhart, Bloomfield Township, Michigan
German Black Forest CakeAs far as I know, this cake recipe can be traced back to my German great-grandma. When I got married, my mother gave me a copy and I hope to someday pass it down to my children. —Stephanie Travis, Fallon, Nevada
Berry Pinwheel CakePerfect for special meals, this lovely chiffon cake is a nice change from strawberry pie or shortcake. Don't be afraid t try this jelly-roll-style dessert...it's easy to make. Plus, the waxed paper-lined pan helps make cleanup a breeze! —Becky Ruff, McGregor, Iowa
Banana Split Icebox CakeA friend showed me how to make a traditional icebox cake with just cream and graham crackers. I make it special by adding fruit. —Shelly Flye, Albion, Maine
Strawberry Mascarpone CakeDon't let the number of steps in this recipe fool you —it's easy to assemble. The cake bakes up high and fluffy, and the berries add a fresh fruity flavor. Cream cheese is a good substitute if you don't have mascarpone cheese handy. —Carol Witczak, Tinley Park, Illinois
Decadent Chocolate Crepe CakeNo other dessert has wowed family and friends the way this stunning crepe cake did the first time I made it. A showstopper in every sense of the word, it features layers of tender chocolate crepes and rich white chocolate buttercream frosting draped in a semisweet chocolate ganache. —Tina Sawchuk, Ardmore, Alberta
Banana Skillet Upside-Down CakeMy grandmother gave me my first cast iron skillet, and I've been cooking and baking with it ever since. Sometimes I add drained maraschino cherries to this banana skillet dessert and serve it with a ice cream. —Terri Merritts, Nashville, Tennessee
Toffee Angel Food CakeChopped toffee bits and whipped cream make the sweet flavor and light, moist texture of angel food even more indulgent. For best results, refrigerate the cake for at least an hour before serving. —Collette Gaugler, Fogelsville, Pennsylvania
Raspberry Fudge TorteThis special-occasion cake impresses all who see and taste it. People are surprised to hear that this torte starts with a simple cake mix—they're sure I bought it at a bakery. —Julie Hein, York, Pennsylvania
Marvelous Marble CakePound cake and chocolate make the best marble cake. — Ellen Riley, Birmingham, Alabama
Cherry Cola CakeCherry cola and marshmallows make a zippy chocolate dessert that is scrumptious topped with vanilla ice cream. — Cheri Mason, Harmony, North Carolina
Cinnamon Twirl Roly-PolyMy whole house smells incredible when this cake is in the oven. Change it up with other extracts—maple is heavenly. —Holly Balzer-Harz, Malone, New York
Red Velvet Marble CakeI watched my grandma prepare her red velvet showstopper many times for family get-togethers. The fluffy butter frosting perfectly complements the flavor of this gorgeous cake.—Jodi Anderson, Overbrook, Kansas
Sacher TorteGuests will be surprised to hear that this Sacher torte recipe starts with a convenient cake mix. Each bite features chocolate, almonds and apricots. —Taste of Home Test Kitchen
Maple Walnut CakeThis maple-flavored cake with candied walnuts honors beloved my grandpa, who made maple syrup when I was a child. It honors his memory and has proven to be a favorite with family and friends throughout the years. —Lori Fee, Middlesex, New York
Blackberry-Orange CakeMy grandmother made luscious fruit pies and cobblers using blackberries from her garden. I decided to follow her lead and create a blackberry cake that's always lovely with a summer meal. —Lisa M. Varner, El Paso, Texas
Coconut-Layered Pound CakeIf you love chocolate, almonds and coconut, this cake is for you. It comes together in a flash and tastes just like an Almond Joy candy bar! —Linda L. Nichols, Steubenville, Ohio
Majestic Pecan CakeThis recipe truly lives up to its name. The pecan-dotted cake is stacked in three layers, and made-from-scratch frosting is the crowning touch.—Karen R. Jones, Claypool, Indiana
Mamaw Emily's Strawberry CakeMy husband loved his mamaw's strawberry cake recipe. He thought no one could duplicate it. I made it, and it’s just as scrumptious as he remembers. —Jennifer Bruce, Manitou, Kentucky
Carrot Cake with Pecan FrostingMy husband constantly requests this homey, old-fashioned version of carrot cake. The frosting is still tasty even without the pecans. —Adrian Badon, Denham Springs, Louisiana
Decadent Fudge CakeEveryone loves the rich flavor in this decadent cake made with four types of chocolate. —Anna Hogge, Yorktown, Virginia
Moist Lemon Angel Cake RollTart and delicious, this pretty cake roll will tickle any lemon lover's fancy. Its feathery, angel food texture enhances its guilt-free goodness. —Taste of Home Test Kitchen
Best Red Velvet CakeIt's just not Christmas at our house until this festive cake appears. This is different from other red velvet cake recipes I’ve had; the icing is as light as snow. —Kathryn Davison, Charlotte, North Carolina
Skillet Pineapple Upside-Down CakeFor a change of pace, you can substitute fresh or frozen peach slices for the pineapple in this old-fashioned recipe. —Bernardine Melton, Paola, Kansas
Aunt Murna's Jam CakeI remember Aunt Murna telling me that she created her jam cake recipe as a young girl. She made improvements over the years, such as soaking the raisins in crushed pineapple. This cake is a favorite at our annual family reunions. —Mrs. Eddie Robinson, Lawrenceburg, Kentucky
Lemon-Blueberry Pound CakePair a slice of this moist lemon-blueberry cake with a scoop of vanilla ice cream. It's a staple at our family barbecues. —Rebecca Little, Park Ridge, Illinois
Peeps Sunflower CakeThe inspiration for this cake came from one of my favorite flowers, the sunflower. The yellow peeps make eye-catching flower petals, and I carefully placed chocolate chips in a circular pattern to resemble the seeds in the middle of a sunflower. This cake is easy, but looks quite impressive. —Bethany Eledge, Cleveland, Tennessee
Raspberry Custard KuchenBack where I grew up in Wisconsin, people have been baking this German treat for generations. We love it for breakfast or as a special dessert. It's no fuss to fix and impressive to serve. —Virginia Arndt, Sequim, Washington
Lemon Meringue Angel CakeI've been told that this dessert tastes exactly like a lemon meringue pie and that it's the best angel food cake anyone could ask for. I'm not sure about all of that, but it is delightful to serve, and each slice is virtually fat free. —Sharon Kurtz, Emmaus, Pennsylvania
Lemon Pound CakeCitrus trees grow abundantly in California, and I'm always looking for new recipes which use the fruit from the orange and lemon trees in my yard. This lemon pound cake is one of my favorites! My mother passed this recipe down to me. —Richard Killeaney, Spring Valley, California
Pumpkin TorteThis beautiful layered cake has a creamy filling with a mild pumpkin flavor and a little spice. It is quick and always turns out so well. The nuts and caramel topping add a nice finishing touch. —Trixie Fisher, Piqua, Ohio
Makeover Peach Upside-Down CakeThis peachy delight has charmed folks for years. Our lightened version is even better with less fat and calories than other similar recipes.—Taste of Home Test Kitchen, Milwaukee, Wisconsin
Lemon-Berry ShortcakeThis simple lemon shortcake is tender and not overly sweet. Enjoy this summertime classic with a generous layer of whipped topping and berries. —Meryl Herr, Overland Park, Kansas
Ice Cream CakeThis eye-catching dessert is actually easy to prepare and keeps well in the freezer for days. It's nice to be able to serve cake and ice cream in one slice.—Anne Scholovich, Waukesha, Wisconsin
Glazed Lemon Chiffon CakeDrizzled with sweet-tart lemon glaze, this fluffy cake is a real treat. —Rebecca Baird, Salt Lake City, Utah
Orange Dream Angel Food CakeA basic angel food cake becomes a heavenly indulgence, thanks to a hint of orange flavor swirled into every bite. The orange color makes slices of the cake look so pretty when arranged on individual dessert plates.—Lauren Osborne, Holtwood, Pennsylvania
Mocha Yule LogThis eye-catching dessert is guaranteed to delight holiday dinner guests. Chocolate lovers will lick their lips over the yummy cocoa cake, mocha filling and frosting. For a festive touch, I garnish the log with marzipan holly leaves and berries. —Jenny Hughson, Mitchell, Nebraska
Chocolate Bavarian TorteWhenever I take this eye-catching torte to a potluck, I get so many requests for the recipe. —Edith Holmstrom, Madison, Wisconsin