


How to Frost a Cake the Easy and Elegant Way
Updated: May 27, 2024
Learn how to frost a cake that your friends and family will ooh and ahh over—no special tools required.
When it comes to desserts, is there anything more impressive and tempting than a beautifully frosted cake? While the cake recipe is absolutely key to these gorgeous desserts, it’s no secret that the frosting is what makes them so beautiful. But how do you frost a cake so perfectly?
What Is the Best Way to Frost a Cake?
When it comes to frosting a cake, especially for beginners, it’s best to go with a simple yet pretty finish. You won’t need a lot of fancy tools to frost a cake, so save those pastry bags and piping tips for another day (or for these cupcakes). Instead, gather up a few kitchen basics.
To Frost a Cake, You’ll Need:
- Your favorite layer cake recipe
- The frosting of your choice
- Long, serrated knife
- Offset spatula
- Waxed paper
- Serving plate or cake stand
Step 1: Level Your Cake
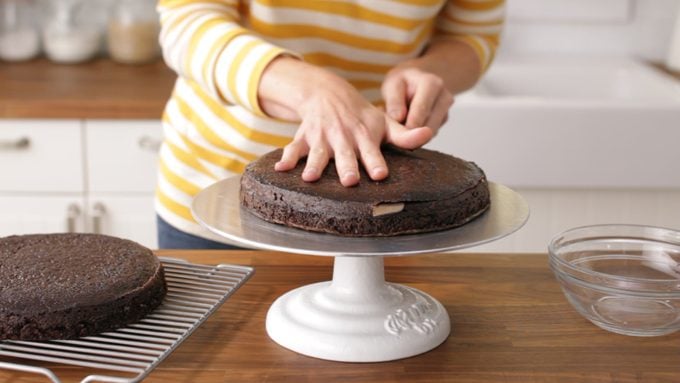
For an extra stable and flat cake, it’s a good idea to level your cake before frosting. This allows your cakes to stack more easily, though if you like the domed appearance of a homemade cake, you don’t need to level off that top layer.
To level the cake, allow the layers to cool completely. A warm cake will crumble easily—plus, frosting warm cakes is bad news (you’ll end up with runny frosting). If you want, you can even refrigerate the cake before frosting and leveling. This will help the cake become a bit firmer and it’ll be easier to work with.
Now, to get even, level layers, place the cake on a flat surface. Then, using a long, serrated knife, cut off the dome of the cake. You can save the cake scraps to make a mini trifle or just eat them as a snack (that’s my preference).
Step 2: Stack the Cakes
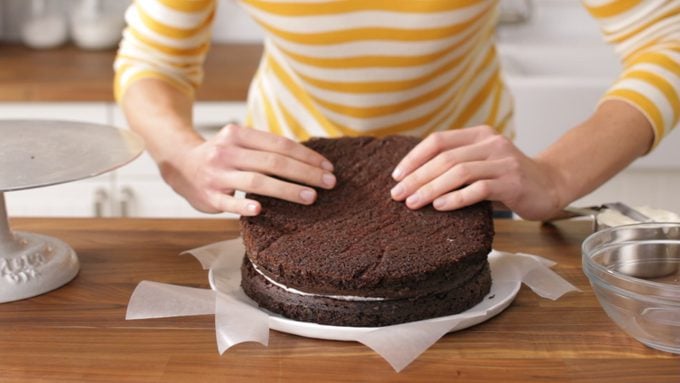
Next, you’ll stack up your cakes. Prep your serving dish or cake stand by lining it with strips of waxed paper. This will help give you a clean finish at the end.
Then, put your first layer in place. If you’d like, spread a small dollop of frosting onto your cake plate before laying down your first layer—it’ll help keep your cake from moving. Then, spread your filling on top with a spatula and top with your next layer. Continue with a third and fourth layer if you’ve got ’em.
Step 3: Give the Cake a Crumb Coat
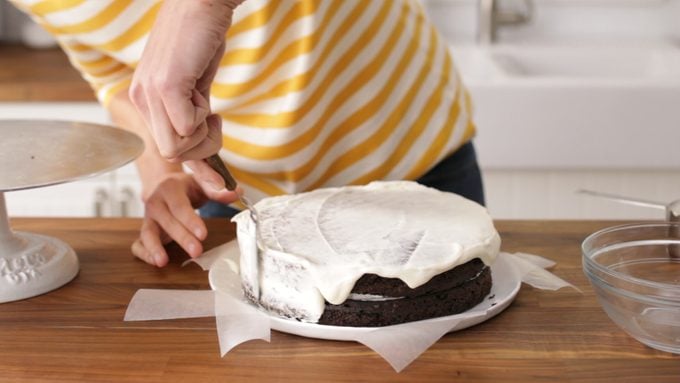
After your layers are stacked and looking nice and even, it’s time to give your cake a quick crumb coat. A crumb coat is simply a very thin layer of frosting that you spread over the whole cake. This helps trap and contain crumbs and serves as a nice base for your showstopping finish.
To crumb coat a cake, just spread a very thin layer of icing over the cake using an offset spatula—here’s our favorite plus a few more essential cooking tools. Try to make this coat as thin and even as possible. Once it’s finished, give your cake a quick chill in the refrigerator to help this base layer set. You can chill the cake overnight, but even a quick, ten-minute stay in the fridge will do wonders.
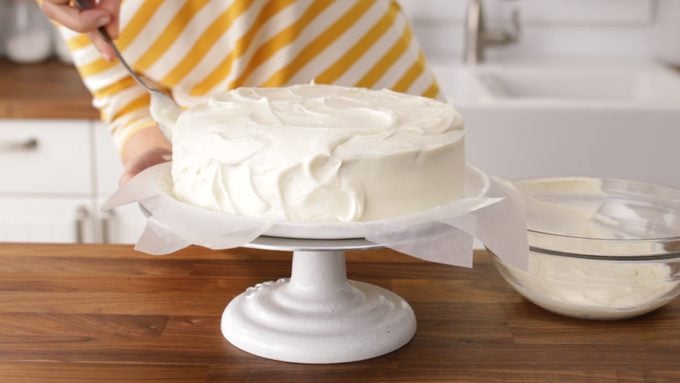
Step 4: Smooth It All Out

After your crumb coat is set, you can start giving your cake the finishing touch. Start by using an offset spatula to frost the top of the cake, starting from the center. For exceptionally smooth frosting, dip the spatula into hot water, then dry it. The warm spatula will really help smooth the frosting out by melting any butter or shortening in your recipe.
You can then move onto the sides of the cake, using the same hot water method. To get a nice smooth finish, be sure to keep cleaning off the spatula as you go—a bench scraper also works well for the sides, too. With a little bit of effort, you’ll have a perfectly smooth, flat finish in no time. If you’re satisfied with the look of the cake, you can stop right here. Just remove those strips of waxed paper carefully and serve.
Step 5: Finish It Off with Some Swirls
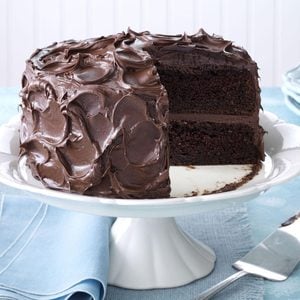
If you want to finish off your cake with a little bit of flair, you can go one step further and add swirls to your cake. Using a teaspoon—you can use the same hot water method as above—spread on swirls of frosting. Use the backside of the spoon. It’s what gives this chocolate cake such a pretty finish. When you’re all done, just remove the waxed paper to reveal a nice finish and a clean cake plate.
“Can I Frost a Cake the Day Before?” and Other FAQs
When it comes to baking and decorating cakes, there are a few questions that come up over and over again—I’ve certainly done my fair share of Googling during a bake. Here are some answers to the most frequently asked cake questions.
Q: Can I frost a cake the day before?
A: You sure can! An unsliced, frosted cake will be just as delicious the next day. The only exception would be a cake frosted with any fresh whipped cream frosting. That’s better fresh.
Q: Do you have to refrigerate cake?
A: It depends. Most frosted cakes are perfectly fine at room temperature for a day or two. If your cake contains fresh fruit or the frosting has whipped cream, cream cheese or mascarpone, you should keep it in the fridge.
Q: Should I refrigerate cake before frosting?
A: You don’t have to. Chilling cake in the fridge before frosting can make it easier to manipulate and level, but it’s not necessary. Just be sure your cake is cooled to room temperature before leveling or frosting.
Q: How do I transport a cake?
A: Your best bet for getting your cake from point A to point B in one piece is to invest in a cake carrier. You can get a good, basic one for just about $16 or opt for a vintage-style one for a bit more. Be sure to place this on a flat surface in your car, either in the trunk or on the floor. If you don’t have a carrier, try to find a box that fits your cake plate as snugly as possible and cover.
Bring a little extra frosting and decorations in case of any mishaps. You can easily fix any smudges when you get to your destination.


Note: Every product is independently selected by our editors. If you buy something through our links, we may earn an affiliate commission.