Just like learning how to write the alphabet as a kid, writing on a cake is a skill that takes some practice. But once you master the moves and method, you’ll be able to create bakery-style designs on your own homemade creations. Here’s how to write on a cake so you can create stunning desserts for special occasions.
To get started on the right foot, brush up on how to frost a cake the easy and elegant way.
The Method We Recommend
For best results, we recommend using a piping bag and tip to write on your cake. You can use any round tip to write your letters, though smaller tips may make it difficult to smoothly squeeze the icing out while larger tips can lead to a messier script. Test a few to find out what works for you—you may land somewhre in the middle.
Fill your piping bag about halfway with icing. If it’s too full, it could be difficult to hold, or it may squeeze out the top. The proper way to hold the bag is by grabbing the top of the bag with your dominant hand and guiding the bag with your non-dominant hand. Hold the bag at a 45-degree angle, but don’t drag the tip in the icing. Check out a few more tips for using a piping bag.
If you don’t have easy access to a piping bag, you can use a zip-top bag instead. Cut a very small hole in the corner to start—you can always cut more if it’s too small.
The Best Icing to Use
Gels, buttercream, melted chocolate and royal icing are all great options for writing on cake. They each feel differently when you write with them, so be sure to practice if you’re trying a new one.
If your cake has buttercream frosting, refrigerating it will help it firm up—creating a better canvas and allowing you to easily scrape off letters if you make a mistake. Keep in mind, however, that you shouldn’t use royal icing on buttercream frosting because the fat in the buttercream will break down the royal icing. Before you think all frostings are the same, check out these different types of frosting.
Melted chocolate makes a great option for beginners because it’s readily available, and if you make a mistake while practicing, you can easily scrape it off and re-melt it to try again. Here’s how to properly melt chocolate.
You can even try piping melted chocolate on parchment paper, refrigerating it until hard and gently lifting the letters off the paper and onto your cake. This works especially well for cursive words that are all one piece.
Need to frost a cake? Discover different types of buttercream frosting to find the best fit for your cake.
Before You Get Started
When it comes to writing on a cake, practice really does make perfect. If you’re a beginner, try holding a thick marker in your fist like a kid would. Write your message while holding the marker like this, as these movements will give you a feel for how to write with a piping bag.
To prevent wasting the frosting, try practicing your lettering by filling a piping bag with mayonnaise or mustard. Cut out a piece of parchment paper that’s the size of your cake to use as a practice canvas.
For beginners, we recommend cursive writing because it’s easier to control the flow. When you come to the end of a word, gently press the tip into the piped icing and lift straight up for a clean edge.
How to Write on a Cake
Here’s the best method for writing on your cake. We recommend writing your message before adding any decorative elements. It’s much easier to add flourishes and flowers around the lettering rather than trying to squeeze your words onto an already crowded cake!
You’ll need:
- Piping bag and tip
- Icing
- Parchment paper
- Marker
- Toothpick
- Frosted cake
Step 1: Prep the piping bag
Fit your piping bag with a tip, and fill it about halfway with icing.
Editor’s tip: If you don’t have a piping bag, use a zip-top bag and cut a small hole in the corner.
Step 2: Prepare your parchment paper
Cut a piece of parchment paper the same size as your cake. Using a marker, write your message on the parchment. To ensure your message is centered, find the middle letter of each line of text (remembering to accommodate any spaces) and mark that as the center. For example, the middle of “happy birthday” is the space between “b” and “i,” which would be the center line. Fill in the remaining letters.
Editor’s tip: Try printing out your message in a font you like, then placing the paper underneath the parchment so you can easily trace!
Step 3: Transfer the message
Gently place the parchment on your cake. Using a toothpick, prick the message onto the frosting. Once you remove the parchment, you can connect the dots with your toothpick.
Step 4: Practice your piping
Before piping on your cake, try a practice round on the parchment. This will help you get a feel for the flow of the icing.
Step 5: Write on the cake
Once you feel comfortable, trace the guide you’ve created in the frosting. When you come to the end of a line, gently touch the tip to the cake and lift straight up for a clean break.
Editor’s tip: Don’t worry if you make a mistake! You can easily scrape off the letters and smooth the frosting with a spatula, or add squiggles and flourishes to cover up any errors.
Step 6: Add decorations
When you’ve finished writing, it’s time to fill in the decorations. Learn how to decorate a cake like a pro!
Alternatives to Writing on a Cake
If you’re looking for an easier way to express your message, try candy letters. You can also spell out letters with small candies, like chocolate chips or M&M’s.
Another easy option is making a stencil out of wax paper. Write your message in block letters and carefully cut out the letters with a knife. Place the wax paper stencil over your cake, and fill in the letters with powdered sugar or sprinkles. Remove the stencil to reveal your message. If you’re looking for more recipes, then learn how to make chantilly cake.
Looking for more cake decorating ideas? Check out easy ways to dress up your cake.
Our Best Birthday Cake Recipes
Sandy’s Chocolate CakeYears ago, I drove more than four hours to a cake contest, holding my entry on my lap the whole way. But it paid off. One bite and you'll see why this velvety beauty was named the best chocolate cake recipe and won first prize. —Sandra Johnson, Tioga, Pennsylvania
Vanilla Cake with Vanilla Buttercream FrostingIndulge in this layer cake topped with rich buttercream—a vanilla lover's dream. I use pure vanilla extract for the best flavor. —Michelle Dorsey, Wilmington, Delaware
Rainbow Birthday CakeHow fun is this rainbow birthday cake? It will add a festive touch to any celebration. Be sure to use gel food coloring for the most vibrant look. —Taste of Home Test Kitchen, Milwaukee, Wisconsin
Homemade Confetti CakeBirthdays aren't complete without a few
confetti-covered treats. This one has rainbow sprinkles inside
and out. It's almost impossible not to feel happy when you see the fun pop of rainbow confetti! —Courtney Rich, Highland, Utah
Berry Chantilly Cake
If I was asked to name my favorite show-stopping cake, Chantilly cake would rank high on the list. It features fresh summer berries and an airy vanilla cake. It's one of my favorite birthday cake ideas to share with my friends. —Sarah Tramonte,
Taste of Home Associate Culinary Producer
Go to Recipe
Speaking of show-stopping, you might like to take a look at these
50th birthday recipe ideas for a special celebration.
 TMB Studio
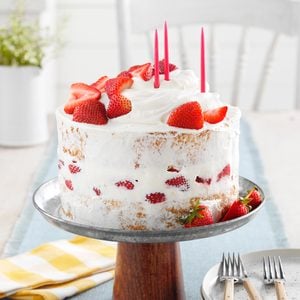
If you're looking for new birthday cake ideas, try this berries and cream naked cake. The cake is so fluffy and the strawberries add a fresh fruity flavor.
Cream cheese is a good substitute if you don't have mascarpone cheese handy. —Carol Witczak, Tinley Park, Illinois
Go to Recipe
 Sydney Watson/Taste of Home
Want birthday cake ideas that aren't
quite cake? Try this pull-apart cupcake cake! It makes portioning out individual servings easy and you can get creative with the decorations. —
Taste of Home Test Kitchen
Go to Recipe
Favorite Coconut CakeWhen I need an impressive dessert for a special occasion, this is the recipe I turn to. My guests are glad I do! —Edna Hoffman, Hebron, Indiana.
Pineapple Pudding CakeMy mother used to love making this easy pineapple sunshine cake in the summertime. It's so cool and refreshing that it never lasts very long! —Kathleen Worden, North Andover, Massachusetts
Chocolate-Dipped Ice Cream Cone CupcakesI created this recipe based on our family's love of chocolate-dipped ice cream cones. I like to vary the sprinkles on these birthday cupcakes to match the season. —Jennifer Gilbert, Brighton, Michigan
Peanut Butter 'N' Jelly CakeIf you're looking for some creative birthday cake ideas, look no further! I made this fun and flavorful peanut butter and jelly cake for my son's first birthday. He just turned 33, and he still has to have his favorite treat. —Linda Graybill, Sebring, Florida
Cream Cheese Sheet CakeThis tender, buttery cream cheese cake with a thin layer of fudge frosting is perfect for get-togethers and parties. It's not uncommon to see folks going back for second and even third pieces. —Gaye Mann, Rocky Mount, North Carolina
Moist Chocolate CakeThis moist chocolate cake recipe with coffee reminds me of my grandmother because it was one of her specialties. I bake it often for family parties, and it always brings back fond memories. The cake is light and airy with a delicious chocolate taste. This recipe is a keeper! —Patricia Kreitz, Richland, Pennsylvania
Margarita Tres Leches CakeThe first time I ever had tres leches cake I felt as if I were in heaven. I have made it at home using several techniques and flavors, and this margarita twist on the classic is my favorite. —Laurie Lufkin, Essex, Massachusetts
Vertical Carrot CakeThis vertical spin on a cherished classic is packed with spices and sure to impress. The brown butter cream cheese frosting truly
makes the vertical cake over the top! —Mark Neufang, Milwaukee, Wisconsin
Oreo Mousse CakeOreo mousse cake is so simple to put together, but it tastes as decadent as fancy restaurant desserts. Have fun garnishing it as you like using crushed or whole Oreos, additional whipped cream rosettes or chocolate shavings. —
Taste of Home Test Kitchen
Best Red Velvet CakeIt's just not just for Christmas, but birthdays too. This is different from other red velvet cake recipes I’ve had; the icing is as light as snow. —Kathryn Davison, Charlotte, North Carolina
Sour Cream Sugar Cookie CakeThis sugar cookie cake is inspired by the classic cookie! The secret to a dense yet cakelike texture is to make sure you don't overbake the cake. —Carmell Childs, Orangeville, Utah
Lemon Lover’s Birthday Pound CakeEveryone raves about this pretty dessert—and it sure doesn't last long with my family. It also freezes beautifully, so why not make two and pop one into the freezer for another day? —Annettia Mounger, Kansas City, Missouri
Layered Yellow Cake with Chocolate ButtercreamThis yellow cake will become your go-to recipe for birthdays, but the tender cake with flavorful chocolate buttercream is truly perfect for any occasion. —
Taste of Home Test Kitchen
Cookie CakeThis oversized cookie cake recipe is so easy and quick that I just might make it instead of traditional cookies from now on. I don't miss portioning out dough or shuffling pans in and out of the oven. Store leftovers in an airtight container for up to a week. —Lisa Kaminski,
Taste of Home Editor
Cherry Chocolate CakeI've had the recipe for this chocolate cherry cake for years—it's a chocolate lover's delight! It's so easy to make, and is perfect for cupcakes and bake sale treats, too. I get many requests for the recipe. —Ann Purchase, Panama City, Florida
Million Dollar CakePineapple and mandarin oranges give this easy cake a refreshing, tropical twist. With cake mix and pudding mix as ingredients, it is a breeze to put together when you're short on prep time. Plus, it needs to chill before serving, so it's a perfect make-ahead dessert for potlucks and parties! —Rashanda Cobbins, Milwaukee, Wisconsin
Classic Pineapple Upside-Down CakeThis pineapple upside-down cake is a classic recipe that never goes out of style! It’s delicious with the traditional pineapple, but try it with peaches or a combination of cranberries and orange. —Bernardine Melton, Paola, Kansas
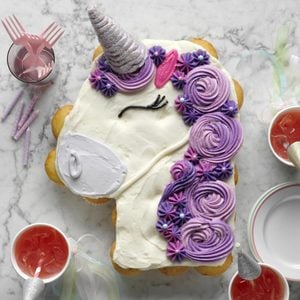
Layered Princess CakeThis magical princess cake will make any party feel special. Whether you're having a birthday party,
princess party or baby shower, it's sure to be a crowd pleaser. —
Taste of Home Test Kitchen
Hummingbird CakeThis impressive hummingbird cake is my dad’s favorite, so I always make it for his birthday. It makes a memorable dessert for any celebration and is lovely with a summer meal. —Nancy Zimmerman, Cape May Court House, New Jersey
 TMB Studio
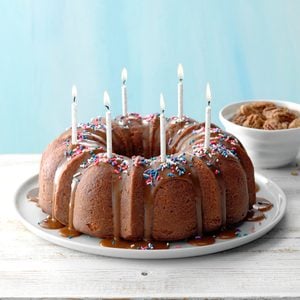
Not all birthday cake ideas need to be layered. A well-made
Bundt cake like this one will steal the show! I love how the frosting are filled with the fabulous flavor of caramel. The candied pecans are almost a dessert by themselves!—Jennifer Rodriguez, Midland, Texas
Go to Recipe
Strawberry Jam CakeEvery year I make this special strawberry jam cake for the Relay for Life cake raffle. It has raised lots of money for a good cause. —Tammy Urbina, Warner Robins, Georgia
Three-Layer Chocolate Ganache CakeThis decadent triple-layer beauty is pure chocolate indulgence. The cake layers can be frozen prior to final assembly; in fact, they're easier to work with when frozen. —Kathleen Smith, Overland, Missouri
Lemon Sheet CakeLemon pie filling lends a splash of citrus flavor to a convenient cake mix, and a rich cream cheese frosting gives it sweetness. My family likes this lemon sheet cake cold, so I cut it into squares and freeze it before serving. —Alyce Dubisar, North Bend, Oregon
Apple Spice Cake with Brown Sugar FrostingI am a healthy eater most of the time, but this apple spice cake is worth the splurge! You can add a cup of raisins to the batter before baking if you'd like. —Jennifer Owen, Louisville, Kentucky
Banana Pudding CakeI love to make cakes, and my family loves banana pudding. One day while brainstorming in the kitchen, I came up with this banana pudding cake recipe to combine the two. My family and friends can't get enough of it! If you are pressed for time, you may substitute whipped topping for the homemade sweetened whipped cream. —Tiffany Barbee, Rocky Mount, North Carolina
Butter Pecan CakeMy husband has a sweet tooth and I enjoy making great desserts like this cake for him! We have two farms - both of which are wonderful - but I also love being in the kitchen. I collect cookbooks and have written one myself.


