ⓘ
Cutout cookies are a must for the Christmas season, especially with so many tasty recipe options out there. The real fun of these cookies, of course, is the opportunity to be creative with decorations. There are lots of methods out there including marbling with royal icing, but this novel technique is one of our Test Kitchen’s new favorites: stamping.
How to Use Stamps to Decorate Cookies
 Taste of Home
That’s right! You can use this crafting tool to create detailed and festive designs on cookies. This method is super easy—just two steps—and is fun for kids and adults alike.
To stamp designs onto your cookies, you’ll need just a few extra supplies. First and foremost, you’ll want to buy a few new stamps (don’t use stamps that you’ve previously used with traditional ink). We used wintry stamps here for the holiday season, but you can use this technique for any occasion with any rubber or foam stamp. You’ll also want to purchase gel food coloring and food-safe ink-free stamp pads—you could also use an unused kitchen sponge.
Step 1: Creating a Base with Royal Icing
 Taste of Home
The first step to creating stamped cookies is to lay a foundation for your stamped design. Royal icing is the perfect base layer for this, and is easy to make at home—just check out our step-by-step guide.
Once you’ve stirred up a batch of icing, simply frost each cookie. You can do this with the piping and flooding method. Use a pastry bag and pipe an outline on your cookie, then fill with a slightly thinner icing. You can also dip your cookies into a thin royal icing as well—you can learn how to do that right here.
Whatever technique you prefer, be sure to let the icing dry completely before moving onto the next step. A few hours is OK, but overnight is better. If you’re decorating with children, it’s a good idea to frost the cookies the day before, that way you can just focus on the exciting part.
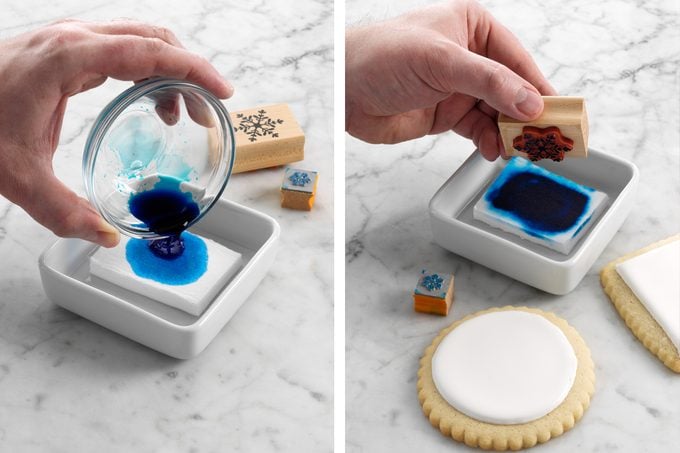
Step 2: Stamping Designs
 Taste of Home
To create your own ink for stamping, mix together a few drops of gel food dye with a few drops of water. Go easy with the water—you don’t want to dilute the color, you just want it to be a suitable consistency for inking a stamp. Then add this mix to the clean stamp pad or sponge.
From there, ink up your stamp. If you’d like, give it a test run on a paper towel (or spare cookie). When you’re ready, move onto your cookies coated in dry royal icing. Press firmly and rock the stamp back and forth just a bit so it makes contact with the frosting.
 Taste of Home
When you lift up the stamp, you should have a crisp stamped design. You can add more stamps or different colors—just repeat until you have the effect you want. Let the food ink dry between colors so nothing runs.
The finished cookies are charming and wonderfully detailed—all without using dozens of piping bags and kinds of sprinkles. These are the cookies that will be in high demand at the cookie exchange!
Try Stamping with Our Favorite Cutout Recipes
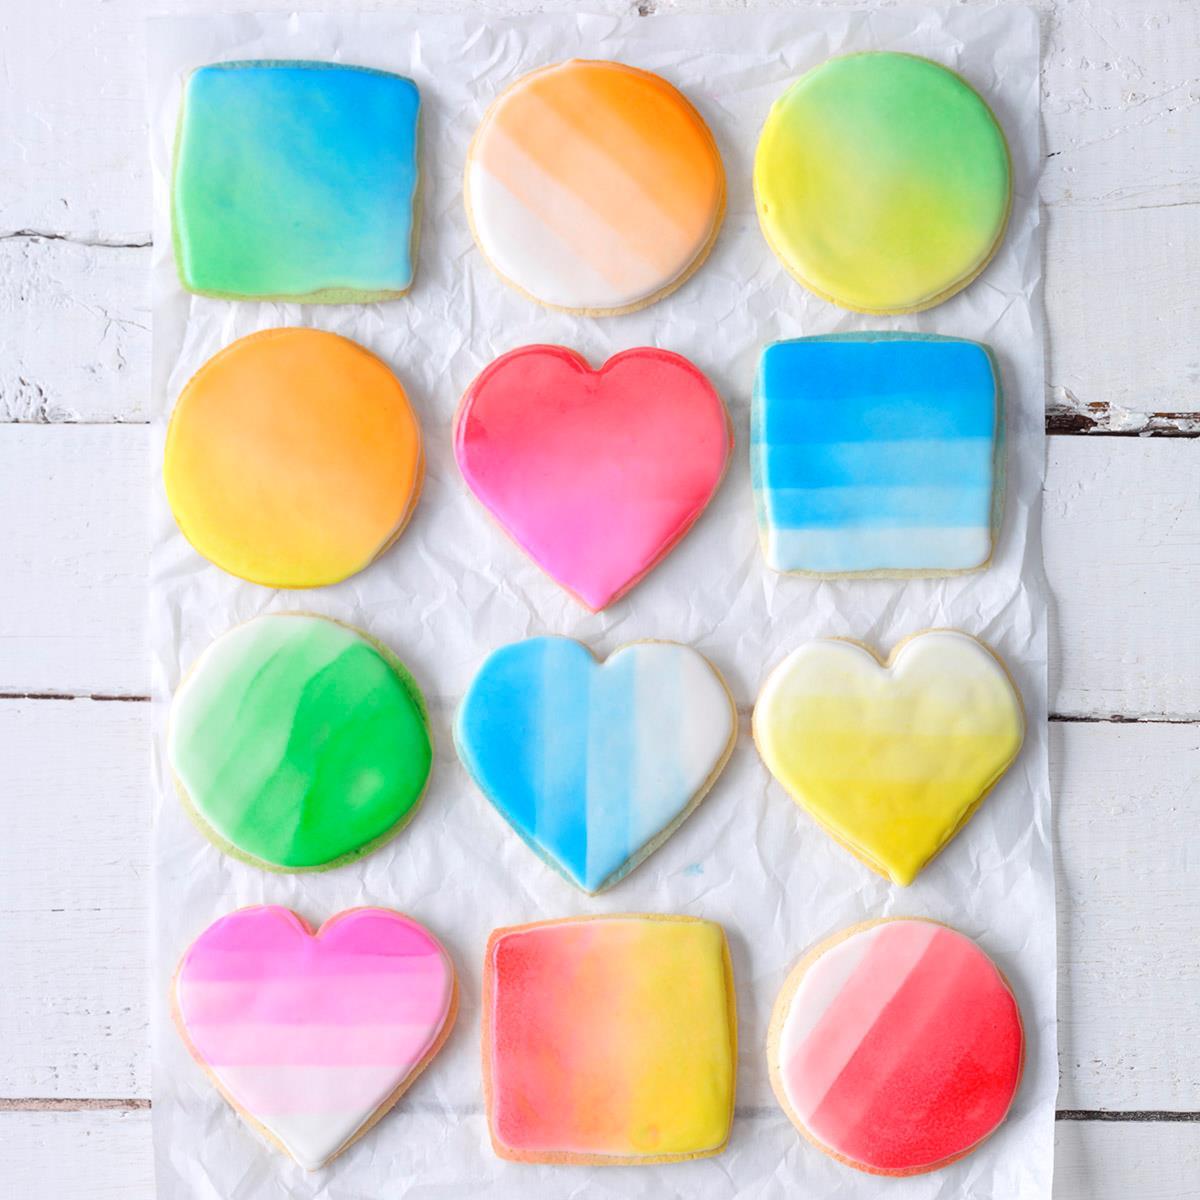
Ombre Cutout Cookies
Talk about playing with your food! An edible color spray lets you create ombre and color blends unlike other decorating techniques. To create the ombre effect, hold a sheet of paper over already-painted sections as you add layers the color. —
Shannon Norris,
Taste of Home Senior Food Stylist
Also, check these
sugar cookie tips for the best-ever treats.
Go to Recipe
Chocolate-Glazed Doughnut CookiesMy little nieces love to help decorate these doughnut-shaped cookies. They top them with sprinkles, chopped pecans or crushed candy canes. —Jolie Stinson, Marion, Indiana
Need some help with your cutouts? Check out our best
cutout cookie tips.
Orange Sugar CookiesI make these citrusy cookies for parties and special occasions, and we always get to eat the ones that don't come out perfectly. Eventually I had to start making extra "mistakes" to keep my family happy! —Myrrh Wertz, Milwaukee, Wisconsin
White Velvet CutoutsWe make and decorate these cutouts for different holidays and give lots of them as gifts. Last year, we baked a batch a week before Christmas to be sure we'd have plenty to give and plenty for ourselves, too. These rich cookies melt in your mouth. —Kim Hinkle, Wauseon, Ohio
Brown Sugar Cutout CookiesOur neighbor made these for me when I was little, and now I make them for my kids, my grandkids and the children at school. Serve them with milk for the kids and tea for the grown-ups. —Nancy Lynch, Somerset, Pennsylvania
Unicorn ManesEveryone loves a classic shortbread cookie. Make each cookie magical with a quick dip into melted baking chips and rainbow-colored sprinkles. Your unicorns will love these rainbow bites. —Angela Lemoine, Howell, New Jersey
Peanut Butter Cinnamon Snap CookiesThese peanut butter cinnamon cookies are perfect for bake sales, potlucks or holiday gift baskets. Use fun cookie cutters for any occasion you are celebrating. The cookie glaze dries shiny, so they look professional. —Kallee Krong-McCreery, Escondido, California
Wookie CookiesWho wouldn’t want a Chewie cookie? These adorable cutouts will be a fan favorite at any kind of "Star Wars" party. —Taste of Home Test Kitchen
Jumbo Chocolate CutoutsThe recipe for these light cookies has been passed down from generation to generation. Have a little extra fun with frosting if you like. They freeze well, too!—Helen Brown, East Dover, Vermont
Peanut Butter Cutout CookiesI used peanut butter in place of the butter in my take on a traditional cutout cookie, which turned out super nutty and soft. My children love to decorate the cookie with frosting, sprinkles and some creativity. —Cindi Bauer, Marshfield, Wisconsin
Viennese CookiesA Swedish friend shared this recipe with me many years ago. A chocolate glaze tops tender cookies filled with apricot jam. —Beverly Stirrat, Mission, British Columbia
Great-Grandma's Oatmeal CookiesThis yummy cookie—a favorite of my husband's—goes back to my great-grandmother. At Christmastime, we use colored sugar for a festive touch. —Mary Ann Konechne, Kimball, South Dakota
Roll-Out CookiesI collect cookie cutters (I have over 5,000!), so a good cutout recipe is a must. These cookies are crisp and buttery-tasting with just a hint of lemon, and the dough handles nicely. —Bonnie Price, Yelm, Washington
(Here's
how to roll out cookie dough like a pro!)
White Chocolate-Cappuccino CookiesThese adorable cookies shaped like coffee cups don't last long with my friends and family. For an even richer flavor, I use a mocha latte coffee mix. —Nancy Sousley, Lafayette, Indiana
Letter-Stamped Butter CookiesAlphabet cookie stamps make creating these one-of-a-kind treats a snap. Surprise your guests with dessert before dinner! —
Taste of Home Test Kitchen
Sugar CookiesThis sugar cookie dates back to a Swedish woman born in 1877! Her daughter, Esther Davis, shared the recipe with me and she came up with all the exact measurements, since the original cookies were mixed by feel and taste. These are my favorite cookies and I hope they'll become yours as well. —Helen Wallis, Vancouver, Washington
Sugar CookiesThis sugar cookie dates back to a Swedish woman born in 1877! Her daughter, Esther Davis, shared the recipe with me and she came up with all the exact measurements, since the original cookies were mixed by feel and taste. These are my favorite cookies and I hope they'll become yours as well. —Helen Wallis, Vancouver, Washington
Grandma's Star CookiesMy husband's grandma would make these butter cutouts only with a star cookie cutter. I use various shapes for celebrations throughout the year. —Jenny Brown, West Lafayette, Indiana
Gingerbread Cookies with Buttercream IcingWhen it’s time to start the cookie-baking season, this recipe always kicks off the festivities. My mother-in-law first shared it with me, but it’s too good to keep to myself! You can tint the buttery gingerbread cookie icing a cheery pink or green and pipe it on with a decorating tip. —Ann Scherzer, Anacortes, Washington
Almond Raspberry StarsThe first Christmas that I baked these, I ended up quickly making a second batch! The whole family enjoyed them. —Darlene Weaver, Lebanon, Pennsylvania
Sugar CookiesThis sugar cookie dates back to a Swedish woman born in 1877! Her daughter, Esther Davis, shared the recipe with me and she came up with all the exact measurements, since the original cookies were mixed by feel and taste. These are my favorite cookies and I hope they'll become yours as well. —Helen Wallis, Vancouver, Washington
Glazed Maple Shortbread CookiesWhenever I visit friends in Lutsen, Minnesota, I make sure to buy maple syrup there because I think it's even better than in Quebec. These delicious cookies can be decorated with sprinkles but they're just fine as is.—Lorraine Caland, Shuniah, Ontario
Caramel-Apple Shortbread CookiesThere is nothing like seeing my friends almost melt to the floor when they bite into something I made. These cookies never fail to elicit oohs and aahs. —Amber Taylor, Lenoir City, Tennessee
Lemon Butter CookiesThese tender cutout cookies have a slight lemon flavor that makes them stand out from the rest. They're very easy to roll out compared to other sugar cookies I've worked with. I know you'll enjoy them as much as we do. —Judy McCreight, Springfield, Illinois
ZimtsterneDuring December, homes and bakeries in Switzerland are filled with the aroma of classic cookies like these "Zimtsterne." —Taste of Home Test Kitchen
Snowy Mountain CookiesI was so excited to bake these with my mom after coming home from studying abroad in Germany. They remind me of the Swabian Alps I could see from my room there. Be careful not to overheat the white chocolate; it’ll lose that attractive shine. —Stephanie Bouley, North Smithfield, Rhode Island
Sweetheart Coconut CookiesRuby red jam and coarse sugar add a festive look to these crisp sandwich cookies that are the perfect gift for loved ones. My husband likes coconut, so I make these for his birthday. —Jo Ellen Helmlinger, Columbus, Ohio
Chocolate Walnut CrescentsI use a round cookie cutter to form the crescent shapes for these nutty favorites. They're so pretty sprinkled with sugar and drizzled with chocolate. —TerryAnn Moore, Vineland, New Jersey
Lemon ShortbreadsEvery year my mom and I collect cookie recipes we want to try and then get together in early December for an afternoon of baking. These no-fail lemon cookies have become an annual tradition. They're a wonderful homemade holiday gift. —Kristen Stecklein, Glendale, Wisconsin
Linzer CookiesThis specialty cookie takes a little extra effort, but the results are sweet! They really help to make the holidays feel special. —Jane Pearcy, Verona, Wisconsin
Pixie Dust CookiesThese crisp and buttery cookies are based on a favorite Scottish shortbread recipe. They're just the right amount of sweet—and fun to decorate! —Peggy Goodrich, Enid, Oklahoma
Decorated Christmas Cutout CookiesRich and buttery Christmas cutout cookies like these never last long at a party. They're one of my favorite homemade Christmas cookies. I use seasonal cutters to celebrate the holidays tastefully. —Lynn Burgess, Rolla, Missouri
Lemon Butter CookiesThese tender cutout cookies have a slight lemon flavor that makes them stand out from the rest. They're very easy to roll out compared to other sugar cookies I've worked with. I know you'll enjoy them as much as we do. —Judy McCreight, Springfield, Illinois
Sugar CookiesThis sugar cookie dates back to a Swedish woman born in 1877! Her daughter, Esther Davis, shared the recipe with me and she came up with all the exact measurements, since the original cookies were mixed by feel and taste. These are my favorite cookies and I hope they'll become yours as well. —Helen Wallis, Vancouver, Washington
Raspberry Linzer CookiesThese wonderful cookies require a bit of extra effort to make and assemble, but the delight on the faces of family and friends when I serve them makes it all worthwhile. —Schelby Thompson, Camden Wyoming, Delaware