ⓘ
Many factors go into making the perfect cake—like whipping egg whites to just the right peak to achieve the perfect springy bake. One of the simplest steps is also the most important: properly preparing your cake pan. If your pan isn’t adequately greased and lined, your cake will definitely stick. Nothing’s sadder than spoiling a gorgeous cake by turning the pan over and watching as only half comes out and the rest stays behind.
Our Test Kitchen shares the secrets of how to grease a cake pan the proper way. (Spoiler alert: it takes more than just grease.)
Not sure what kind of cake to make? Check out our favorite cake recipes, here.
How to Grease a Cake Pan
You’ll need:
- Cake pan (check your recipe for the proper size and type)
- Butter, shortening, cooking spray, or a cooking spray with flour in it, such as Baker’s Joy
- Flour
- Parchment paper
 Taste of Home
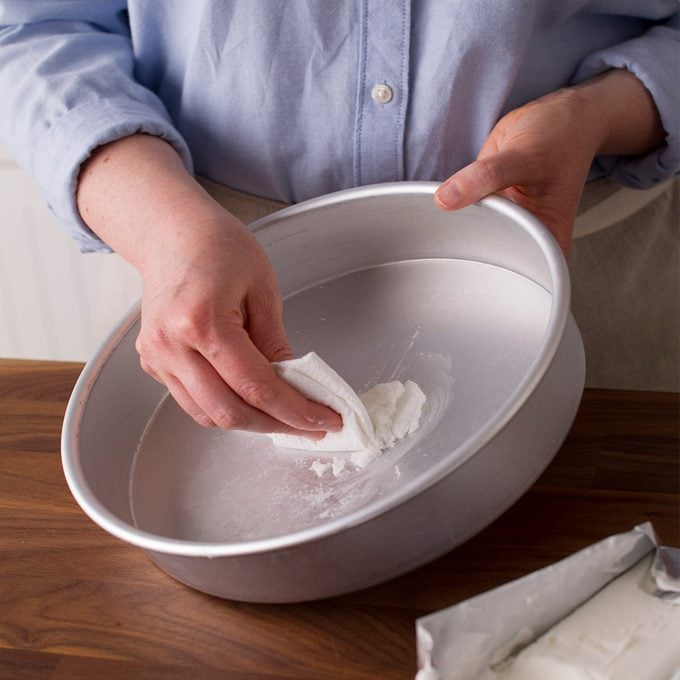
Step 1: Grease the pan
Tear a square of parchment paper (or a piece of paper towel in a pinch). Put a generous dollop of grease on one side and get a grip on the opposite side, keeping your hand clean. Smear grease over every inch of the inside of the pan: the bottom, sides and corners. Be generous!
If you’re using a spray, this step is simple: just liberally spray all over the pan. If you’ve got a spray with flour in it, you can skip ahead to No. 3.
 Taste of Home
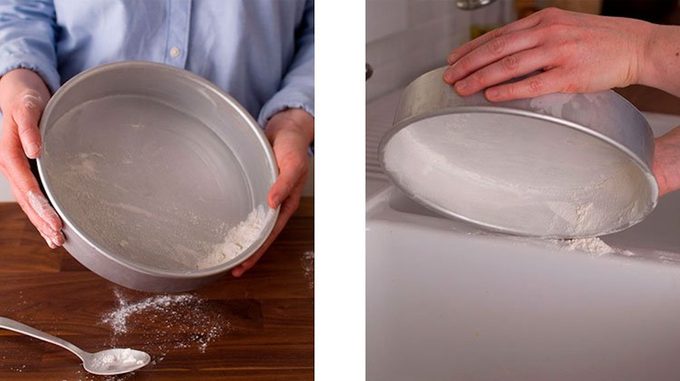
Step 2: Flour the pan
Flour will stick to the grease adding an extra layer of protection between pan and cake. Flouring is satisfying but it can get messy; we suggest wearing an apron and working over the sink.
Take a spoonful of flour and hold it evenly over the pan. Shake your wrist to send the flour showering down into the pan. It probably won’t disperse very evenly at this point; don’t worry. Take the pan over to your sink and tilt it back and forth, hitting the bottom or sides as needed to shake up drifts of flour and send them to sparser areas. Once your pan looks about evenly covered, turn it upside down and gently rap the bottom to shake out any excess.
 Taste of Home
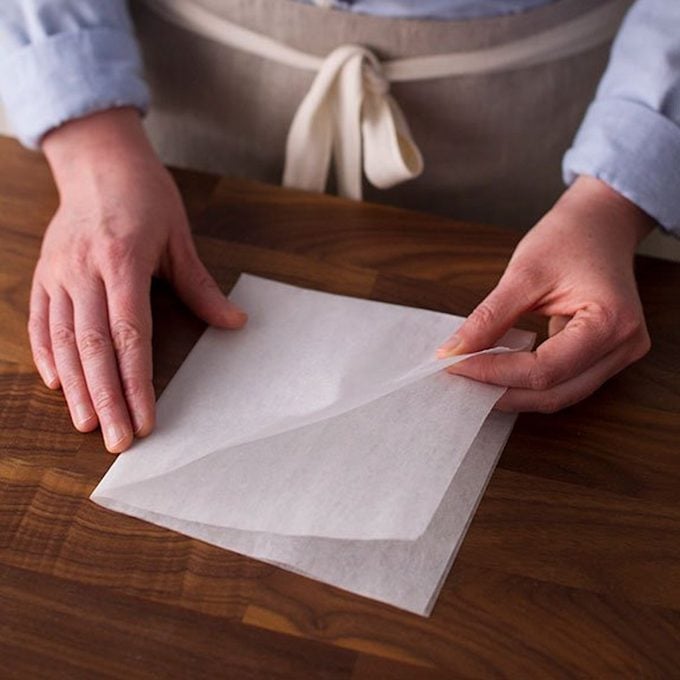
Step 3: Line the pan
Lining the pan is a step that can feel unnecessary after you’ve greased it already. But trust us, it’s worth it.
(Note: Some recipes call for only greasing and flouring a pan, while some call for greasing and lining. You can follow your recipe, or do all of the steps here to be extra sure your cake won’t stick.)
The only real challenge in lining a pan is cutting paper to fit. You can buy pre-cut parchment circles, or grab some regular parchment paper and a pair of sharp scissors.
You can lay the parchment flat under the pan. Trace around the pan, and cut a circle slightly smaller than your line.
 Taste of Home
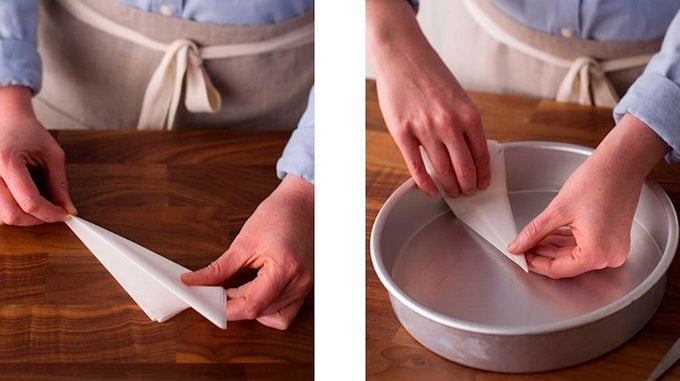
Or try this nifty magic trick. Stretch a piece of parchment long enough to fit the pan. Cut, fold in half, then fold in half again. Fold into a triangle (it won’t be perfect), keeping the folded sides together. Fold into another triangle, again with the folded sides together. Tip your pan over, set the point at the center of the bottom. Hold it there and cut off the extra length. When you unfold the paper, you’ll have a circle the size of your pan.
 Taste of Home
Step 4: Grease (and flour) the lining
Yep, you’ll want to grease the lining. Follow steps one and two.
Step 5: Triumph in your clean cake release!
After you bake, gently turn the pan over to release the cake. It will slip out easily. Pull off the parchment circle smoothly. Your double greasing will come in handy here, as you won’t lose a bit of crust.
Use This Technique for These Recipes
 Taste of Home
Years ago, I drove 4-1/2 hours to a cake contest, holding my entry on my lap the whole way. But it paid off. One bite and you'll see why this velvety beauty was named the
best chocolate cake recipe won first prize. —Sandra Johnson, Tioga, Pennsylvania
Coconut Chiffon CakeToasted coconut adds visual appeal to this tall and impressive cake. With an airy texture and heavenly coconut-ginger flavor,it's a lovely end to meals throughout the year.
Mocha CakeWithout a doubt, this is the best cake I've ever made. I share this decadent mocha cake with everyone I can! —Katherine DeLoach, Visalia, California
Vanilla Cake with Vanilla Buttercream FrostingIndulge in this layer cake topped with rich buttercream—a vanilla lover's dream. I use pure vanilla extract for the best flavor. —Michelle Dorsey, Wilmington, Delaware
Raspberry Lemon CakeWant a change from chocolate cake? Try this elegant lemon raspberry cake packed with refreshing citrus flavor, from the cake to the homemade lemon curd and creamy frosting. It won a blue ribbon at the Alaska State Fair and it's definitely a winner with me. —Shirley Warren, Thiensville, Wisconsin
Majestic Pecan CakeThis recipe truly lives up to its name. The pecan-dotted cake is stacked in three layers, and made-from-scratch frosting is the crowning touch.—Karen R. Jones, Claypool, Indiana
Banana Pudding CakeI love to make cakes, and my family loves banana pudding. One day while brainstorming in the kitchen, I came up with this banana pudding cake recipe to combine the two. My family and friends can't get enough of it! If you are pressed for time, you may substitute whipped topping for the homemade sweetened whipped cream. —Tiffany Barbee, Rocky Mount, North Carolina
Malted Chocolate & Stout Layer CakeIf you want a
St. Patrick's Day dessert that will take the cake, look no further! The rich chocolate cake is incredibly moist and has a nice malt flavor that's perfectly complemented by the Irish cream frosting. —Jennifer Wayland, Morris Plains, New Jersey
When assembling a layer cake, you'll want to follow these tips for
torting a cake.
Red Velvet CakeOur red velvet cake recipe is traditionally southern with light, tender, ruby-red cakes held together with a rich vanilla frosting.
Chocolate Spice Cake with Caramel IcingI found this recipe back in the late '80s and knew it was a special cake. The caramel icing can be a little tricky because you have to work quickly, but it's so worth it! —Mariann James, Ferguson, Missouri
Chocolate Hazelnut TorteMost cake recipes feed a crowd. So we came up with this elegant little cake that serves six. That's enough for two…with just the right amount of leftovers! —Taste of Home Test Kitchen
Black Walnut Layer CakeMy sister gave me the recipe for this beautiful cake years ago. The thin layer of frosting spread on the outside gives it a chic modern look. —Lynn Glaze, Warren, Ohio
Moist Chocolate CakeThis moist chocolate cake recipe with coffee reminds me of my grandmother because it was one of her specialties. I bake it often for family parties, and it always brings back fond memories. The cake is light and airy with a delicious chocolate taste. This recipe is a keeper! —Patricia Kreitz, Richland, Pennsylvania
Peanut Butter ‘N’ Jelly CakeI made this fun and flavorful peanut butter and jelly cake for my son's first birthday. He just turned 33, and he still has to have his favorite treat. Kids of any age have a hard time turning down peanut butter and jelly—especially when it comes tucked into cake and frosting! —Linda Graybill, Sebring, Florida
Cherry Nut CakeMy grandmother made up this recipe for her children. Using Ozark-grown cherries and walnuts, she invented one they all liked. Granny always used cream from the dairy farm near her home, but the half-and half works well and is easier to find. —Diana Jennings, Lebanon, Missouri
Favorite Coconut CakeWhen I need an impressive dessert for a special occasion, this is the recipe I turn to. My guests are glad I do! —Edna Hoffman, Hebron, Indiana
Confetti Birthday Cake with Chocolate ButtercreamThis is a moist confetti cake with lots of sprinkles and a whipped chocolate buttercream. It's perfect for birthday celebrations! —Courtney Rich, Highland, Utah
Strawberry Mascarpone CakeDon't let the number of steps in this recipe fool you —it's easy to assemble. The cake bakes up high and fluffy, and the berries add a fresh fruity flavor. Cream cheese is a good substitute if you don't have mascarpone cheese handy. —Carol Witczak, Tinley Park, Illinois
Chocolate Bavarian TorteWhenever I take this eye-catching torte to a potluck, I get so many requests for the recipe. —Edith Holmstrom, Madison, Wisconsin
Pink Lemonade Stand CakeIf you love a moist and creamy cake, this one’s for you. The lemon juice and lemonade give the layers a tangy, citrusy touch, and the cream cheese frosting with sprinkles makes it extra pretty. —Lauren Knoelke, Milwaukee, Wisconsin
Carrot Cake with Pecan FrostingMy husband constantly requests this homey, old-fashioned version of carrot cake. The frosting is still tasty even without the pecans. —Adrian Badon, Denham Springs, Louisiana
Chocolate Cake with Chocolate FrostingI once sent this rich chocolate cake to my kids' teachers, and it vanished, so I had to make another one! —Megan Moelbert, Springville, New York
Lemon Ricotta CakeThis lemon ricotta cake recipe is a family gem that was passed down from my grandmother and mother. Garnished with shaved lemon zest, the moist four-layer cake is the perfect dessert when you want to impress. —Nanette Slaughter, Sammamish, Washington
Rich Chocolate Peanut Butter CakeThe combination of mocha and peanut butter will satisfy every sweet tooth at your table. The garnish is a little extra work, but what are special occasions for? —Tammy Bollman, Minatare, Nebraska
Italian Cream Cheese CakeButtermilk makes every bite of this awesome Italian cream cheese cake recipe moist and flavorful. I rely on this recipe year-round. —Joyce Lutz, Centerview, Missouri
Pineapple Carrot CakeThis pineapple carrot cake is sweet, tangy, fluffy and soft. It's perfect for snacking or when you want a dessert that isn't as sweet as other cakes or cookies.
Cranberry Layer CakeI adapted a Bundt cake recipe to create this layer cake. Cranberries, walnuts and homemade frosting make it taste so delicious that you'd never guess it starts with a convenient cake mix. —Sandy Burkett, Galena, Ohio
Mama's Spice CakeThis spice cake recipe has stood the test of time and it's one you'll probably hand down yourself.
Come-Home-to-Mama Chocolate CakeYou'll spend less than a half hour whipping up this cure-all cake that starts with a mix. Sour cream and
chocolate pudding make it rich and moist, and chocolate, chocolate and more chocolate make it decadent
comfort food at its finest. —Taste of Home Test Kitchen
Lemon CakeThis four-layer lemon cake uses lemon juice, lemon zest, a sweet-tart lemon syrup and a lush cream cheese frosting to make sure there's a sunshiny taste of citrus in every bite.
Layered Yellow Cake with Chocolate ButtercreamThis yellow cake will become your go-to recipe for birthdays, but the tender cake with flavorful chocolate buttercream is truly perfect for any occasion. —
Taste of Home Test Kitchen, Milwaukee, Wisconsin
Hummingbird CakeThis impressive hummingbird cake is my dad’s favorite, so I always make it for his birthday. It makes a memorable dessert for any celebration and is lovely with a
summer meal. —Nancy Zimmerman, Cape May Court House, New Jersey
If you like trying different cake recipes also try making
Faith Hill's coca-cola cake and
Ina Garten's mocha chocolate icebox cake.
Spiced Devil's Food CakeOne of my mom's friends gave her this recipe when I was a child and it has been a family favorite ever since. When your "
chocolate sweet tooth" acts up, this really hits the spot! —Linda Yeamans, Ashland, Oregon
Pumpkin Pie CakeMix boxed cake mix and pureed pumpkin to get this moist, flavorful cake. The frosting is a simple mix of vanilla frosting and cinnamon and you'll want to make this cake on repeat.
Three-Layer Chocolate Ganache CakeThis decadent cake is what every chocolate lover dreams of!
Almond Joy CakeThis is a fantastic Almond Joy cake recipe—tastes just like the candy bar. —Daria Burcar, Rochester, Michigan
Contest-Winning Chocolate Potato CakeI won grand champion honors in a potato festival baking contest with this moist chocolate cake. The icing recipe can be doubled if you have a real sweet tooth. —Catherine Hahn, Winamac, Indiana
Maple Walnut CakeThis maple-flavored cake with candied walnuts honors my grandpa, who used to
make maple syrup. —Lori Fee, Middlesex, New York
Pumpkin Cake with Whipped Cinnamon FrostingMy mom made this for me, and one bite can completely take me back to my childhood. You can easily convert it into a great carrot cake recipe: just use grated carrots in place of pumpkin and add raisins. —Melissa Pelkey Hass, Waleska, Georgia
Million Dollar CakePineapple and mandarin oranges give this easy cake a refreshing, tropical twist. With cake mix and pudding mix as ingredients, it is a breeze to put together when you're short on prep time. Plus, it needs to chill before serving, so it's a perfect make-ahead dessert for potlucks and parties! —Rashanda Cobbins, Milwaukee, Wisconsin