ⓘ
We all love instant pudding mix. It might just be the best thing since (dare I say it?) sliced bread. It’s been our go-to ingredient for making quick desserts like this Chocolate Chip Cookie Delight or the creamy frosting on our favorite Pineapple Orange Cake. But what happened to its predecessor, homemade pudding? With all the hustle and bustle of today’s busy cooks, I think this old-school dessert deserves a comeback. It’s creamy and delicious, and much tastier than a quick mix.
Why You Should Make Homemade Pudding
It’s a fantastic way to use up extra egg yolks.
Ever wondered what to do with your leftover egg yolks when making meringue or angel food cake? Homemade pudding is your answer. Its simple recipe calls for those sunny centers (and not the whites) to create its moist, delicious texture. Check out these other recipes that use up egg yolks.
It’s a great pantry dessert.
Alongside the egg yolks, the recipe for old-fashioned pudding calls for basic ingredients, most of which you probably already have on hand. Think sugar, salt, cornstarch, milk and a bar of chocolate. (OK, bars of chocolate never last long in my household, so you might have to stop by the store for that one.)
You can customize the flavor.
For those of us who love to get creative in the kitchen, homemade pudding is the perfect medium. The simple recipe can be expanded upon to build any flavor you can dream of. Cinnamon white chocolate? Yep. Dark chocolate and raspberry extract? Yum-O. Peanut Butter ‘n’ Banana? Oh my.
The proof truly is in the pudding.
It’s just a fact that old-fashioned pudding is much richer and tastier than the pre-made or instant mix stuff. Once you’ve had it, you’ll never be able to compare the two again. It’s the ultimate comfort food to have slowly cooking on the stove.
Sold yet? I thought so. Our Test Kitchen has devised the best way to make pudding at home.
How to Make Pudding the Old-Fashioned Way
 Taste of Home
This homemade chocolate pudding comes from Taste of Home reader Lily Julow. Lily says of the recipe, “Life is too short to pass on dessert. This old-fashioned treat is so creamy and comforting!” And we certainly agree!
Get Recipe
Ingredients
- 1/4 cup sugar
- 3 tablespoons cornstarch
- 1/4 teaspoon salt
- 2 cups whole milk
- 3 large egg yolks
- 1 dark chocolate candy bar (6.8 ounces), finely chopped
- 1/2 teaspoon flavored extract. We like vanilla, but you can experiment with flavors like almond, orange or mint.
Tools
Directions
Step 1: Combine the first three ingredients
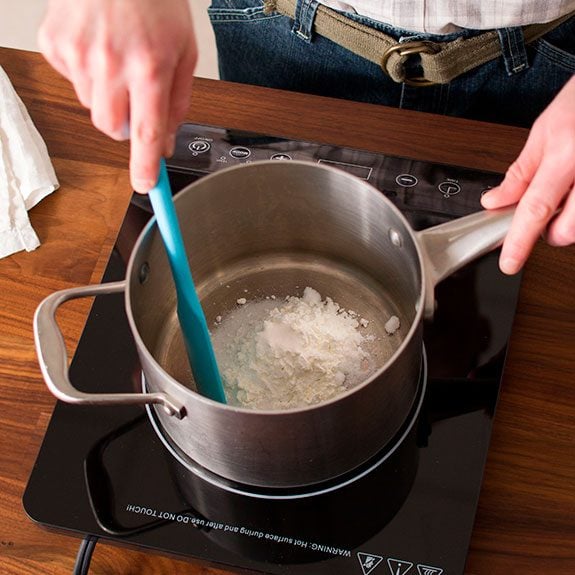
In a large saucepan, mix the sugar, cornstarch and salt. We’re adding cornstarch for two reasons. One, it helps thicken the custard, and two, it helps keep the eggs from coagulating once they’re heated. You definitely don’t want bites of scrambled egg in your pudding! Be sure to avoid these other common egg mistakes.
Step 2: Add the milk and gently cook
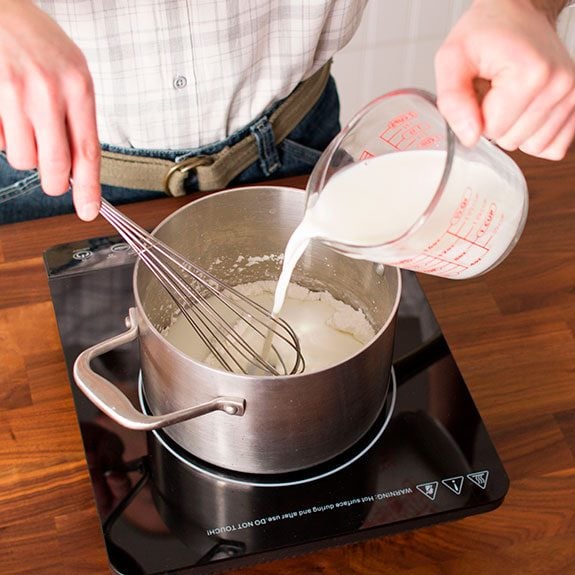
At this point, were going to challenge you to multitask. Slowly pour the milk into the pan while gently whisking the ingredients. Whisk until the mixture reaches a smooth consistency. Then, dial up the burner to medium heat. Make sure to stir the pot continuously until the liquid has started to thicken and bubble. Don’t be tempted to leave it unattended-your pudding might scorch!
Test Kitchen Tip: If you’re a utensil connoisseur like me, a flat whisk is a great tool to reach into the corners of your saucepan. This extra reach will make sure you whisk every bit of milk. Here are some more reasons you’ll want a flat whisk in your kitchen.
Step 3: Lower heat and stir
Once the pudding has started to bubble, reduce the heat to low. Continue gently stirring for 2 minutes longer, then remove from heat. By the way, this is the difference between pudding and custard.
Step 4: Carefully add the egg yolks
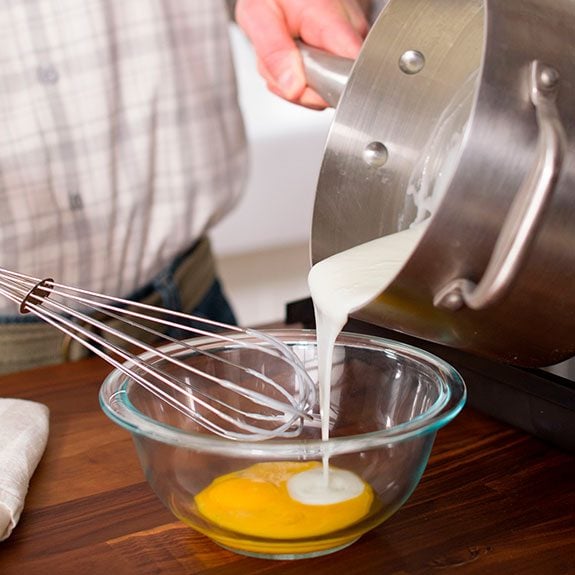
Combine the egg yolks with a small portion of the hot custard mixture in a small bowl and give it a whisk to combine. This brings the eggs up to a higher temperature, so they’ll mix into the pudding more smoothly, without curdling. Pour the milky yolk mix into the saucepan. Whisk again to combine.
Step 5: Heat things up again
Bring the saucepan, yet again, to a gentle boil. Continue to cook and stir for 2 minutes. These are the cooking and baking steps you should never skip.
Test Kitchen Tip: This extra step might seem unnecessary but it’s actually quite important. Why? The extra cook time kills off an enzyme in the raw yolk called alpha-amylase. If the enzyme remains in your pudding, you’re likely to end up with a watery mess.
Step 6: Bring on the chocolate (or other flavors)
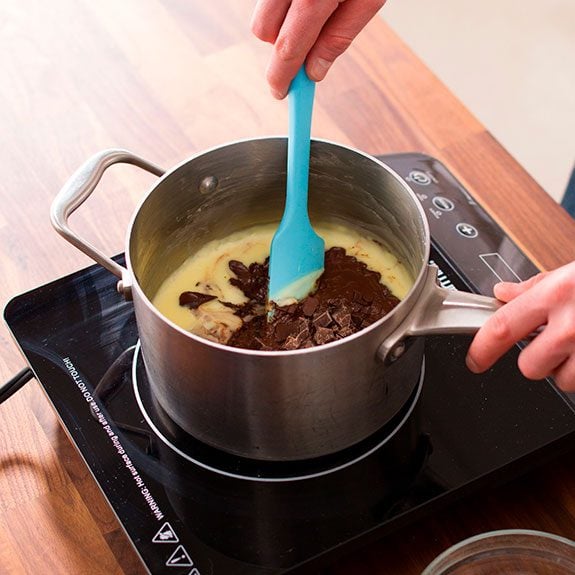
Stir in the chopped chocolate. Once it’s fully melted, remove the saucepan from the heat. Top it off by stirring in the vanilla extract. Let the mix cool about 15 minutes or so, stirring once in a while to keep it smooth.
Test Kitchen Tip: You can add lots of different flavors. Try heating up your chocolate with some cayenne, or lose the chocolate and just make vanilla pudding, maybe with some cinnamon? Get creative! Check out these pudding recipes for some inspiration.
Step 7: Cover with plastic wrap and cool
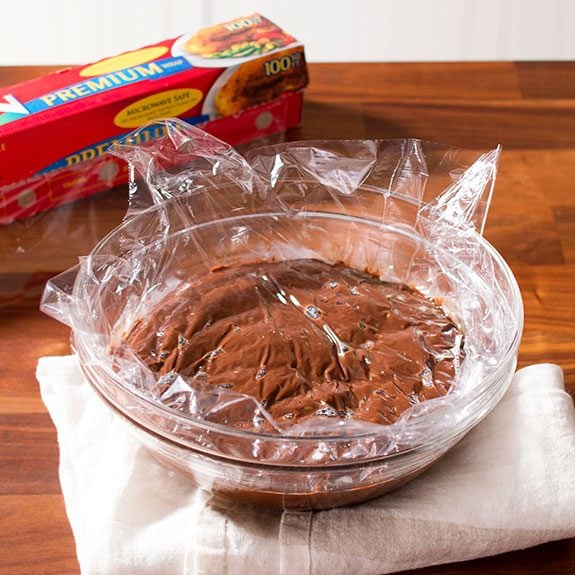
Once the pudding has cooled slightly, transfer it to a bowl. Press plastic wrap right onto the surface of the pudding, which helps prevent a skin from forming. Pudding skin is simply milk protein (casein) that’s dried out due to evaporation. It can form a thin, rubbery layer on top of your dessert. It won’t hurt you; if it happens, just scrape it off with the edge of a spoon. Refrigerate the pudding for a few hours until cold and try not to stir the pudding once it’s set. It’ll start thinning the rich texture. Next, learn how to make figgy pudding, a dessert for every season.
Test Kitchen Tip: No plastic wrap on hand? You can also keep the skin from forming by adding a thin layer of butter. To do this, lightly dab a stick of butter on the surface of the hot mix until a thin layer has collected on top.
Step 8: Enjoy!
When your pudding has cooled completely, remove it from the fridge and serve with homemade whipped cream and some chocolate curls.
How to Store Homemade Pudding
If you manage to have any leftovers, transfer the pudding to an airtight container, covering the top of the pudding with plastic wrap or butter, and enjoy within four days.
How to Customize Pudding
Now that you’re a pudding pro, there’s no limit to the flavor combinations you can achieve by simply mixing and matching ingredients. Here are a few to get you started:
- Make it a mocha: Stir 2 teaspoons instant espresso powder in with the sugar mixture at the beginning of the recipe.
- Add some heat: Swap out the plain chocolate for Mexican chocolate instead.
- Incorporate sweet flavors: Substitute white chocolate and orange extract for a fruity delight or whip it up with bananas instead.
Love old-fashioned pudding? Try these vintage desserts next!
Grandma’s Old-Fashioned Strawberry Shortcake
When my grandma served this shortcake, she usually topped it with homemade vanilla ice cream. —Angela Lively, Conroe, Texas
Get Recipe
Marzipan Cups with Currant JellyThese bite-size beauties look and taste gourmet, but they're easy to make and boast a delicate almond flavor. The hidden jelly surprise and pretty nut accent make them a nice addition to any treats tray. You can make them in advance and freeze them for up to three months, if you like. —Lorraine Caland, Shuniah, Ontario
Burnt CustardThe recipe for this smooth-as-silk custard came from a local restaurant years ago. With its broiled topping it looks pretty in individual cups. —Heidi Main, Anchorage, Alaska
Homemade Butterscotch PuddingHomemade pudding reminds me of my grandma and how she turned milk and eggs into creamy textures before my eyes. The
butterscotch in this recipe adds a caramel-sweet touch. —Teresa Wilkes, Pembroke, Georgia
Almond TorteReduced-fat sour cream, egg whites and applesauce lighten up this gorgeous almond torte. A creamy custard filling lends richness. —Kathy Olsen, Marlborough, New Hampshire
Meringue Snowballs In CustardMy family has passed down this elegant dessert generation by generation. It started with my Russian great-grandmother, who traveled to America more than 100 years ago. I love continuing the tradition with her recipe. —Tonya Burkhard, Palm Coast, Florida
Mango Gelatin SaladMy Aunt Nannette often made this salad as a convenient make-ahead dish. The mango mold has hints of apricot and can be served with pork, chicken and beef—or for dessert. —Debra Sult, Chandler, Arizona
Mocha Baked AlaskasMake these baked Alaskas ahead of time—you can torch the completed desserts and freeze them up to 24 hours before serving. —Kerry Dingwall, Ponte Vedra, Florida
Shoofly CupcakesThese were my grandmother's specialty. To keep them from disappearing too quickly, she used to store them out of sight. —Beth Adams, Jacksonville, Florida
Charlotte's Green Tomato PieGreen tomato pie makes an awesome conversation piece. I took it to a potluck and it was a delight to share. —Charlotte McDaniel, Jacksonville, Alabama
Strawberry Crunch Ice Cream CakeWhile growing up, I loved treats from the ice cream truck that rolled through my neighborhood. This ice cream cake is inspired by one of those crunchy, strawberry novelties. —Lisa Kaminski, Wauwatosa, Wisconsin
Divinity CandyEvery Christmas my grandmother and I made divinity candy, just the two of us. I still make it every year. —Anne Clayborne, Walland, Tennessee
Cherry Gelatin SupremeWhen I was growing up, this yummy, easy dessert was always on the menu at holiday get-togethers. Years ago, my aunt gave me the recipe, and now when I make it for my family, I think of her. —Janice Rathgeb, Brighton, Illinois
Lemon Icebox PieYou will detect a definite lemonade flavor in this refreshing pie. High and fluffy, this dessert has a creamy smooth consistency. —Cheryl Wilt, Eglon, West Virginia
Skillet Blueberry SlumpDon't let the homey, almost unappetizing name "slump" fool you. Easier than pie, these baked summer
fruit desserts are topped with tasty biscuits. If you love vintage food, learn how to make
cottage cheese biscuits.
Figgy Apple Brie TartOur holiday gatherings often included baked Brie. I transformed it into a dessert that’s savory and sweet. It makes a wonderful appetizer, too. —Kristie Schley, Severna Park, Maryland
Fresh Plum Crumb DessertMy old-fashioned dessert has the perfect sweet-tart balance with its fresh-plum tang and sweet, crispy topping. Imagine it warm from the oven, served with a scoop of ice cream…yum! —Janet Fahrenbruck-Lynch, Cincinnati, Ohio
Old-Fashioned Honey Baked ApplesMy baked apple recipe is very old-fashioned yet tried and true. It's definitely a comfort food. —Rachel Hamilton, Greenville, Pennsylvania
Apple Roly-PolyMy grandmother’s apple dessert is genuine regional fare. With 13 children plus the men at Grandpa’s sawmill, she had to do lots of cooking each day! —Megan Newcombe, Cookstown, Ontario
Grandmother's Corn PuddingMy grandmother always served this pudding for holidays and family reunions. Everyone loves it. Corn pudding is a popular side dish on Maryland's eastern shore. —Susan Brown Langenstein, Salisbury, Maryland
Old-Fashioned Rice PuddingThis comforting dessert is a wonderful way to end any meal. As a girl, I always waited eagerly for the first heavenly bite. Today, my husband likes to top his with a scoop of ice cream. —Sandra Melnychenko, Grandview, Manitoba
Crunchy Candy ClustersThese cereal and marshmallow clusters are so simple that I make them for the holidays each year, as my family looks forward to them. —Faye O'Bryan, Owensboro, Kentucky
LebkuchenDense, chewy lebkuchen is a great addition to your Christmas-cookie routine, but you can make it any time of year. While most lebkuchen contains ginger, this is a ginger-free version that uses other spices and molasses to achieve a similar flavor.
Lemon Chiffon CakeLemon chiffon cake is soft and spongy, with a fresh lemon flavor in the cake and the luscious buttercream frosting. Plan to eat this cake quickly, as chiffon cakes don't last very long. But that shouldn't be a problem, given how delicious this cake is.
Peach BavarianFruit molds are my specialty. This one, with its refreshing peach taste, makes a colorful salad or dessert. —Adeline Piscitelli, Sayreville, New Jersey
Scottish Shortbread CookiesThis simple three-ingredient shortbread cookie recipe makes wonderfully rich, tender cookies. Serve them with fresh berries of the season for a nice, light dessert. You'll get miles of smiles when friends see these at an afternoon tea or a bridal shower. —Marlene Hellickson, Big Bear City, California
Italian Holiday CookiesMany of our holiday traditions center around the foods my mother made while I was growing up. These cookies, which we called "Strufoli", bring back wonderful memories. —Sue Seymour, Valatie, New York
Aunt Ione's Icebox CookiesWhenever we went to visit my Aunt Ione in south Georgia, her icebox cookies were our favorite treat. My mother later make these cookies, and I remember begging for a slice of the raw dough—I thought the unbaked cookies tasted just as great as the baked! —Jenny Hill, Meridianville, Alabama
Traditional Hot Cross BunsOn Easter morning, our family always looked forward to a breakfast of dyed hard-boiled eggs and Mom's hot cross buns. I still serve these for special brunches or buffets. —Barbara Jean Lull, Fullerton, California
Mincemeat TrifleInstead of fixing a traditional pie, I gussied up mincemeat by creating this fancy trifle. The recipe's a time-saver, since it can be prepared a day ahead.
Apple Dumplings with SauceThis warm and comforting apple dumplings recipe is incredible by itself or served with ice cream. You can decorate each dumpling by cutting 1-inch leaves and a 1/2-inch stem from the leftover dough. —Robin Lendon, Cincinnati, Ohio
Easter PieEaster Pie is a specialty in many Italian homes, so mothers make sure their daughters master the recipe to ensure that the tradition continues. —Barbara Tierney, Farmington, Connecticut
Grandma's Polish CookiesThis traditional khruchiki recipe has been handed down through my mother's side from my great-grandmother. As a child, it was my job to loop the end of each cookie through its hole. —Sherine Elise Gilmour, Brooklyn, New York
Banana PuddingI didn’t see my son, Lance Corporal Eric Harris, for more than two years after he enlisted in the Marines after high school. And when I saw him arrive at the airport, I just grabbed hold of him and burst out crying. When we got home, the first thing he ate was two bowls of my easy banana pudding recipe. He’s a true southern boy! It’s a dessert, but you can have it for breakfast, lunch or dinner. —Stephanie Harris, Montpelier, Virginia. Hungry for more? Here's our collection of delicious
retro breakfast recipes.
Apple Bavarian TorteA cookie-like crust holds the sensational filling of cream cheese, apples and almonds. This comforting apple torte will be welcomed addition to a bake sale or potluck. —Sheila Swift, Dobson, North Carolina
Mulled Wine Jelly CandiesI don’t drink alcohol, so after I’ve had company over for dinner, I have to do something with the leftover wine. These unusual jelly candies make a nice hostess gift during the holidays. I make the mulled red wine version for the winter holidays, and a white wine variation in spring and summer.—Jennifer Mack, Pensacola, Florida
Cranberry Ambrosia SaladMy paternal grandmother used to make this for Christmas dinner. I'm not sure how many batches she made since there were nearly 50 aunts, uncles and cousins in our family. I still make the recipe in memory of her, and it's still as good as I remember. —Janet Hurley, Shell Rock, Iowa
Rhubarb Fool with StrawberriesA fool is a classic British and Irish dessert that's usually made with whipped cream and cooked fruit. Try my quick version with rhubarb and berries. —Cheryl Miller, Fort Collins, Colorado
Honey and Spice Snack CakeThe sweetness of honey, the bold flavors of nutmeg and cloves and the crunch of walnuts make for happy snacking. —Taste of Home Test Kitchen, Greendale, Wisconsin
Banana SouffleThis pretty, golden-topped puff is so easy to whip up, but looks like you really fussed. Lightly laced with rum, the moist, tender, banana-rich souffle makes that perfect “little something” to wrap up any holiday dinner. —Crystal Jo Bruns, Iliff, Colorado
Makeover Sweet KugelThis is a traditional recipe I make for the holidays. My close friend and I used to bake together until she moved 1,300 miles away. Now when I make this dish, I’m reminded of our time together. —Eileen Wolf, Abington, Pennsylvania
Strawberry TrifleI won first prize in a dairy recipe contest with this tasty strawberry trifle. You can double the recipe and make two for large groups. —Norma Steiner, Monroe, Wisconsin
Sticky Toffee PuddingThe classic sticky toffee pudding is a traditional dessert in the United Kingdom. I love that I can just stay home and bake this cake version, featuring saucy butterscotch. —Agnes Ward, Stratford, Ontario
Pretzel Gelatin DessertThis is one of my mother's absolute favorite desserts. The salty pretzel crust is the perfect complement to the sweet cream cheese filling. —Erin Frakes, Moline, Illinois
Down East Blueberry BuckleThis buckle won a contest at my daughter’s college. The prize was four lobsters, but the real reward was the smile on our daughter’s face. —Dianne van der Veen, Plymouth, Massachusetts
No money? No problem! Try this
vintage cake recipe, appropriately named
poor man's cake.