World's Best Lemon PieTotal Time: 1 hour + chilling and cooling
Main Ingredients: Pie dough, egg whites, lemon filling
Level: Advanced
We're positive: This is the world's best lemon meringue pie recipe. With pillowy meringue, smooth lemon filling and perfectly flaky pie crust, this dessert is a showshopper. Before getting started, read our guide to
making perfect meringue so your pie gets the mile-high topping you see in bakeries.
"Mother's pies were always so memorable, with tender, flaky crusts. In summer the order of the day was lemon meringue!" —Recipe contributor Phyllis Kirsling, Junction City, Wisconsin
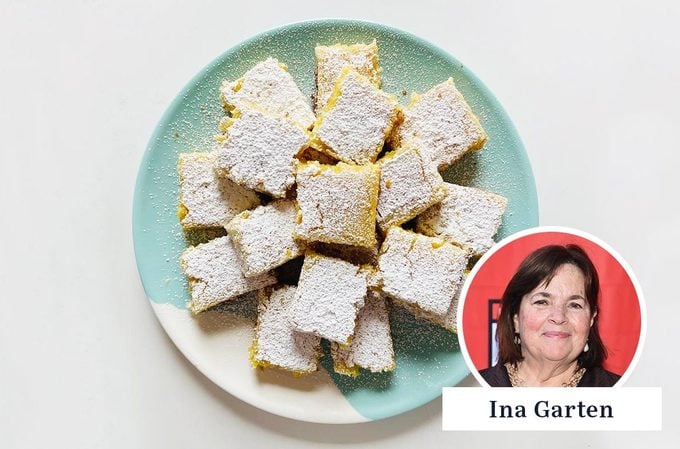
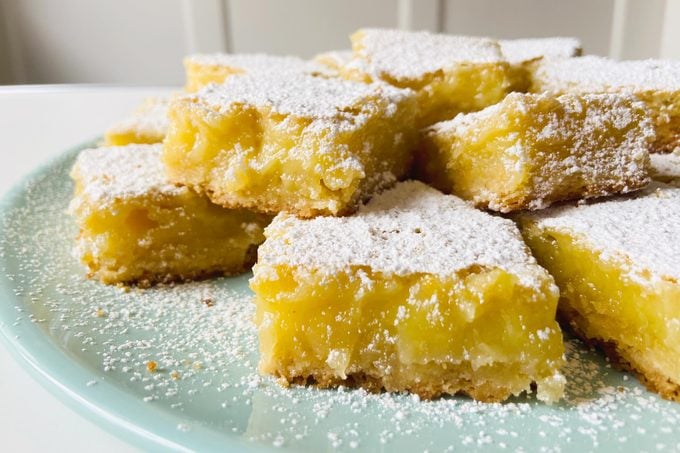
Audrey's Lemon Meringue BarsTotal Time: 1 hour, 15 minutes + cooling and chilling
Main Ingredients: Flour, sugar, butter, lemon, eggs
Level: Intermediate
Both sweet and tart, lemon meringue bars make the perfect dessert for a crowd or
picnic spread. Make sure to refrigerate the bars for at least four hours before serving so they're nice and compact.
"In our backyard resides a prolific lemon tree. We are forever trying to find new ways to incorporate these lovely yellow fruits into our culinary endeavors so that none go to waste. My 13-year-old daughter, Audrey, knows my love of all things sweet. She decided to test her baking skill by combining two of my lemony favorites: lemon bars and lemon meringue pie. After several intense hours in the kitchen (warding off her horde of brothers), these delicious bars were born." —Recipe contributor Monica Fearnside, Rancho Palos Verdes, California
Lemon Meringue Angel CakeTotal Time: 1 hour, 30 minutes + cooling
Main Ingredients: Egg whites, sugar, cake flour, cream of tartar, lemon curd
Level: Advanced
This gorgeous, lemony cake is well worth the effort it takes. In a pinch, swap in store-bought angel food cake instead of making it from scratch
"I've been told that this dessert tastes exactly like a lemon meringue pie and that it's the best angel food cake anyone could ask for. I'm not sure about all of that, but it is delightful to serve." —Recipe contributor Sharon Kurtz, Emmaus, Pennsylvania
Lemon Cake Mix Dessert PizzaTotal Time: 55 minutes + chilling
Main Ingredients: Lemon cake mix, cream cheese, lemon curd, blueberry pie filling
Level: Intermediate
Dessert pizzas are the most fun way to serve after-dinner treats. Stock your pantry with lemon cake mix, lemon curd and a can of blueberry pie filling so you can make this lemon version any time. To make dessert even more decadent, serve this pizza with a scoop of vanilla ice cream.
"Light and lemony, this blueberry dessert pizza is nice to serve after dinner, as an accompaniment to a cup of afternoon tea or as a special breakfast pastry. You can use a 13x9-inch pan instead of a pizza pan—just pat the crust over the bottom and 1/2 inch up the sides of the pan." —Recipe contributor JM Holt, Mendota Heights, Minnesota
Blueberry Lemon CakeTotal Time: 45 minutes
Main Ingredients: Butter, sugar, lemon, blueberries, yellow cake mix
Level: Beginner
Lemon and blueberry make one of the greatest flavor pairings, and this quick dessert proves why. Boxed yellow cake mix becomes transcendent with a healthy dose of lemon zest and blueberries, fresh or frozen.
"I always set aside some of my fresh-picked blueberries to make this tender lemon blueberry cake. Using cake mix makes it a quick and easy dessert." —Recipe contributor Leona Luecking, West Burlington, Iowa
Italian Lemon CookiesTotal Time: 45 minutes
Main Ingredients: Butter, sugar, eggs, lemon, flour
Level: Intermediate
There's something about these buttery, lemony cookies that taste like a special occasion. Get festive with the colored sugar topping and tailor to the time of year or holiday.
"Christmas wouldn't be the same without my grandmother's cookies. A plate full of these light and zesty cookies is divine!" —Recipe contributor Elisabeth Miller, Broadview Heights, Ohio
Raspberry Lemon CakeTotal Time: 1 hour, 35 minutes + chilling and cooling
Main Ingredients: Eggs, sugar, lemons, butter, flour, evaporated milk, cream cheese
Level: Advanced
One of the reasons this magnificent layer cake is so flavorful? It's packed with so many different lemon elements: zest, juice, extract and concentrate. With creamy frosting and layers of raspberry, this dessert is spring perfection.
"Want a change from chocolate cake? Try this elegant lemon raspberry cake packed with refreshing citrus flavor, from the cake to the homemade lemon curd and creamy frosting. It won a blue ribbon at the Alaska State Fair and it's definitely a winner with me." —Recipe contributor Shirley Warren, Thiensville, Wisconsin
Lemon Sheet CakeTotal Time: 30 minutes + cooling
Main Ingredients: Lemon cake mix, eggs, lemon pie filling, cream cheese, butter
Level: Beginner
Light, lemony and pretty to look at, this sheet cake is one of our most reliable pantry desserts. Lemon pie filling and lemon cake mix make absolute magic together. Make sure the cake is completely cool before spreading with frosting so no crumb clumps appear. Elevate the topping with
candied citrus or sprinkles.
"Lemon pie filling lends a splash of citrus flavor to a convenient cake mix, and a rich cream cheese frosting gives it sweetness. My family likes this lemon sheet cake cold, so I cut it into squares and freeze it before serving." —Recipe contributor Alyce Dubisar, North Bend, Oregon
Lemon Olive Oil CakeTotal Time: 45 minutes
Main Ingredients: Eggs, sugar, olive oil, milk, lemon, flour
Level: Beginner
If you've been making butter-based cakes your whole life, give olive oil a whirl. It keeps the cake supremely tender, while adding a slight herbaceous flavor. Choose a quality
olive oil for this recipe—the better the quality, the tastier the cake.
"Olive oil cakes are tender and moist, and stay that way longer than butter-based cakes, so they are wonderful if you need to make dessert ahead of time. Serve this recipe with fresh berries when your favorites are in season." —Recipe contributor Nicole Gackowski, Antioch, California
Lemon Icebox CakeTotal Time: 15 minutes + 8 hours in fridge
Main Ingredients: Whipped topping, instant pudding mix, lemon, graham crackers
Level: Beginner
Chilled, layered
icebox cakes are a beloved summer confection for a reason. This lemony version with graham crackers and instant pudding mix is a fun no-bake twist on the classic. Show up to any party with this dessert and you'll be the most popular person there.
"An icebox cake is a classic confection that comes together with just a few simple ingredients and sets in the refrigerator. Since icebox cakes don't involve baking, they're the perfect sweet summer treat." —Taste of Home
Test Kitchen
Easy Lemon Pound CakeTotal Time: 50 minutes + cooling
Main Ingredients: Cream cheese, milk, lemon cake mix
Level: Beginner
Beating cream cheese into boxed lemon cake mix is one of the easiest ways to upgrade it. This pound cake is lovely on its own, but you could also top it with a simple
vanilla glaze.
"Who doesn't love moist lemon cake, especially when you add cream cheese to a boxed mix for extra richness?" —Recipe contributor Flora Valdez, San Bernadino, California
Coconut-Lemon Ice Cream CakeTotal Time: 30 minutes + freezing
Main Ingredients: Shortbread cookies, shredded coconut, lemon, cream of coconut, vanilla ice cream, frozen whipped topping
Level: Intermediate
We love finding new
ways to use up a pint of vanilla ice cream, and what's better than ice cream cake? For the buttery, crushed shortbread streusel on top, swap in lemon cookies for even more zing.
"I developed this cool treat because I wanted to find a new use for cream of coconut. The sweet coconut combines beautifully with the tart lemon juice, and the streusel adds a nice crunch. Look for cream of coconut in the cocktail mixer section of your grocery store." —Recipe contributor Janet Gill, Canton, Ohio
Lemon Dream CheesecakeTotal Time: 1 hour, 25 minutes + chilling
Main Ingredients: Graham crackers, butter, sugar, cream cheese, lemon, flour, eggs
Level: Intermediate
Summer soirees wouldn't be complete without a lemon cheesecake set in a buttery graham cracker crust. Here's
everything you need to know about making the perfect cheesecake at home.
"Light and creamy, this lemon cheesecake recipe is just the thing for a spring or summer day." —Recipe contributor Bonnie Jost, Manitowoc, Wisconsin
Lemon Cheesecake SquaresTotal Time: 1 hour
Main Ingredients: Sugar, flour, oats, raspberry jam, flour, lemon, eggs
Level: Beginner
If you like a bit of nuttiness in your desserts, add 1/2 cup of ground, toasted pecans or hazelnuts to the crust of this pretty picnic dessert. To turn this recipe into an
orange dessert, use orange zest and juice instead of lemon.
"Whether I'm hosting friends or sending a plate to work with my husband, these creamy elegant lemon cheesecake bars are always a hit. It's a wonderful make-ahead dessert that easily serves a large group." —Recipe contributor Peggy Reddick, Cumming, Georgia
Shortbread Lemon TartTotal Time: 45 minutes + cooling
Main Ingredients: Eggs, lemon juice and zest, sugar, butter, flour, ground almonds
Level: Beginner
This elegant, citrusy tart is sunshine in a dessert. If the surface of your tart cracks a bit while baking, fret not—that's what fresh fruit and whipped toppings are for!
"For a change from ordinary lemon bars, we added grated orange zest to both the crust and filling to turn the recipe into a lemon tart." —Taste of Home
Test Kitchen
Strawberry Lemon TrifleTotal Time: 20 minutes
Main Ingredients: Cream cheese, vanilla yogurt, milk, lemon pudding mix, strawberries, angel food cake
Level: Intermediate
We love a layered dessert—especially one as visually appealing as this trifle. Fluffy
angel food cake absorbs all that creamy lemon flavor. Let the trifle refrigerate for at least two hours before serving so all the elements have a chance to meld.
"This refreshingly fruity dessert is one of our favorites. It looks so beautiful layered in a glass bowl that people will think it took ages to make. The secret is starting with a purchased angel food cake." —Recipe contributor Lynn Marie Frucci, Pullman, Washington
Lemon Poppy Seed CakeTotal Time: 1 hour, 5 minutes + cooling
Main Ingredients: Lemon cake mix, lemon pudding mix, eggs, poppy seeds, lemon
Level: Beginner
When boxed lemon cake mix and instant lemon pudding mix come together, magic happens. This perfectly moist cake would make the perfect sweet for
afternoon tea or brunch.
"This luscious lemon poppy seed cake recipe uses cake mix and pudding mix for an easy dessert highlighting the classic flavor combination." —Recipe contributor Betty Bjarnason, Egbert, ON
Lavender Lemon BarsTotal Time: 40 minutes
Main Ingredients: Butter, flour, almonds, dried lavender, lemon, sugar, eggs
Level: Intermediate
Floral lavender and bright lemon make one of the most elegant flavor combinations. If you have lavender growing in your garden, you could swap that in for the dried version—just make sure it hasn't been treated with chemicals. Use up any extra bits from your harvest in our
lavender desserts.
"Hints of lavender and lemon zest in the crust make these treats a favorite." —Recipe contributor Judith Hilinski, Cuyahoga Falls, Ohio
Lemon Coconut CupcakesTotal Time: 40 minutes + cooling
Main Ingredients: Butter, sugar, eggs, lemon, flour, sour cream shredded coconut, cream cheese
Level: Intermediate
We love decorating these fluffy, moist cupcakes with candied citrus, but regular lemon slices do the job too! Use yellow paper baking cups to go all in on the sunshiny vibes.
"Lemon plus coconut equals big smiles in this cupcake equation. These zesty gems are a hit with my family, friends and neighbors." —Recipe contributor Debra Henderson, Booneville, Arkansas
Ginger-Glazed Lemon BundtTotal Time: 1 hour, 20 minutes + cooling
Main Ingredients: Cranberries, sugar, butter, eggs, lemon, Greek yogurt, ginger
Level: Advanced
Making sugared cranberries from scratch couldn't be easier (you can do it in the microwave!), and they make the prettiest topping for this Bundt cake. To make the cranberries really sparkle, mix half sanding sugar with regular sugar when coating them. These
decorative Bundt pans will turn out a gorgeous cake.
"Tangy ginger, tart lemon and puckery cranberries make this melt-in-your-mouth cake as crisp—and gorgeous—as autumn." —Taste of Home
Test Kitchen
Lemon Tart with Almond CrustTotal Time: 50 minutes
Main Ingredients: Flour, almonds, sugar, butter, eggs, lemon
Level: Intermediate
This elegant, rich lemon tart is
the dessert to make when you want to impress a crowd. You can easily swap in gluten-free flour when making the crisp almond crust. Just use our
gluten-free baking guide for the best types of flours to swap.
"Our state produces an abundance of lemons, and everyone is always looking for new ways to use them. This beautiful tart is my delicious solution to the excess-lemon problem!" —Recipe contributor Lois Kinneberg, Phoenix, Arizona
Lemon MacaronsTotal Time: 1 hour, 15 minutes + standing and cooling
Main Ingredients: Almond flour, egg whites, sugar, butter, heavy cream, lemon curd
Level: Advanced
Pulling off airy, delicate
French macarons requires a bit of patience and a lot of technique, but we promise it's worth it. Fill the lemony macarons with buttercream and homemade lemon curd or store-bought jam.
"These light and airy lemon macarons are perfect for special occasions or to give as gifts." —Recipe contributor Josh Rink, Milwaukee, Wisconsin
Homemade Lemon CurdTotal Time: 20 minutes + chilling
Main Ingredients: Eggs, sugar, lemon, butter
Level: Beginner
Every home baker should have a classic lemon curd recipe in their repertoire. This creamy curd comes together with five ingredients, and you can store leftovers in your fridge for one to two weeks.
"Lemon curd is a scrumptious spread for scones, biscuits or other baked goods. You can find it in larger grocery stores alongside the jams and jellies or with the baking supplies, but we like making this lemon curd recipe from scratch." —Recipe contributor Mark Hagen, West Allis, Wisconsin
Red, White and Blue Frozen LemonadeTotal Time: 10 minutes
Main Ingredients: Lemon, sugar, blueberries, Maraschino cherries
Level: Beginner
Refreshing frozen lemonade gets a colorful upgrade with muddled blueberries and a sweet cherry topping. Check out more
red, white and blue desserts for summer sweetness.
"This patriotic drink is as pretty as it is delicious. With cherries, blueberries and lemon juice, we created a striped lemonade that is perfect for a Fourth of July celebration." —Recipe contributor Shawn Carleton, San Diego, California
Lemon SconesTotal Time: 35 minutes
Main Ingredients: Flour, sugar, butter, buttermilk, lemon
Level: Beginner
It's amazing what a bit of lemon zest can do! These crispy, no-fuss lemon scones are the perfect treat for afternoon tea. Try drizzling with a
quick vanilla glaze for a hit of sweetness.
"These delicate lemon scones are the perfect lightly sweet treat to serve with coffee or tea at any holiday get-together. It's a simple bread since, like biscuits, it doesn't require much kneading and there's no need to let the dough rise." —Recipe contributor Maureen DeGarmo, Martinez, California
Lemon GelatoTotal Time: 50 minutes + freezing
Main Ingredients: Milk, sugar, egg yolks, lemon, heavy whipping cream
Level: Intermediate
Dreamy lemon gelato is one of our most popular
ice cream recipes for a reason: The flavor and texture will transport you right to Italy. Serve with a sprig of mint and fresh berries.
"On a recent trip to Italy, I fell in love with gelato. My favorite choice was lemon because Italian lemons have an intense flavor. This recipe brings back memories of our vacation." —Recipe contributor Gail Wang, Troy, Michigan
Zesty Lemon GranitaTotal Time: 15 minutes + freezing
Main Ingredients: Sugar, lemon, thyme
Level: Beginner
You'll never want summer to end after tasting this pleasingly tart, icy granita, which is packed with fresh lemon juice. To mix up the flavor, use half lemon juice and half lime juice or grapefruit juice.
"A light dessert with a refreshing, icy texture, one taste tester dubbed this 'the most lemony thing I've ever eaten'!" —Recipe contributor Sonya Labbe, Santa Monica, California
Tangy Lemon Chiffon PieTotal Time: 1 hour, 5 minutes + cooling and chilling
Main Ingredients: Pie dough, sugar, lemon, eggs, heavy whipping cream
Level: Intermediate
This showstopping, airy lemon chiffon pie is pure joy.
Store-bought pie crust works perfectly for this dessert. You could also use a
simple graham cracker crust.
"This lemon chiffon pie is so easy to make, you can put it together in no time at all. And it's impressive enough to share with guests!" —Taste of Home
Test Kitchen
Lemon Chiffon Blueberry DessertTotal Time: 25 minutes + chilling
Main Ingredients: Graham crackers, blueberries, lemon gelatin, cream cheese, frozen whipped topping
Level: Intermediate
When the weather gets hot, we love no-bake treats, and this rich, creamy chiffon dessert is the perfect way to celebrate a leisurely summer day. To make it a
gluten-free dessert, swap in GF cookies when making the crumb crust. One
Taste of Home reader raved about a version with animal crackers.
"This cool and creamy no-bake dessert is perfect for hot summer days. I sometimes replace raspberries for half of the blueberries to make it look more patriotic." —Recipe contributor Jodie Cederquist, Muskegon, Michigan
Lemon SnowflakesTotal Time: 40 minutes
Main Ingredients: Lemon cake mix, whipped topping, eggs
Level: Beginner
Boxed lemon cake mix does it again! These fun, festive cookies don't take much effort. To play with the flavor profile, use any type of cake mix, such as vanilla or confetti.
"You'll need just four ingredients to make these delightful lemon snowflake cookies. Confectioners' sugar highlights the cracked tops to give them their snowflake appearance." —Recipe contributor Linda Barry, Dianna, Texas
Lemon Sour Cream Pound CakeTotal Time: 1 hour, 15 minutes + cooling
Main Ingredients: Butter, sugar, eggs, lemon, flour, sour cream
Level: Intermediate
We love to bake pound cakes in Bundt pans, which lend them an elegant shape and an even bake. Make sure to read our tips for
perfect Bundt cakes every time.
"Everyone raves about this pretty lemon sour cream pound cake—and it sure doesn't last long with my family. It also freezes beautifully, so why not make two and pop one into the freezer for another day?" —Recipe contributor Annettia Mounger, Kansas City, Missouri
Lemon BreadTotal Time: 50 minutes + cooling
Main Ingredients: Butter, sugar, eggs, lemon, flour, milk
Level: Beginner
Banana bread this, banana bread that…don't forget about lemon bread! The bright, lemony loaf tastes just as good for breakfast as it does for dessert.
"I often bake this sunshiny-sweet lemon bread when company's due. It has a loaf-like texture." —Recipe contributor Kathy Scott, Lingle, Wyoming
Lemon Blueberry BreadTotal Time: 1 hour, 15 minutes + cooling
Main Ingredients: Butter, sugar, lemon, eggs, flour, milk, blueberries
Level: Beginner
The lemon glaze looks pretty and keeps the bread incredibly moist and tender. Swap in raspberries for the blueberries or use orange juice instead of lemon and cranberries for the blueberries.
"Of all the quick breads we had growing up, this beautiful lemon blueberry bread is the best! The citrus glaze adds a lustrous finish and locks in moisture." —Recipe contributor Julianne Johnson, Grove City, Minnesota
Lemon Chess PieTotal Time: 50 minutes + chilling
Main Ingredients: Pie crust, eggs, sugar, lemon, butter
Level: Beginner
Use a refrigerated pie crust to cut down on prep time. The filling is so creamy and tart, no one will question the store-bought crust. And if you're on a chess pie kick, don't miss out on this
chocolate version.
"This bright and creamy lemon chess pie cuts beautifully and has a smooth texture. It's one of my favorites." —Recipe contributor Hannah LaRue Rider, East Point, Kentucky
Air-Fryer Lemon OreosTotal Time: 20 minutes
Main Ingredients: Buttermilk pancake mix, sugar, lemon yogurt, milk, egg, lemon creme Oreo cookies
Level: Beginner
As it turns out,
boxed pancake mix makes the ideal batter for air-fried lemon Oreos, which come out so fluffy and sweet. Serve warm and dusted with confectioners' sugar, and you'll be transported to the county fair.
"I love to get fried Oreos at the county fair every summer. Since this version cooks up quickly in the air fryer, I can enjoy my favorite summer treat all year round! Lemon zest and lemon yogurt add a burst of flavor to the batter, and a dusting of powdered sugar makes for a pretty presentation." —Recipe contributor Jennifer Gilbert, Brighton, Michigan
Lemon Dessert FAQ
What can I do with a lot of lemons?
To use up a full bag of lemons, choose a dessert that calls for a lot of lemon juice, like a tart or layer cake.
This citrus lasts almost a month when stored in the refrigerator, so you have plenty of time. If you're worried about wasting, whip up a few batches of
lemon curd. It lasts up to a year in the freezer.
What desserts can I make with lemon curd?
Upgrade homemade cakes, pies and cookies with lemon curd. You can even fill simple
meringue shells with curd and top them with fresh fruit. When you're not in the mood for baking, top vanilla ice cream with lemon curd and crushed vanilla cookies for a lemony sundae.
Can I use a metal pan for lemon desserts?
Because metal is reactive, we don't recommend using metal pans for lemon desserts—unless you line it with parchment. In fact, we have a whole guide on when to use
parchment vs. aluminum foil. If metal pans are all you have, that's fine, but you may notice a slight metallic taste in your sweets.