


We love to eat caramel apples this time of year. You can learn how to make caramel apples at home with just three ingredients.

How to Make Easy Caramel Apples, Step by Step

Updated May 09, 2022
Is there anything sweeter than a caramel apple in the fall? Crisp, crunchy apples covered in ooey-gooey caramel are like autumn on a stick. And while you can pick up premade caramel apples from a local grocery store or apple orchard, making homemade caramel apples is a fun and easy fall project.
Our Test Kitchen’s step-by-step guide shows you how to take three ingredients (plus all those delicious toppings) and make your own caramel apples that are perfect for snacking and entertaining all season long.
How to Make Caramel Apples
The following homemade caramel apples method uses store-bought caramels for a quick and easy approach to this classic fall treat. If you want to make them completely from scratch, use this caramel apple recipe to make your own caramel.
Ingredients
- 6 small Gala apples
- 6 wooden pop sticks
- 1 package (14 ounces) caramels, unwrapped
- 2 tablespoons milk
Directions
Step 1: Prepare the apples
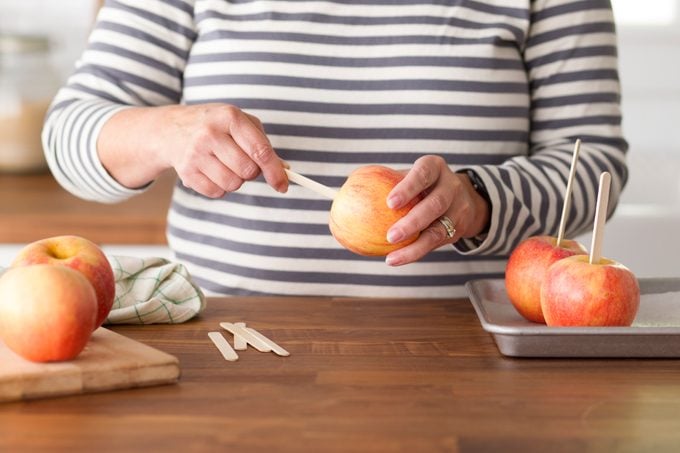
Start by thoroughly washing the apples and removing the stems. Store-bought produce often has a waxy coating to keep it fresh, so be sure to rub your apples with a dishcloth until that finish is gone—they should look natural and dull. Once they’re clean, dry the apples and insert a pop stick into the top of each.
Line a baking sheet with greased parchment paper. (Greasing the paper is important so the caramel won’t stick later.)
Step 2: Melt the caramel
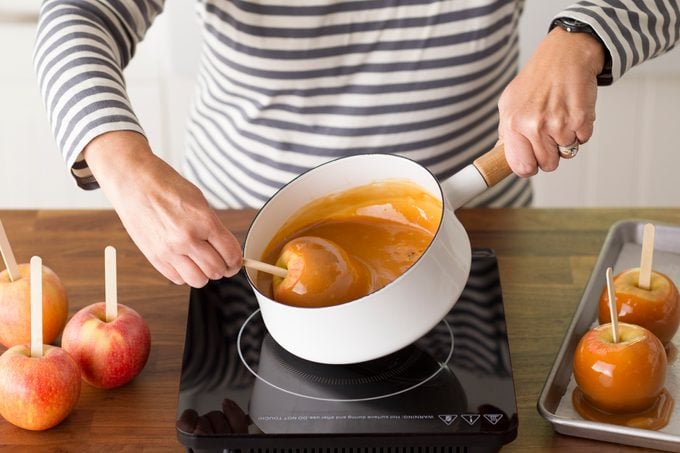
Next, prepare the caramels for all that sticky goodness. Unwrap the candies (this is a great cooking task for kids) and heat the caramels in a saucepan with the milk over medium-low heat, stirring frequently. It should take 3 to 5 minutes for the mix to be nice and smooth.
Step 3: Dip the apples in the caramel
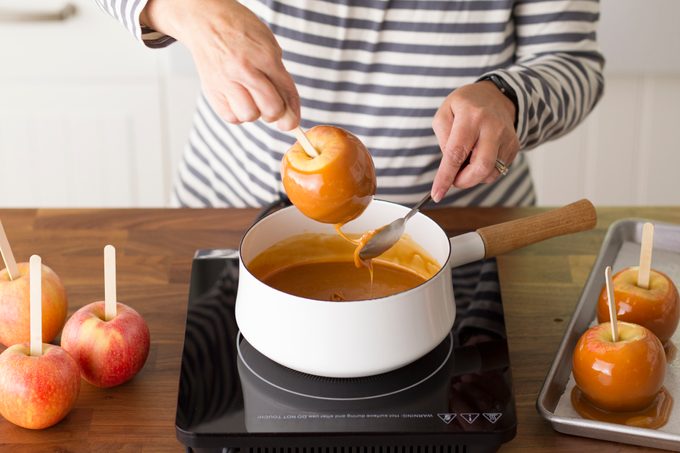
Once the caramel is smooth, remove it from the heat and prepare for dipping. To fully coat the apple in sticky caramel goodness, tip the saucepan a bit and rotate the apple until the surface is completely covered. Allow the excess caramel to drip off before you place it upright onto the parchment-lined pan.
Test Kitchen tip: If you find that the caramel runs off the apples, don’t worry! The caramel might just be a touch too warm. Wait a minute and give it another dip.
Caramel Apple Variations
Here’s how to put your own spin on your homemade treats—but first, get inspired by these fun caramel apples!
- Pick your own apple variety. Though our recipe calls for Gala apples (we love their sweet flavor!), feel free to use whatever apple you prefer for eating. Granny Smiths are a traditional option if you prefer more tartness and a good crunch.
- Try fun toppings. After dipping and while the caramel is still sticky, roll the apples in your favorite toppings, such as:
- Chopped nuts
- Sprinkles
- M&M’s minis
- Crushed Oreos
- Reese’s Pieces
- Crushed graham crackers
- Add the finishing touches. For a final flourish, drizzle with melted milk, dark or white chocolate. If you like salty with your sweet, add a pinch of sea salt as the caramel is about to set.
How to Store Caramel Apples
If you’re looking to gobble up these sweet treats right away, let the apples stand until the caramel is set, about 10 minutes. Or, you can refrigerate them for a week or so—just be sure to take them out of the fridge 10 to 15 minutes prior to eating so the caramel can soften a bit. However, avoid leaving homemade caramel apples out on the counter overnight. (Here’s how to store leftover caramel.)
If you want to wrap the caramel apples to give them as gifts, let the caramel set in the fridge for at least 10 minutes before wrapping. (Try these other food gift ideas, too!)
Caramel Apple Tips
How do you get the caramel to stay on the apples?
There are a few reasons why the caramel could be sliding off the apples:
- The caramel is too hot. If the caramel runs right off as you’re dipping them, try letting the caramel cool for a minute or so. Using chilled apples also helps the caramel stick better.
- The apples are too waxy. Before you begin dipping, rub the apples with a dishcloth to remove the waxy coating.
- The caramel didn’t set. Don’t forget to set the caramel by placing your dipped apples in the refrigerator for at least 10 minutes before eating or wrapping.
Can you make the caramel ahead of time?
Caramel can be fussy (as evidenced by these common caramel mistakes), so you’re better off making the caramel right before you’re ready to dip the apples.
However, if you make the caramel and it gets too cool and thick while you’re dipping, warm the caramel over low heat in order to regain a smooth, dip-able consistency. (For more tips, our guide on how to make caramel can help.)
Caramel Apple-Inspired Recipes

Caramel Apple Rice Krispies TreatsOoey, gooey caramel meets your favorite crisped rice treat in this caramel apple Rice Krispies Treat recipe. —Taste of Home Test Kitchen

Caramel Apple FloatWho doesn't love the flavors of caramel, apples, and vanilla ice cream together? If I'm feeling fancy, I drizzle caramel syrup around the inside of my glass before adding the apple cider and ginger ale. —Cindy Reams, Philipsburg, Pennsylvania


Apple SconesFlakey, moist and brimming with fall flavor, these apple scones are the ideal breakfast treat for a chilly autumn morning. Serve with a caramel drizzle over the top as the recipe calls for, or make them your own with a cinnamon-sugar sprinkle that complements the apples baked inside.

Caramel AppleOur caramel apple recipe is an out-of-this-world classic and includes how to make homemade caramel.

Caramel Apple StrudelMy father, who was born and raised in Vienna, Austria, would tell us stories about how his mother covered all the kitchen counters with dough whenever she made apple strudel. This recipe is a modern, delicious way to carry on part of my family's heritage. —Sarah Haengel, Bowie, Maryland


Caramel-Apple Shortbread CookiesThere is nothing like seeing my friends almost melt to the floor when they bite into something I made. These cookies never fail to elicit oohs and aahs. —Amber Taylor, Lenoir City, Tennessee

Oatmeal Cookie BarsThese bars make an excellent fall dessert. We like to warm individual servings in the microwave and serve with a scoop of vanilla ice cream. It quickly became a family favorite; maybe it'll become one of your family's, too. —Carol Stuber, Osawatomie, Kansas

Caramel Apple CupcakesBring these extra special cupcakes to your next event and watch how quickly they disappear! With a caramel topping and spice cake base, they're the perfect mix of two fall-favorite treats. —Diane Halferty, Corpus Christi, Texas

Oatmeal Caramel Apple CookiesHomemade caramel apple cookies are a fall favorite. They combine the rich flavors of caramel, brown sugar, oats and fresh apples. Easy to make and perfect for the season, these cookies offer a delightful taste of autumn with every bite.

Apple CrostataThis apple crostata recipe has firm apple slices covered with cinnamon sugar and a drizzle of caramel topping, resting in a simple dough circle. This is a terrific dessert to make when you don't want to bother with shaping and blind-baking a pie crust.

Caramel Apple Coffee Cake with WalnutsI created this recipe after a trip to an orchard with my family. This moist cake is full of hearty apples and nuts, while the caramel topping adds a delectable finish. —Sharon Cable, Dyersville, Iowa.

Easy Mini Caramel Apple CheesecakesCheesecake is the ultimate comfort food, but a big slice can be too rich. These bite-sized cheesecakes topped with apples and creamy caramel dazzle the senses. —Brandie Cranshaw, Rapid City, South Dakota

Apple Crisp PizzaWhile visiting the bakery at a Wisconsin apple orchard, I tried this tempting treat. At home, I put together this recipe. As it bakes, the enticing aroma fills my kitchen, and friends and family linger waiting for a sample. —Nancy Preussner, Delhi, Iowa

Caramel Apple MuffinsThese muffins are perfect for anyone who loves caramel apples. They are particularly good with breakfast or during a coffee break. —Therese Puckett, Shreveport, Louisiana

Apple Pie BitesThese apple pie bites are fun for kids to make. Simply wrap strips of pastry around apple wedges and shake on some cinnamon-sugar. Then just bake and watch them disappear! —Taste of Home Test Kitchen

Gourmet Caramel ApplesThese drizzled confections look gorgeous and taste over-the-top yummy. With peanut butter flavor and a salty burst, they'll be the treats you can't wait to make each year. —Taste of Home Test Kitchen

Chunky Apple CakeAfter taste testing lots of apple cakes, I've found this apple cake recipe the best. Full of old-world comfort, the yummy brown sugar sauce really makes the cake special. For a festive occasion, top with a dollop of whipped cream. —Debi Benson, Bakersfield, California

Caramel Apple BitesKids can help make these perfect fall bites by dipping the baked cookies in caramel and nuts. It's a fun food craft for all of us. —Darlene Brenden, Salem, Oregon

Spiced Apple Cake with Caramel IcingEasy to prepare and popular with my friends and family, this apple cake is one of my all-time favorite autumn recipes. A slice of this soft treat is delicious with a hot cup of coffee or tea. —Monica Burns, Fort Worth, Texas


Apple Caramel Cheesecake BarsThese apple caramel cheesecake bars are perfect for autumn desserts, although they're delicious at any time of the year. The bars are easy to make ahead of time and the streusel and caramel toppings will have you coming back for more bites.


Fluffy Caramel Apple DipThis sweet, smooth and fluffy dip is really a crowd-pleaser. Be careful—it's so good that you won't want to stop eating it! —Taste of Home Test Kitchen

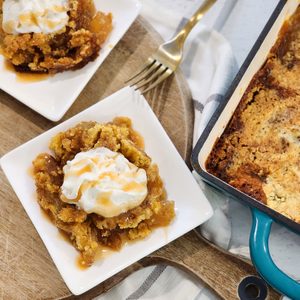
Contest-Winning Caramel Apple CrispWhen my kids and I make apple crisp, we use all sorts of apples to boost the flavor and texture. Add melted caramels, and you’ve got something scrumptious. —Michelle Brooks, Clarkston, Michigan


Teddy Nykiel, Taste of Home Associate Digital Editor, contributed to this article.
Originally Published: October 26, 2020