 Photo: Taste of Home
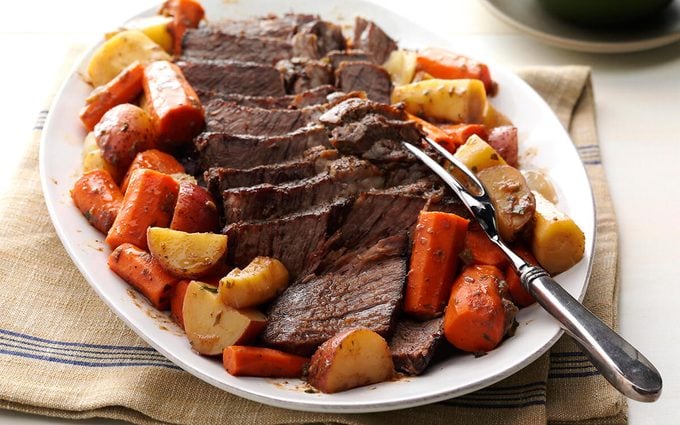
There’s nothing quite as comforting as a pot roast on a cold winter’s day. It’s hard to say exactly what makes it so perfect—is it how that tough meat becomes so juicy and tender as it roasts? Is it the sweetness of the root vegetables? Is it the savory gravy created from the cooking liquid? For me, it’s the culmination of all of the ingredients in this simple one-pot dish, caramelizing together to create a melt-in-your-mouth experience.
Don’t miss more one-pot wonders, here.
It may be hard to believe that a tough chuck roast can break down to be so tender, but we have a fool-proof cooking method that transforms this cut into a fork-friendly meal. Follow along as our Test Kitchen experts share the pro tips and secrets to make a juicy, tender pot roast every time.
How to Make Pot Roast
You’ll need:
1 boneless beef chuck-eye or other chuck roast (3 to 4 pounds)
Test Kitchen tip: There are many varieties of beef roast, but we think the chuck-eye cut is best for this dish. It’s tender, flavorful and ideal for a long braise. Can’t find chuck-eye? A standard chuck roast will do just fine.
2 teaspoons pepper
2 teaspoons salt, divided
2 tablespoons canola oil
2 medium onions, cut into 1-inch pieces
2 celery ribs, chopped
3 garlic cloves, minced
1 tablespoon tomato paste
1 tablespoon minced fresh thyme (or 1 teaspoon dried thyme)
2 bay leaves
1 cup dry red wine or reduced-sodium beef broth
2 cups reduced-sodium beef broth
1 pound small red potatoes, quartered
4 medium parsnips, peeled and cut into 2-inch pieces
6 medium carrots, cut into 2-in. pieces
1 tablespoon red wine vinegar
2 tablespoons minced fresh parsley
Tools
Large Dutch oven
Kitchen twine
Step 1: Preheat the oven and prep the roast
This roast gets its tender texture from low-and-slow braising. Preheat the oven to 325º, which is a low enough temperature to allow the roast’s tough muscle fibers to relax and become tender as they cook.
To prepare the roast, remove it from the package and pat it dry with a paper towel. This extra step helps you get the best browning when searing, which also adds a layer of flavor to the dish.
Step 2: Truss it up
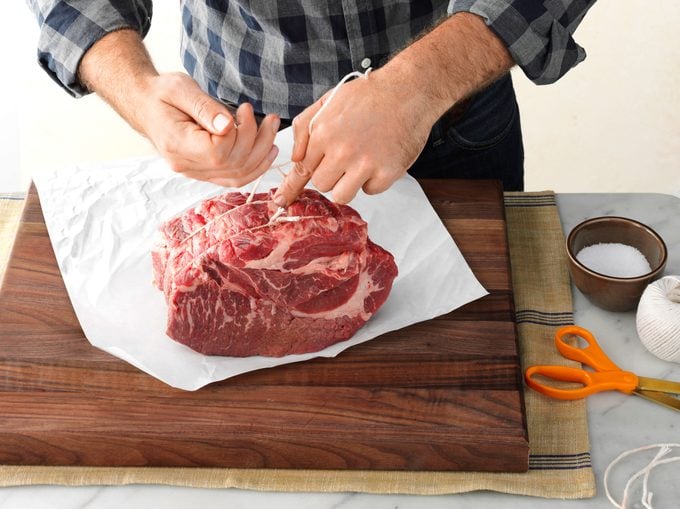 Photo: Taste of Home
Trussing a roast is an important step because it gives the meat a uniform shape, helping it cook more evenly. If you’ve never trussed meat before, this is a great place to start. A roast is the easiest cut of meat to tie.
Truss the roast by cutting 12 inches or so of kitchen twine. Wrap the string around the roast, about two inches in from the end. Tie a knot at the top and cut the string. Continue to truss at two-inch intervals until the entire roast is tied. Next, season the roast with the pepper and one teaspoon of the salt.
Need more practice? Here’s how to truss a chicken without tying yourself into knots.
Step 3. Give it a nice sear
 Photo: Taste of Home
While it is rumored that searing meat seals in the juices, this is actually a common kitchen myth. The real reason to sear the meat is to build a layer of caramelization. That’s the stuff that adds a deep depth of flavor for the roast and also creates a fond (the French word for “base”). These roasty bits found at the bottom of your pan are the beginning of any great gravy. (Psst! Our from-scratch gravy recipe is an instant hit.)
In a large Dutch oven, heat the oil over medium-high heat. Once the oil is shimmering, brown the roast on all sides. Remove the roast from the pan and add the onions, celery and remaining salt. Cook, stirring to free up all those browned bits, until the onions have softened, 8-10 minutes.
Once the onions are lightly browned, add the garlic, tomato paste, thyme, and bay leaves. Cook for 1 minute, then take a whiff. Is the pot mouthwateringly fragrant? Good. That’s when you’ll know it’s ready.
Step 4. Deglaze the pan
Deglazing the pan is the best way to create a rich, complex, flavorful sauce. When the cold liquid hits the hot pan, it releases any built-up fond from the bottom.
Add the wine, stirring to loosen any remaining browned bits from the pan. Once the wine has reduced by half and the smell of alcohol has dissipated, add the broth.
Test Kitchen tip: If you don’t like cooking with wine, you can use broth for both steps.
Step 5. Cook until tender
At this point, you should have a rich and flavorful sauce, which will act as a sauna for your roast. Cooked low and slow, the muscle fibers in the tough chuck roast will relax and become tender.
Return the roast to the pan and arrange the potatoes, parsnips and carrots around the meat. Bring the mixture to a boil on the stovetop before transferring it to the oven. Bake, covered, for 2 to 2-1/2 hours, until the meat is fork-tender.
Test Kitchen tip: You can use an instant-read thermometer on the roast if you like, but the best way to know if it’s done is to pierce it with a fork. If the fork goes in easily and twists without resistance, you’re good to go!
Step 6. Finish the sauce
While the roast cooks, its rich, beefy flavor will seep into the cooking liquid. Who needs to create an extra sauce when reducing the cooking liquid makes the perfect gravy?
Remove the roast to a cutting board with a well and remove the potatoes, carrots and parsnips to an ovenproof platter. Place the platter in a 200º oven to keep the vegetables warm.
Discard the bay leaves and skim any excess fat from the cooking liquid. Bring the mixture to a boil and cook for 10 to 12 minutes, until the liquid has reduced by half. Stir in the vinegar and parsley and place the sauce in a serving dish such as a gravy boat.
Test Kitchen tip: Adding a splash of red wine vinegar gives a beautiful brightness to the sauce. This little bit of acidity really perks things up, so don’t skip this step!
 Taste of Home
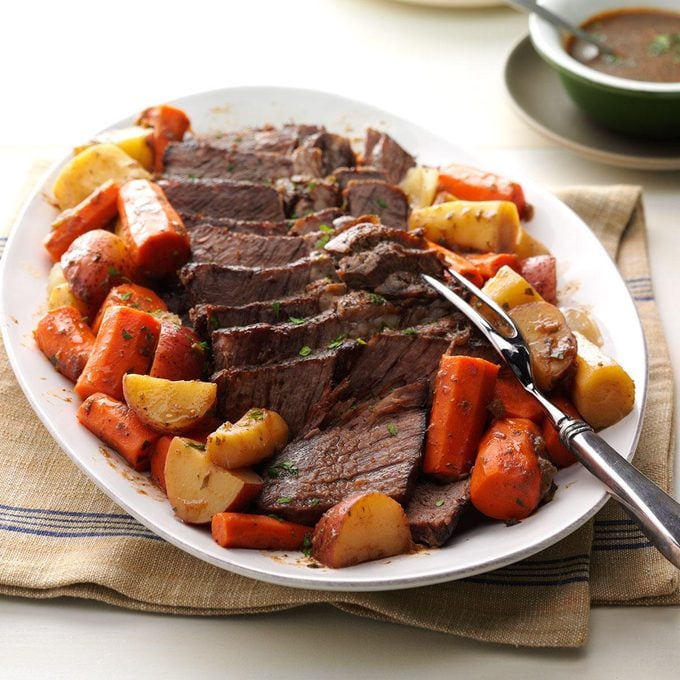
Step 7. Slice and serve!
It’s important to let the roast rest for at least 15 minutes—this is the key to keeping the juices inside the meat instead of letting them spill out onto the cutting board. Don’t worry about the roast cooling down, there’s plenty of residual heat to keep it warm enough.
Once the roast is rested, remove the string with a paring knife or kitchen shears. Slice the meat across the grain into 1/2-inch pieces. Place the sliced beef in the middle of a platter and surround it with the roasted vegetables. Dress the roast with the gravy or serve it on the side.
If there’s such a thing as leftover roast (this almost never exists in my house), it makes some pretty amazing next-day meals. The leftovers are incredible diced and used as a substitute for corned beef in a breakfast hash. Or, shred it and stuff it into beef enchiladas for dinner. Get creative—and let us know how you use this tender and flavorful pot roast in your favorite beef dishes.
Try More Cozy Recipes
Ravin' Good StewThis stew is loaded with ingredients. It's sure to fill up the kids before they head out trick-or-treating, and the family enjoys it all season long! —Shirley Smith, Yorba Linda, California
Turkey Biscuit StewThis chunky stew makes a hearty supper, especially in the fall and winter. It'salso a great way to use extra turkey during the holidays. —Lori Schlecht, Wimbledon, North Dakota
Taco StewThe ingredients are simple, but together they make this awesome stew. If you want to a little added crunch, crush a few tortilla chips on top of each bowl. —Suzanne Francis, Marysville, Washington
Braised Pork StewPork tenderloin becomes amazingly tender in this braised stew. It's a fantastic meal for a cold winter night. —Nella Parker, Hersey, Michigan
Wintertime Braised Beef StewThis easy beef stew is incredibly rich. Since it's even better a day or two later, you may want to make a double batch. —Michaela Rosenthal, Woodland Hills, California
Spicy Pork Chili VerdeMy pork chili is brimming with poblano and sweet red peppers for a hearty kick. Serve it with sour cream, Monterey Jack and tortilla chips. —Anthony Bolton, Bellevue, Nebraska
Creamy Bratwurst StewA rich sauce coats this hearty combination of potatoes, carrots and bratwurst chunks. I adapted a baked stew recipe that appeared in a newspaper. This is so comforting on cold winter evenings. —Susan Holmes, Germantown, Wisconsin
Don't forget to take a look at our collection of the best
stew recipes.
Texas StewI love to experiment with many different types of recipes. But as a mother of young children, I rely on family-friendly ones more and more. Everyone enjoys this stew. —Kim Balstad, Lewisville, Texas
Stovetop GoulashI created this recipe after trying goulash at a local restaurant. The blend of spices gives it fabulous flavor, and it’s so easy to make on a weeknight! —Karen Schelert, Portland, Oregon
Great Northern Bean StewThis thick and hearty stew with great northern beans is sure to chase the winter chills away. —Mildred Sherrer, Fort Worth, Texas
Creamy Chicken & Broccoli StewShh! Don’t tell anyone! This recipe is so simple, but you’d never know it. My husband, who normally doesn’t like chicken, asks for this dish regularly. —Mary Watkins, Little Elm, Texas
Beef & Mushroom Braised StewEvery spring, my family heads out to our timber acreage to collect morel mushrooms, and then we cook up this stew. We use morels, of course, but baby portobellos or button mushrooms or will work, too. —Amy Wertheim, Atlanta, Illinois
Okra and Butter Bean StewThis stew is adapted from my mom's down-home Louisiana recipe, and it turns okra-haters into okra-lovers. Guaranteed. —Kaya Mack, Wichita Falls, Texas
Slow-Cooked Hearty JambalayaI love anything with Cajun spices, so I came up with this slow-cooker jambalaya that’s just as good as that served in restaurants. If you can’t find Andouille sausage, hot links, smoked sausage or chorizo will also work. I like to serve it with warm cornbread and garnished with sliced green onions. —Jennifer Fulk, Moreno Valley, California
Spiced Lamb Stew with ApricotsMy family loves lamb, especially my son. During his first year of college, he claimed to be a vegetarian. When he came home, I had a pot of this slow-cooked lamb stew simmering on the counter. At dinnertime, my husband and I found only a few shreds of meat left floating in the gravy. My son confessed that he was the culprit! —Arlene Erlbach, Morton Grove, Illinois
Spicy Seafood StewThe hardest part of this quick and easy recipe is peeling and dicing the potatoes—and you can even do that the night before. Just place the potatoes in water and store them in the refrigerator overnight to speed up assembly the next day. —Bonnie Marlow, Ottoville, Ohio
Cassoulet for TodayFrench cassoulet is traditionally cooked for hours. This version of the rustic dish offers the same homey taste in less time. It’s easy on the wallet too. —Virginia Anthony, Jacksonville, Florida
Italian Beef Barley StewWith potatoes, carrots, roast beef and barley, this soup is a hearty meal-in-a-bowl. —Jacqueline Kloess, Iowa City, Iowa
Spicy Lentil & Chickpea StewThis recipe came to me from a friend who had worked at a health food store. I changed a few things until I found a version that my family loved. My son doesn't like things too spicy, so I make the stew milder for him and add a sprinkle of extra spice in mine. My husband, who farms, works outdoors for long hours at a time and finds this soup hearty enough to keep him satisfied. —Melanie MacFarlane, Bedeque, Prince Edward Island
Hearty Hunter's StewMoist, tender meat and thick, rich gravy are the hallmarks of my classic recipe simmered in a cast-iron pot. —Joyce Worsech, Catawba, Wisconsin
Thai Coconut BeefMy husband and I love Thai food, but going out on weeknights can be challenging with busy schedules. I wanted to create a Thai-inspired dinner that could double as an easy lunch the following day. The beef is fantastic in this dish, but chicken or pork would be equally delicious! —Ashley Lecker, Green Bay, Wisconsin
Carolina Crab BoilThis pot is a fun way to feed a crowd for a tailgate. You can serve it two ways: Drain the cooking liquid and pour out the pot on a paper-lined table so folks can dig in, or serve it as a stew in its liquid over hot rice. —Melissa Pelkey Hass, Waleska, Georgia
Sausage Pasta StewIf you like chili, you'll enjoy my slow-cooker specialty packed with turkey sausage, pasta and vegetables. My family gobbles it up! It's not only tasty, but loaded with protein and low in fat. —Sarah Bowen of Upland, California
Curry Chicken StewMy Grandma Inky grew up in India and passed down this recipe to my mother, who then passed it down to me. The recipe brings back fond memories of the family gathered around the table, enjoying this delicious meal and catching up on one another's day. I tweaked the ingredients a bit to fit my toddler's taste buds, but it's just as scrumptious as Grandma's own. —Teresa Flowers, Sacramento, California
Slow-Cooker Burgundy BeefWhen my adult children are coming over for dinner, this is the request. All three of them, and their significant others, love this dish. Yum! — Urilla Cheverie, Alfred, Maine
Turkey Dumpling StewMy mom made this stew when I was young, and it was always a hit. Since it's not time-consuming to make I can fix it on a weekend for our children, who love the tender dumplings. —Becky Mohr, Appleton, Wisconsin
Mexican Pork & Pinto BeansWe've lived in Arizona for decades, so Mexican-style cooking has become the same as "Arizona-style cooking" for us. Nothing tastes better than chili-spiced pork with tortillas. —Anne Fatout, Phoenix, Arizona
Slow-Cooked Meatball StewI came up with this hearty meal-in-one as another way to use frozen meatballs. It's quick to put together in the morning and ready when my husband gets home in the evening. —Iris Schultz, Miamisburg, Ohio
Caribbean Chicken StewI lived with a family from the West Indies for a while and enjoyed watching them cook. I lightened up this Caribbean chicken stew by leaving out the oil and sugar, removing the skin from the chicken and using chicken sausage. It's just as good. —Joanne Iovino, Kings Park, New York
Slow-Cooked Spicy GoulashGround cumin, chili powder and a can of Mexican diced tomatoes jazz up this goulash recipe. Even the macaroni is prepared in the slow cooker. —Melissa Polk, West Lafayette, Indiana
Satay-Style Pork StewThai cuisine features flavors that are hot and sour, salty and sweet. This one-dish pork satay balances all of them using ginger and red pepper flakes, rice vinegar, garlic, lime juice and creamy peanut butter. —Nicole Werner, Ann Arbor, Michigan
Spicy Beef Vegetable StewThis zesty ground beef and vegetable soup is flavorful and fast to fix. It makes a complete meal when served with warm cornbread, sourdough bread or French bread if you enjoy a supper with a side. —Lynnette Davis, Tullahoma, Tennessee
Casablanca Chutney ChickenIf you enjoy Indian food, you'll love this dish. An array of spices and dried fruit slow cook with boneless chicken thighs for an aromatic and satisfying meal. To make it complete, serve over Jasmine or Basmati rice. —Roxanne Chan, Albany, California
Pork Chile VerdePork slowly stews with jalapenos, onion, green enchilada sauce and spices in this flavor-packed Mexican dish. It's wonderful on its own or stuffed in a warm tortilla with sour cream, grated cheese or olives on the side. —Kimberly Burke, Chico, California
Quick Chicken and DumplingsUsing precooked chicken and ready-made biscuits, this hearty dish is comfort food made simple. It's the perfect way to warm up on chilly nights. —Lakeya Astwood, Schenectady, New York
Southwestern Chicken & Lima Bean StewI love to have my daughter, son-in-law and grandchildren over for this supper. They make me so happy with their compliments or just by going to fill up their bowls again. It's a good-for-you hit. —Pam Corder, Monroe, Louisiana
Southwestern Pork and Squash SoupI adapted a pork and squash stew recipe using tomatoes and southwestern-style seasonings. My husband and sons loved it, and the leftovers were even better the next day! Try it with fresh corn muffins. —Molly Newman, Portland, Oregon
Home-Style StewMy husband and I both work full time and we have three daughters, so good, quick meals are important. This stew works wonders. It always tastes great and is a regular menu item for us. —Marie Shanks, Terre Haute, Indiana
Squash & Chicken StewWe created a satisfying stew that’s nutritious, loaded with flavor and family-friendly. Slowly simmer chicken thighs with stewed tomatoes, butternut squash, green peppers and onion for meal-in-one convenience. —Taste of Home Test Kitchen
Slow Cooker Beef Vegetable StewCome home to warm comfort food! This vegetable beef stew is based on my mom’s wonderful recipe, but I adjusted it for the slow cooker. Add a sprinkle of Parmesan to each bowl for a nice finishing touch. —Marcella West, Washburn, Illinois
West African Chicken StewI really love African flavors, but you don't really encounter them much in the U.S. Here the combination of native African ingredients, all of which can be found in the States, transports you to a new culinary place. —Michael Cohen, Los Angeles, California


