If you’ve ever moved to Denver, Santa Fe or another city with a high altitude, the first cake you made in your new home probably didn’t turn out so well. But take heart: Most likely, it was not your fault. You can blame it on the high elevation. But don’t worry—there’s a solution! We’ll explain what’s happening in the first place and how you can overcome the challenges of high elevation baking.
Why your cakes fall flat
Baking at a higher elevation—at least 3,000 ft. above sea level—causes different chemical reactions than baking at sea level, resulting in cakes that wind up pancake-flat. While you may not think of bakers as scientists, there is actually a lot of science behind the art of baking. The ingredients react a certain way under certain conditions, and if conditions or something else change, the reactions change, and you end up with a different result.
In this case, atmospheric pressure is the wild card. There’s less of it at higher elevations because the air is thinner. This causes water to boil at a lower temperature and evaporation to occur faster. The gases from leavening agents that cause dough to rise (baking powder, baking soda and.yeast, to name a few) end up expanding too quickly, making cakes rise too early and then fall, like the one below did.
Psst: Ever wonder the difference between baking powder and baking soda? Here it is.
 Photo: Shutterstock/Corinna Haselmayer
How to avoid it
It’s absolutely possible to bake the best-ever chocolate cake in Colorado Springs, Flagstaff or Reno. All you have to do is make a few adjustments in oven temperature, baking time and ingredient amounts. But here’s the key: Every city, home and kitchen is different, so what works for your neighbor may not work for you.
First, make the recipe as written to see which specific issues you run into. Then, make the recipe again using the smaller adjustment when given a range, because that’s all it might take to keep your cakes from falling flat. Keep baking until you get it right, making sure to take notes along the way so you remember how to do it right the next time.
Adjustment #1: Oven temperature
You’ll likely need to increase the oven temperature when baking at a higher elevation. This helps to set the structure of the cake before the cells expand too quickly. An increase of 15-25 degrees should do the trick. Don’t forget to preheat your oven fully, and use the middle rack to ensure even heating. And for added measure, use an auxiliary thermometer to double-check the actual temperature of your oven.
Adjustment #2: Baking time
If you increase the oven temperature, then you’ll also need to decrease the baking time. This one is self-explanatory. Since the temperature is higher, the cake doesn’t need to bake as long. Decreasing the bake time by 5 minutes is a good place to start.
Adjustment #3: Ingredients
Each ingredient plays an important role in the baking process, so small adjustments are needed to ensure a perfect, made-from-scratch cake in the mountains.
- Liquids: You will need to increase the liquids to prevent your cake from drying out. Since liquids evaporate faster in high altitudes, adding more liquid will keep your cake moist. Sometimes, it’s as simple as adding an extra egg—or using an extra-large egg instead of a large egg. (Speaking of eggs, ever wonder what the numbers on your egg carton mean?)
- Flour: You may need to slightly increase the amount of flour when baking at high elevation, especially for angel food or sponge cakes. Rapid expansion of those air cells can make the cake coarser even if it doesn’t make it fall, and you may need more flour to reach the same consistency. You won’t need much; just 1 extra tablespoon at 3,500 feet, and then one more tablespoon for every additional 1,500 feet. This tip is tricky, though. Sometimes you need to decrease the flour by about the same amount, because it can be drier at high elevations and the batter will absorb more liquid. Experiment!
- Sugar: You’ll also need to decrease the amount of sugar called for in a recipe. Faster evaporation causes an increase in sugar concentration, which weakens a cake’s structure. Decreasing the sugar by about 1 tablespoon per cup will ensure the cake’s structure is strong enough.
- Baking powder: Decrease the baking powder, which is a leavening agent. Since leavening gases expand more quickly at higher elevations, you don’t need as much of the agent. Reduce each teaspoon by 1/8 teaspoon at 3,000 feet and by 1/4 teaspoon at 7,000 feet.
- Egg whites: At a high elevation, you only need to beat egg whites until soft peaks form. Stiff peaks don’t work because the air they contain expands too quickly and makes your cake collapse. Hey, less work for you! And here’s a refresher on how to separate an egg.
Follow these guidelines, and you’re sure to master high elevation baking. Just remember: Practice makes perfect!
Get Inspired by These Classic Cakes
 Taste of Home
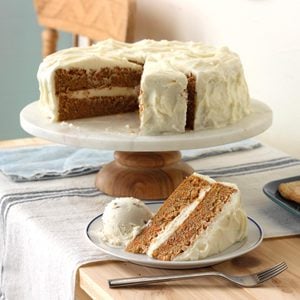
A pleasingly moist cake, this treat is the one I requested that my mom make each year for my birthday. It's dotted with sweet carrots and a hint of cinnamon. The fluffy buttery frosting is scrumptious with chopped walnuts stirred in. One piece of this carrot cake with cream cheese frosting is never enough—it's better than all the other carrot cakes I've tried! —Kim Orr, West Grove, Pennsylvania
Go to Recipe
Psst! These are the secret ingredients Grandma used to make her cake taste so great.
Honey Berry Sheet CakeI adapted a traditional honey cake recipe for this dessert. I wanted something that would show off all our amazing local honey as well as tasty summer berries. This also works perfectly as a
Fourth of July cake, with the blueberries in the top corner and the raspberries in stripes—you wouldn't need as many blueberries, but you would need more raspberries. —Elisabeth Larsen, Pleasant Grove, Utah
Pecan Pound CakeThis pecan pound cake always turns out great. It's wonderful with a steaming cup of coffee on a chilly winter day. —Fleta West, Hayes, Virginia
Icebox CakeYou don't have to bake to serve a wonderful dessert! This icebox cake is made from chocolate wafers and whipping cream. It is so delicious.—Cindy Hawkins, New York, New York. If you're looking for more recipes, then you must try these
vintage chocolate desserts.
Glazed Lemon Chiffon CakeThis fluffy cake is a real treat drizzled with the sweet-tart lemon glaze. —Rebecca Baird, Salt Lake City, Utah
Italian Cream Cheese CakeButtermilk makes every bite of this awesome Italian cream cheese cake recipe moist and flavorful. I rely on this recipe year-round. —Joyce Lutz, Centerview, Missouri
Classic Pineapple Upside-Down CakeThis pineapple upside-down cake is a classic recipe that never goes out of style! It’s delicious with the traditional pineapple, but try it with peaches or a combination of cranberries and orange. —Bernardine Melton, Paola, Kansas. Love upside-down cakes? Be sure to check our favorite
cranberry duff.
Hummingbird CakeHummingbird cake is a scrumptious tropical cake made of layers of spices, bananas, pineapple and nuts. This one is a classic for a reason!
Spiced Devil's Food CakeOne of my mom's friends gave her this recipe when I was a child, and it has been a family favorite ever since. When your chocolate sweet tooth acts up, this really hits the spot! —Linda Yeamans, Ashland, Oregon
Oklahoma Coconut Poke CakeCoconut is the star of this cake. You get a double dose, once with the mixture that soaks into the cake and second with the coconut sprinkled on top. Don't worry though, it's a nice flavor treat—not too much coconut. —
Taste of Home Test Kitchen
7UP Pound CakeThis classic 7UP cake recipe uses the carbonated beverage to bake a tall pound cake with hints of lemon and lime. We also use the soda in the glaze to really drive home its iconic flavor.
Moist Lazy Daisy CakeWe always called this Mama's never-fail recipe. I guess the same holds true for me since I've won contests with this lazy daisy cake. The tasty dessert always brings back fond memories of Mama. —Carrie Bartlett, Gallatin, Tennessee
Southern Lane CakeWhat’s the most sumptuous, indulgent cake you can bake for your guests? The answer is probably Lane Cake, a Southern classic with a rich history and even richer filling. This Lane Cake recipe takes some planning and patience, but it’s all worth it in the end.
Lingonberry-Cardamom CakeOur family is Scandinavian, and we love using almonds, cardamom and lingonberries in desserts, as in this cardamom cake. If lingonberry jam is difficult to obtain, you can use pureed cranberry sauce with a little lemon juice to get a similar sweet-tart flavor. Whipped cream is a perfect topping for this Scandinavian-inspired dessert. —Barbara Kvale, Cologne, Minnesota
Gran's Apple CakeMy grandmother occasionally brought over this wonderful cake warm from the oven. The spicy apple flavor combined with the sweet cream cheese frosting made this recipe one that we treasured. Even though I've lightened it up, it's still a family favorite. —Lauris Conrad, Turlock, California
Gooey Butter CakeA friend gave me a quick version of this
gooey butter cake recipe using a cake mix, but I prefer baking from scratch, so I came up with my own. My family can't get enough! The middle will sink a little; this is normal. This dessert is delicious served warm or cold. —Cheri Foster, Vail, Arizona
Red Velvet CakeOur red velvet cake recipe is traditionally southern with light, tender, ruby-red cakes held together with a rich vanilla frosting.
Traditional Sponge CakeThis light sponge cake makes a fitting finale to any meal.—Arlene Murphy, Beverly Hills, Florida
Grandma's Tandy KakeMy grandmother made this for all our family gatherings. Everyone loves it now I make it for every party we attend or host. —John Morgan III, Lebanon, Pennsylvania
Walnut Blitz TorteThis pretty torte is very popular at family gatherings. The cake layers are baked with the frosting—crunchy, sweet meringue—already in place, and then assembled with a layer of luscious custard in the center. Whenever I make it, everyone always asks me for the recipe. —Suzan Stacey, Parsonsfield, ME
Banana Cake with Cream Cheese FrostingAs a mother of three sons, sweets are a staple in my kitchen! I buy ripe fruit on sale and freeze it to make this cake. My banana cake with cream cheese frosting is a favorite among loved ones at my family picnics and dinners. —Bonnie Krause, Irvona, Pennsylvania
German Apple CakeWith the long, cold winters we have here, this German apple cake recipe has warmed many a kitchen. The cake is perfect for breakfast, dessert or an evening snack. I've often made it for parties, and I've always received compliments on it. —Grace Reynolds, Bethlehem, Pennsylvania
Tres Leches CakeExperience the ultimate in creamy, dreamy desserts with this easy-to-make tres leches cake, soaked in a trio of milks and finished with a cloud of whipped cream.
Layered Yellow Cake with Chocolate ButtercreamThis yellow cake will become your go-to recipe for birthdays, but the tender cake with flavorful chocolate buttercream is truly perfect for any occasion. —
Taste of Home Test Kitchen, Milwaukee, Wisconsin
Apple Brandy Pecan CakeMy favorite apple cake is made with a shot of brandy and drizzled with caramel to set off the wonderful flavors. If alcohol is a no-go, use orange juice instead of apple brandy. If you'd rather follow a chocolate route, add mini chocolate chips to the cake and use chocolate ice cream topping for the drizzle. —Nancy Heishman, Las Vegas, Nevada
Angel Food CakeThis top-rated angel food cake recipe is a light and airy dessert everyone loves. It's heavenly served with berries or other fresh fruit and a dollop of homemade whipped cream.
Coconut Chiffon CakeToasted coconut adds visual appeal to this tall and impressive cake. With an airy texture and heavenly coconut-ginger flavor,it's a lovely end to meals throughout the year.
Old-Fashioned Rhubarb CakeMy great-aunt gave me this rhubarb cake recipe. It's especially delicious when rhubarb is in season, and tastes even better with the old-fashioned milk topping. But you'll love it even with frozen rhubarb and "modern-day" whipped topping! —Marilyn Homola, Hazel, South Dakota
Sandy's Chocolate CakeYears ago, I drove 4-1/2 hours to a cake contest, holding my entry on my lap the whole way. But it paid off. One bite and you'll see why this velvety beauty was named the best chocolate cake recipe and won first prize. —Sandra Johnson, Tioga, Pennsylvania
Next: Learn about the king cake!
Glazed Spiced Rum Pound CakesMy recipe makes two loaf-sized treats, perfect for sharing. The spiced rum flavor really comes through in both the cake and the glaze. —Christine Russell, Littleton, New Hampshire