


How to Use a Moka Pot to Make Espresso-Style Coffee

Updated: Feb. 15, 2023

The strongly-brewed coffee from a Moka pot has a similar taste and texture to espresso, making home lattes and post-dinner coffees better than ever.
Picture it: You wake up, trudge to the kitchen, pull out your coffee mug and start grinding beans. You’re excited about your morning cup of coffee, but you’re also tired of the same old drip coffee every day. It’s also much too early for a coffee shop run, plus it would require getting dressed.
Here’s where learning how to use a Moka pot will revamp your morning. The small stovetop appliance looks like a fancy metal teapot, and it’s going to give you a stronger boost of caffeine than your trusty drip maker can brew. (Sorry, Mr. Coffee!) If you love to make lattes at home, the Moka pot is good for more than just regular joe. Because of the brewing method, coffee from a Moka pot is very strong and tends to have a creamier consistency similar to that of espresso.
How to Use a Moka Pot
Moka pots vary in size from 1-cup to 6-cup to 18-cup. This makes it easy to brew exactly what you need without wasting precious beans. For single servings, a 1-cup Moka pot will do the trick. If you’re serving a small crowd, a 6- to 9-cup Moka pot should be enough. Cups are measured in espresso cup size.
To get the most consistent results when brewing your morning coffee in a Moka pot, make sure your beans are ground correctly. You’ll want to aim for grounds that are coarser than what you would need for an espresso machine, but finer than what you scoop into a drip coffee maker.
Ingredients
- Coffee grounds, enough to fill your pot’s filter
- Water
Tools You’ll Need
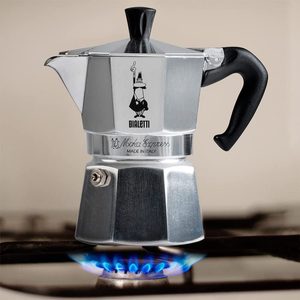

- Moka pot: This pot is the main event for this brew method. Choose the size that best suits your needs—for a starting point, the 1-cup Bialetti Moka Express makes about 2 ounces of coffee. That’s enough to fill one espresso cup.
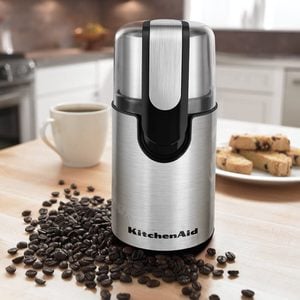
- Coffee grinder: For the best-tasting coffee, you’ll want fresh ground beans. The KitchenAid Blade Coffee Grinder is a great space-saving option, or you can opt for a manual grinder from our list of best coffee grinders.
- Tea kettle: If you have an electric kettle like many other home baristas, it’s time to heat it up. If you’d rather not boil the water for your Moka pot directly on the stove, you can pour in boiling water from the kettle instead.
Directions
Step 1: Grind the beans
Grind your favorite coffee beans to a fine consistency. The grounds should be a little larger than table salt.
Step 2: Boil the water
Boil water in the bottom portion of the pot. Be sure only to add water to the fill line and no higher. The fill line is just under the pressure release valve (also called a safety valve). This valve needs to be clear in order to release steam as pressure builds.
Step 3: Add grounds to filter
Once the water is just boiling, turn off the heat. Put coffee grounds in the middle portion of the pot that looks similar to a funnel. Don’t tamp the grounds down, but do level the grounds off. Gently drop the filter into the bottom of the pot.
Editor’s Tip: While it might be easier to assemble the whole Moka pot (grounds in filter, cold water and top twisted on) and boil fully assembled, this will result in bitter coffee. Allowing the water to boil first and then adding the grounds, means the grounds haven’t spent time heating up. The heating time is what will make your coffee taste bitter (like having stronger tea the longer you steep the leaves).
Step 4: Add pot back to heat
Hold the bottom portion of the pot with a towel (no burnt hands in this kitchen!) and twist the top of the Moka pot on. Immediately move the pot to a burner set at medium heat, and wait until the coffee begins to pour up and out. Make sure the lid is propped open so you can see when the coffee starts to brew.
Step 5: Remove the pot from the burner
As soon as you hear a gurgling sound, shut the lid and remove the pot from the burner. You can place the pot on a trivet, or run the bottom of the pot under cold water to stop the brewing process.
Step 6: Serve
Pour coffee into an espresso cup if drinking black. Pour into a larger coffee mug if you like to add water for Americanos or frothed milk for lattes.
FAQs About How to Use a Moka Pot
Can you use regular coffee grounds in a Moka pot?
Learning how to use a Moka pot can seem like a lot at first. To cut out a step, you can use pre-ground beans. Just note that the flavor may not taste as fresh and the coffee may not be as strong. The strength of the coffee depends on the correct grind size. Pre-ground coffee is more coarse than what a Moka pot calls for, so the brew won’t be quite the same.
However, you can consult with a barista at your local coffee shop and they can ground the beans to your precise specifications.
Should you tamp coffee in a Moka pot?
No, and for good reason. If you love your espresso machine and the art of prepping your daily double-shot, you’ll have to remember that grounds in Moka pots should never be tamped down.
Espresso machines are made for high pressure, Moka pots are not. Though they are nicknamed “stovetop espresso machines,” Moka pots do not actually generate enough pressure to create a true shot of espresso. Tamping down the grounds could result in an exploding Moka pot—a fiasco no one needs at 7 a.m.
Moka pot vs. French press: Which is better?
While either brew method is a fantastic gift for coffee lovers (or for yourself!), there’s a definite difference between the two. Moka pots aren’t necessarily better than French presses, and vice versa.
Instead, it’s all about what you prefer in a cup of coffee. Do you like super strong coffee that is thick and rich like espresso? Then a Moka pot is the best option for you. Do you prefer a more full-bodied coffee that is still strong, but not quite as sharp? Then using a French press would be your best bet.


Originally Published: February 15, 2023