How to Make Salt-Rising Pioneer Bread
Updated: Dec. 30, 2021
Take yourself back in time with this irresistible salt-rising bread recipe.
There are few things in life better than a slathering a pad of butter on a slice of fresh, still-warm-from-the-oven bread. Whether it’s paired with a bowl of chicken noodle soup or used to sandwich peanut butter and jelly, a loaf of homemade bread is a simple pleasure that just can’t be beaten.
At Taste of Home, we are no strangers to bread. We have recipes for easy quick breads, drop-dead gorgeous braided breads and even breads that are made with five ingredients or less. But no recipe has been more time-honored than Doris Musick’s pioneer salt-rising bread.
Why It’s Special
Passed down in an ancient cookbook from her father-in-law, Doris’s pioneer-style bread is unique because it’s made without any yeast. Instead, the starter is made from cornmeal. This technique was developed in 1800s Appalachia when packages of active dry yeast weren’t yet available for purchase. Compared to modern methods, it’s a tricky process involves a two-step starter that needs two long-term proofings before being made into dough and left to rise yet again.
It’s definitely a labor of love, but the resulting bread is a dense white loaf with a delicious cheese-like flavor that is worth the time and effort it takes to make. Here, we’ll share Doris’ recipe along with some handy notes that will help make the recipe a bit easier. Let’s get started.
Note: This can be a difficult recipe to get right at first. But don’t be discouraged! With a little practice and Doris’ guidance, you’ll nail these loaves in no time (well, maybe over a day or two!).
How to Make Old-Fashioned Salt-Rising Bread
Ingredients:
- 1-1/2 cups water
- 1/2 cup organic, yellow grist mill cornmeal
- 1 3/4 teaspoon salt, divided
- 1/8 teaspoon baking soda
- 1 teaspoon sugar
- 4 cups milk
- 6-8 cups flour, divided
- 3-4 tablespoons shortening, butter or lard, softened
Directions:
Step 1: Create Your Cornmeal Starter
The night before you bake, heat your water until it is almost boiling, with small bubbles around the sides of the pan. Add the warm water, cornmeal, 1/4 teaspoon of salt, baking soda and sugar to a heatproof bowl that will allow the mixture to expand and combine well. Then, cover the bowl with plastic wrap and place it in a warm place to prove. You’ll want to find somewhere that is consistently between about 90°F and 100°F. There are two places that work really well:
- An electric proofer (like this one from Brod & Taylor) that allows for hands-free temperature control.
- The oven. If you don’t own a proofer, you can use an electric oven instead. Simply turn your oven light (but not the oven itself) on 2 hours before making the starter, which should warm the oven to around 95°F. Be sure to check that this method has actually warmed your oven with a cooking thermometer (we love this one from ThermoWorks).
Step 2: Smell It
In the morning, remove your starter from its proofing spot. It should have expanded slightly with small visible bubbles. The best way to know if the job is done? The starter will smell. It may sound silly, but to some, the fermentation will smell like old parmesan and to others, it smells like dirty socks. Trust us: It’s going to taste delicious.
Pro tip: If the smell is slight, pop it back into the electric proofer or oven for another hour and check again. If there is no smell, your starter has likely not worked and you’ll have to try again.
Step 3: Add Milk, Salt and Flour
When your starter is looking (and smelling!) ready, add the milk, 1/2 teaspoon of salt and enough flour until the mixture has the consistency of a thick pancake batter—about four cups. Cover the bowl with plastic wrap and add it to a container of very warm water (between 90°F and 100°F). For this step, Doris explains, “You will likely have to drain some of the water off and replace with warmer water on a continuing basis. Try not to make any drastic change in the temperature as you are adding the warmer water, change only a small amount of water at a time to hold the temperature as constant as possible.” We recommend placing the container back into your electric proofer or lit oven at 90-100°F until the mixture has doubled in size, about 2-4 hours.
Step 4: Create the Dough
Your mixture should now be very bubbly and moved up the sides of the bowl. Add it to a stand mixer along with the remaining teaspoon of salt, the fat of your choice and enough flour for the mixture to become a dough that is still slightly sticky, about 2-4 cups. Be sure to add the flour in a bit at a time to make sure too much flour isn’t added.
Then, knead until smooth, about 8-10 minutes.
Pro tip: If the starter refused to form bubbles, you can try raising the heat of your proofer or oven a few degrees. If it still hasn’t formed bubbles and expanded, though, you’ll have to toss it and start over.
Step 5: Divide and Rest
Divide the dough into three greased loaf pans, cover and allow to rest until they have doubled in bulk, about an hour.
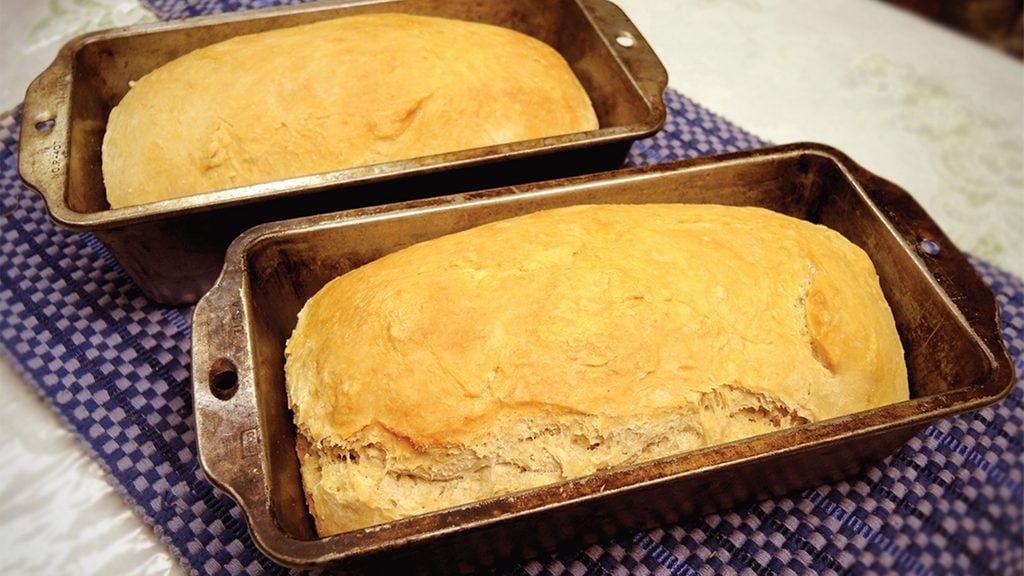
Step 6: Bake!
Once the loaves have risen, bake them at 375°F for 30-40 minutes. Remove them from the oven and immediately grease the crust with a healthy helping of butter and allow to cool completely.
Step 7: Enjoy
When your bread has cooled, give yourself a pat on the back. You did it, just like the pioneers did! Cut into your salt-rising loaf, slather on some butter and take a bite out of your success.
To save for later: Loaves can be stored in your pantry or bread box for about a week. After that, be sure to freeze them to maintain their freshness.


Note: Every product is independently selected by our editors. If you buy something through our links, we may earn an affiliate commission.