How to Make a Flawless Chocolate Swirl Cheesecake

Updated: Feb. 13, 2024
Few desserts are as luscious and impressive as a chocolate swirl cheesecake. We'll show you how to master cheesecake-baking techniques so you have a stunning, crack-free cake.
When it comes to desserts, we’re often told to “save room.” But no matter how stuffed you are after a delicious dinner party, there are some desserts there are worth making room for, and cheesecake always seems to be one of them.
Cheesecake of any kind always seems a bit special. Perhaps that’s because it requires a bit of finesse to get just right. But with our top-rated chocolate swirl cheesecake recipe and plenty of cheesecake tips, you’ll be whipping up this stunning cake with ease. Let’s dive right in!
How to Make Brown Sugar and Chocolate Swirl Cheesecake

At the Taste of Home Test Kitchen, this brown sugar and chocolate swirl cheesecake is always a hit. The recipe came to us from reader Jeanne Holt in Mendota Heights, Minnesota. It has a rich cheesecake base thanks to brown sugar and a bit of sour cream, and the chocolate ganache makes an amazing swirl. Here’s what you’ll need to make it:
For the crust:
- 3/4 cup cinnamon graham cracker crumbs (about 4 whole crackers)
- 3/4 cup finely chopped walnuts, divided
- 1 tablespoon sugar
- 3 tablespoons butter, melted
For the filling:
- 1/2 cup heavy whipping cream
- 1 cup (6 ounces) semisweet chocolate chips
- 4 packages (8 ounces each) cream cheese, softened
- 3/4 cup packed brown sugar
- 1/2 cup sour cream
- 3 tablespoons all-purpose flour
- 1 teaspoon vanilla extract
- 1/4 teaspoon salt
- 1/4 cup maple syrup, divided
- 3 large eggs, room temperature, lightly beaten
For the topping:
- 2 cups sweetened whipped cream
- Toasted walnuts
Step 1: Make a Crumb Crust

Like most cheesecakes, this Test Kitchen-favorite recipe starts with a crumb crust. But before you get crumbling, it’s important to prep your springform pan. Even if your pan says leak-proof, it’s always a smart decision to wrap your pan in a layer of foil just in case. This will prevent any leaks later in the baking process.
Once your pan is wrapped, it’s time to make the graham cracker crust. Start by crushing up the cinnamon graham crackers. You can do this with a rolling pin or use a food processor to make quick work of this step. Then stir together with a tablespoon of sugar, finely chopped walnuts and melted butter.
Editor’s tip: If you don’t have cinnamon graham crackers on hand, you can try these alternative crumb crusts. It’s fun to experiment with the flavor combinations.

Then press this mix into the bottom of your greased pan (yes, grease the pan, even if it’s nonstick). The best way to get a nice firm, even crust is to use the flat bottom of a glass or measuring cup. This way, you can get a nice flat finish and press along the very edge of your pan.
Then pop this into a 350ºF oven and bake for 10 minutes. Let this cool on a wire rack while you work on the rest of the cheesecake.
Step 2: Make the Chocolate Ganache
The chocolate swirl in this cheesecake comes from a rich chocolate ganache. Making ganache might sound fancy and even a bit complex to less experienced bakers, but it’s really a cinch.
Start by heating the cream in a small saucepan just until it starts to bubble. Then pour over your chocolate chips; try one of our Test Kitchen-recommended brands. All that’s left to do is whisk away until the cream and chocolate come together into a smooth mixture. At first, it might look like the two ingredients will never combine, but just keep whisking!
When it finally does comes together, put aside and let cool.
Step 3: Stir up the Cheesecake Batter
With the ganache and crust in order, all that’s left is to make the cheesecake batter. For this, make sure that you’re using room-temperature ingredients. This will ensure that the batter beats up nice and smooth.
Start by mixing the cream cheese until smooth. Be sure to use a hand mixer or stand mixer here—you’ll want the power to really get these ingredients nice and creamy. Then add in the brown sugar, sour cream, flour, vanilla extract, salt and maple syrup and mix until combined. And be sure to use real maple syrup here. It makes all the difference.
Finally, add in your eggs. Stir in the eggs until just combined. The more you whip in the eggs, the more air you incorporate into your batter—and more air can make your cake liable to cracks.
Editor’s tip: Find out how you can prevent cracks in your cheesecake here.
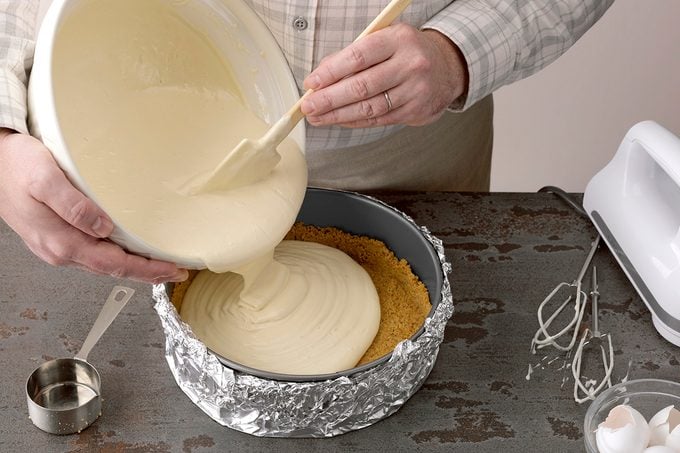
Once finished, set three tablespoons of filling aside and pour the remainder over the cooled graham cracker crust.
Step 4: Create the Chocolate Swirl
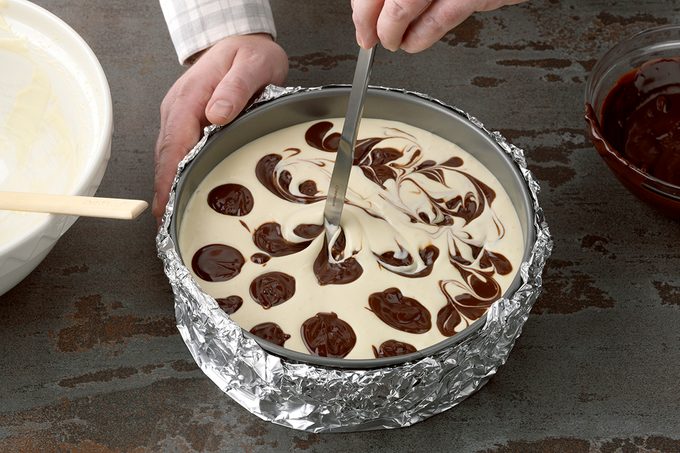
After all that, it’s finally time to create the chocolate swirl. Start by mixing together your reserved batter with the chocolate ganache.
You can try to create a design in your chocolate swirl cheesecake, but abstract always looks so nice. Do this by spooning dollops of the chocolate filling over the top of the cake. Then grab a butter knife or wooden skewer and drag it through the two batters. Just a few swirls will give you a nice marble pattern.
Step 5: Bake in a Water Bath
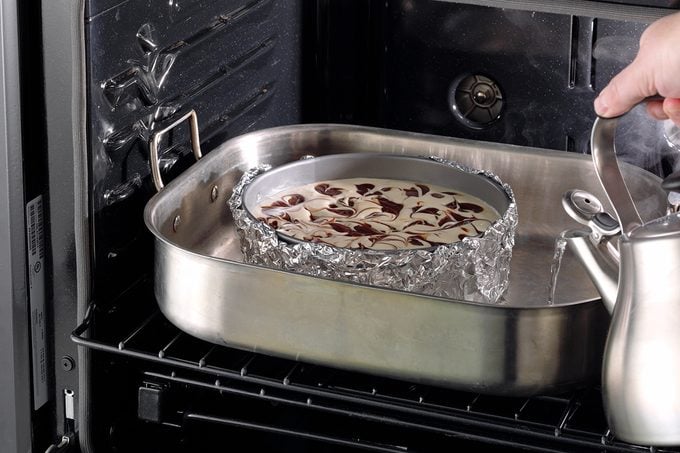
After all that work, it’s finally time to bake. But don’t just pop your cheesecake right into the oven and call it a day. You’ll want to set up a water bath (sometimes called a bain-marie) first.
To make a water bath, pop a high-sided pan into your oven and nestle your wrapped cheesecake pan inside it. Then fill the pan up an inch or so with very hot (almost boiling) water. The water bath will help bake the cake gently and evenly. Plus, the moisture keeps the oven nice and humid, which is a great atmosphere for cheesecakes.
Bake your cheesecake at 350ºF for 50 to 65 minutes. You’ll know your cheesecake is done when you conduct the wobble test. This test sounds funny, but it’s the best way to test the doneness of cheeescake. Just tap the side of your cheesecake pan with a wooden spoon. If the wobbles just a bit in the center, it’s done. If the batter ripples all over, it still needs time.
Editor’s tip: Don’t bake your cheesecakes until they are set in the middle! This indicates that the cake is actually overbaked and overbaked cheesecakes are more prone to crack.
Step 6: Cooling and Serving

After your cake has passed the wobble test, remove it from the oven and let it cool for ten minutes on a wire rack. Then run a knife along the outside edge of the cake to loosen it from the sides. As the cake cools, it contracts a bit. If any bits are stuck to the edge of your pan, it could pull your cake apart as it cools and cause cracks.
Let the cake cool another hour before popping in the fridge overnight. When you’re ready to serve it the next day, remove the collar from the pan.
To get nice clean slices of cake, dip a sharp knife into hot water and wipe dry. Then slice away, refreshing after each cut. The warm blade will cut smoothly and give you gorgeous pieces. You can top each slice (or the whole cake) with fresh whipped cream, toasted walnuts and a drizzle of maple syrup.
Editor’s tip: Be sure to toast your walnut garnish. Toasting gives them more flavor (and it’s very simple to do—you can even use the microwave).
The Gorgeous Chocolate Swirl Cheesecake Finish
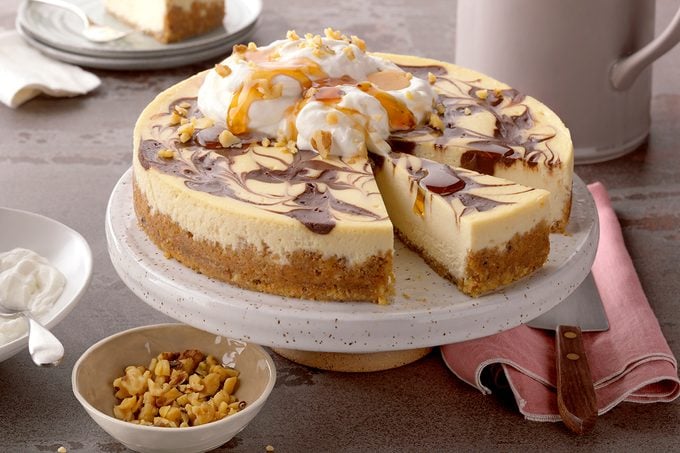
In the end, this cheesecake is just stunning. The simple marbling technique makes quite a statement. Topped off with all sorts of sweet and salty garnishes, you have a cake no one can resist. Be prepared for all your guests to make room for this one (and to hand out copies of this much-requested recipe).


Originally Published: February 04, 2020