


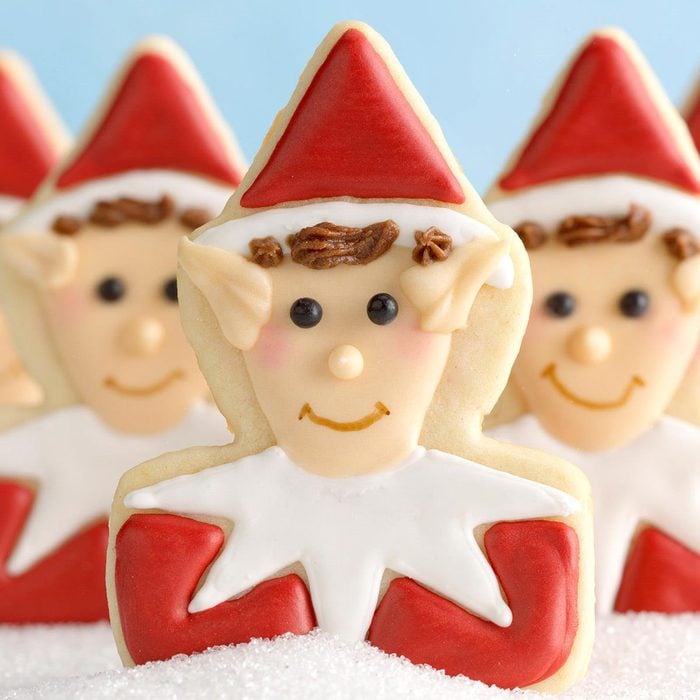
Elf on the Shelf is a Christmas tradition that’s here to stay. This sweet (yet mischievous!) little helper finds his way into homes as the holiday draws near to help Santa sort out who’s naughty and nice.
Pay homage to this rosy-cheeked icon with these stunning elf cookies that will put your decorating skills to the test. Follow along to learn how these adorable royal icing cookies come to life.
Refresh yourself on what Elf on the Shelf is and how it got started before you begin.
Ingredients for Elf Cookies
Cookies:
- Butter
- Confectioners’ sugar
- Egg
- Vanilla extract
- Self-rising flour
Royal icing:
- Confectioners’ sugar
- Water
- Meringue powder
- Cream of tartar
- Food coloring
Decorations:
- Black nonpareils
- Pink luster dust
- Chocolate frosting
Directions
Step 1: Make the cookie dough
Cream the butter and confectioners’ sugar until it’s light and fluffy. Then, beat in the egg and vanilla. Gradually beat in the flour.
Step 2: Refrigerate the cookie dough
Once everything is combined, divide the dough in half. Wrap each half in plastic and refrigerate for two hours, or until it’s firm enough to roll.
Editor’s Tip: Refrigerating the cookie dough is a step you can’t skip, so make sure you budget enough time for it. In the fridge, the dough becomes more firm—which prevents the cookies from spreading and losing their elf shape while baking. Here are more tips on making the best cutout cookies.
Step 3: Roll and cut out the cookie dough
Preheat the oven to 375°F. On a floured surface, roll each portion of dough to a 3/16-inch thickness. Cut with the floured elf cookie cutter, and place each cutout 2 inches apart on ungreased baking sheets.
Editor’s Tip: Here’s an elf-shaped cookie cutter if you need one!
Step 4: Bake the cutouts
Slide the baking sheet in the oven and bake for five to seven minutes. Cool on the pans for two minutes after pulling them out of the oven, and then remove to wire racks to cool completely.
Step 5: Create and color the royal icing
In a large bowl, whisk confectioners’ sugar, water, meringue powder and water for icing. Whip the ingredients until they’re light and airy. Add water until you reach a thick consistency for piping outlines, then divide the icing into thirds. Leave one portion white, tint another portion with red food coloring (this will be for the elf’s signature outfit) and tint remaining portion with your desired skin tone coloring.
Step 6: Outline and flood
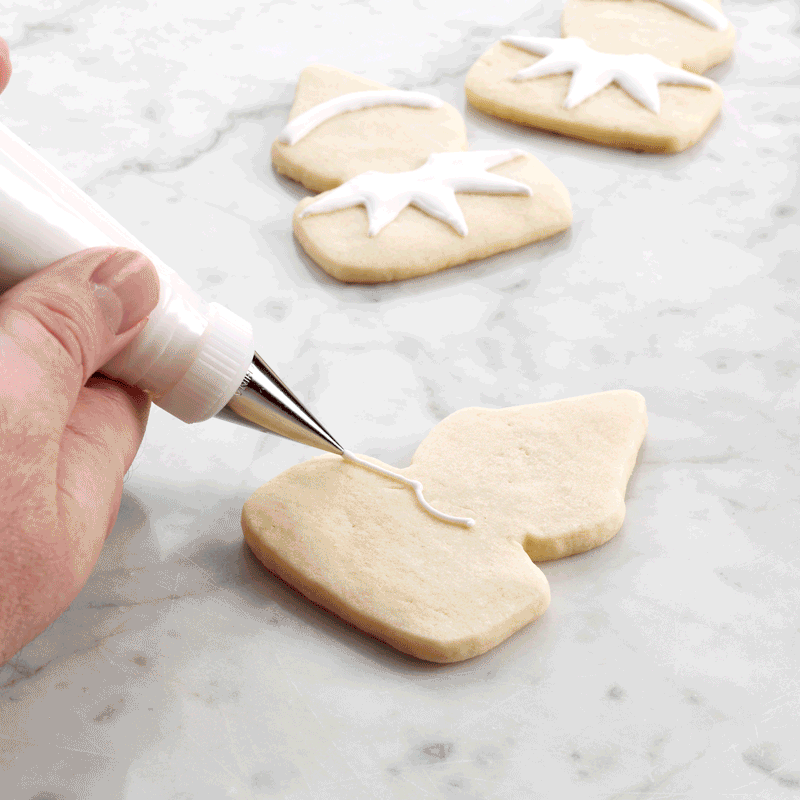
Divide each colored icing in half. You’ll need to use two different consistencies for your royal icing—one stiffer icing for piping and one more fluid one for flooding—the pool of icing that creates a flat, smooth texture.
Place the stiff white royal icing into a piping bag fitted with a #2 round tip and pipe on the elf’s signature collar and the brim of his hat. Then fill in (or flood) the design with your reserved white icing. To get it to a flood consistency, simply add water a tablespoon at a time. Repeat this design on the remaining cookies.
Once the white icing is completely dry, start the process again using the red royal icing to fill in the top of his hat and the lower part of his outfit by outlining and flooding the shapes.
Editor’s Tip: While outlining before you flood may seem fussy, it’s essential for a crisp design as it prevents the thinner icing from dripping out of place.
Step 7: Fix up the face
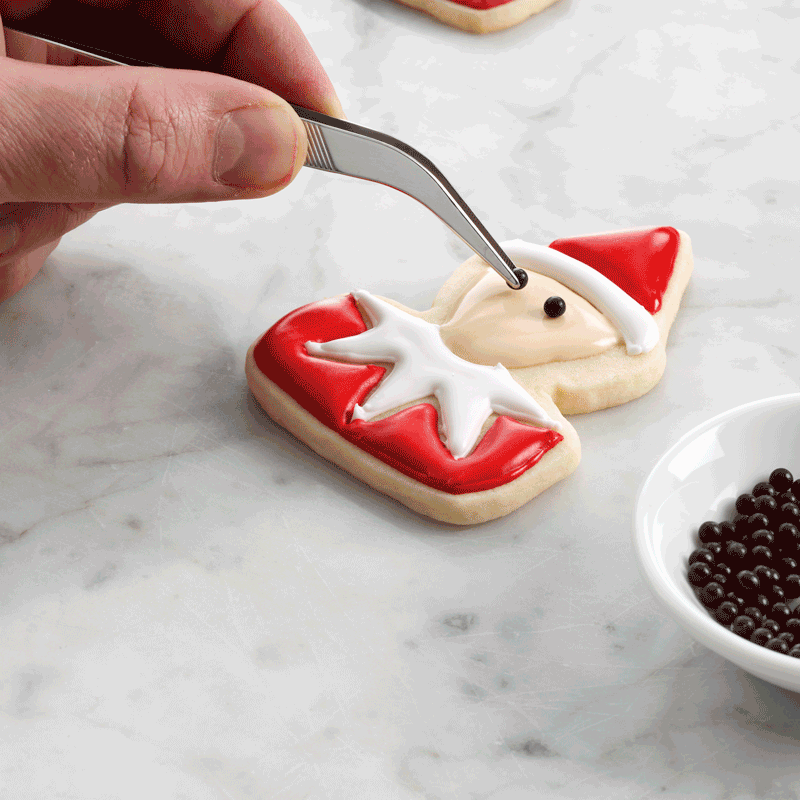
Create the foundation for the elf’s cute little face by outlining and flooding the center using the skin tone icing. While the icing is still wet, carefully place two black nonpareils to create eyes. Let the icing dry completely.
If you’d like, dip a Q-tip into pink luster dust, tapping off the excess, and dab onto cookies to create the elf’s cheerful pink cheeks.
Editor’s Tip: If the icing dries before you add the eyes, don’t sweat it. Simply draw on eyes using an edible marker or two dabs of chocolate frosting.
Step 8: Add a smile (and a ‘do)
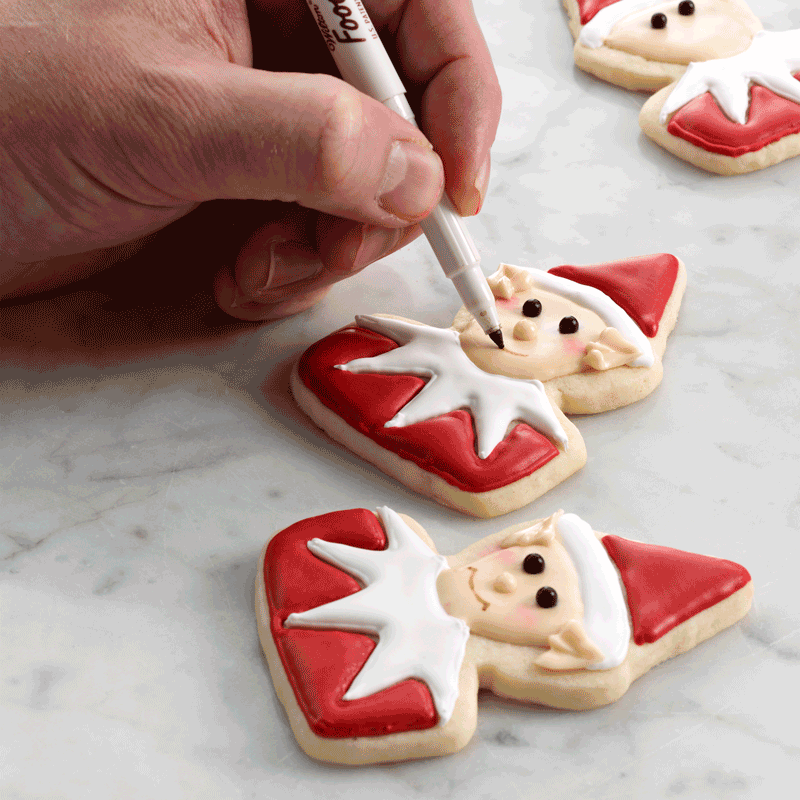
Now it’s time for the finishing touches to make Santa’s helper come to life. Using leaf tip #67, pipe the stiff skin tone frosting to create a set of pointed ears. Then using a small round tip, pipe the same icing to create his nose. Using an edible pen, draw on his smile.
To finish it off, place chocolate frosting into a piping bag fitted with #14 star tip and pipe along the top of the face to create his lush locks.
Editor’s Tip: Make it your own by creating different hairdos and facial expressions on each cookie.
Tips for Elf on the Shelf Cookies
How else can you decorate elf cookies?
Besides drawing on different facial expressions and hairstyles on your Elf cookies, you can change the color of the elf’s outfit from a jolly red to a festive green, or, take some extra time by creating stripes with both colors. If you want to go the extra mile, write each of your kids’ names on the elf’s shirt with the food writing pen.
How should you store elf cookies?
Store decorated elf cookies in an airtight container, where they should last for about five days at room temperature. As long as you let the icing dry completely before putting away the cookies, you can store them in layers between waxed paper.