


When you're craving a panini, turn to your handy cast-iron skillet.

How to Make Paninis Without a Panini Press
We’ve all been there; you’re craving an ooey-gooey panini, but there’s a problem. You don’t have a panini press! Luckily, you don’t have to crowd your countertop with another appliance for a cafe-worthy panini. Our Test Kitchen has a secret for a press-free panini.
By the way, this is how to make the best mozzarella, tomato and basil panini you’ve ever had.
Step 1: Pull Out Your Cast-Iron Skillets
The secret for a crispy panini is to use two hot cast iron skillets to toast the sandwich. To start, preheat two cast-iron skillets over medium-high heat. If you can, use one skillet that is slightly smaller than the other so they can be stacked.
Need a new cast iron skillet? Here’s how to pick out the best one for you.
Step 2: Assemble the Panini
While your skillets are heating up, put your panini together. You can use whatever meat, cheese and veggies you’d like, but we’d suggest using a heartier bread, like ciabatta, French bread or thick-sliced sourdough. If you need some inspiration, these are some of our favorite panini recipes.
Step 3: Cook the Panini
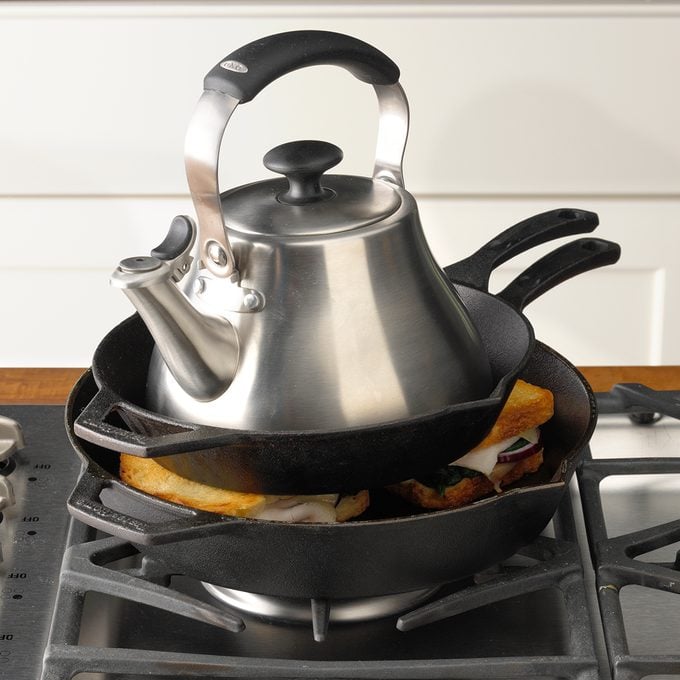
Add some oil to one of the skillets (the larger of the two, if possible) and use a paper towel to oil the bottom of the other cast-iron skillet. It will be very hot, so be careful! Put your sandwich in the skillet and then place the second skillet on top of the sandwich, pushing it down a bit.
Then, place a heat-safe weight, like a filled tea kettle or saucepan, on top of the second skillet to apply pressure. Let the sandwich cook for about 4 minutes, or until it’s golden brown and toasty.
Make sure you’re not making one of these common cast-iron skillet mistakes.
Step 4: Eat!
When the panini is done, carefully remove the weight and cast iron skillet and remove the sandwich from heat. Transfer it to a plate, slice in half and enjoy your melty panini.
Once you’re done, clean your cast-iron skillet the right way.
Bring On the Yum!
Chicken PaniniThis ooey-gooey, melty delight is packed with bacon, chicken, cheese and just enough lemon to tickle your taste buds. Other chicken panini recipes don't compare!—Terri McCarty, Oro Grande, California

Grilled Eggplant Panini with Basil AioliI love being able to use the bounty of fresh vegetables and herbs from my garden for summer meals. This sandwich is loaded with veggies and has such a satisfying crunch. The melty provolone finishes things off perfectly. —Joseph A. Sciascia, San Mateo, California

Fig, Caramelized Onion and Goat Cheese PaniniA taste of this sandwich whisks you to the Italian countryside. It combines sweet honey, dried figs, tangy goat cheese, nutty Asiago and salty prosciutto. We often pack it in our picnic basket for summer or fall outings. —Maria Brennan, Middlebury, Connecticut

Triple Pepper Steak SandwichesMake parts of this steak sandwich recipe ahead of time and you can assemble the sandwich quickly for a weeknight meal. This fork-and-knife sandwich works very well with leftover fajita meat and peppers, or as a way to use leftover grilled steak or chicken. The chipotle cream sauce can be made up to three days in advance.—Robert Taylor, Shawnee, Kansas


Mediterranean Turkey PaniniThe word panini refers to sandwiches that are pressed and toasted. I make panini for my fellow teachers and friends. For potlucks, make several and cut them into fourths. —Martha Muellenberg, Vermillion, South Dakota

Prosciutto Egg PaniniWith mustard, maple syrup, prosciutto and eggs, this is a yummy twist on the usual bacon-and-egg sandwich. Your family will agree that this is one breakfast worth waking up for! —Erin Renouf Mylroie, Santa Clara, Utah

Bistro Apple PaniniMy family loves panini press recipes. The bacon, apple and tarragon in this recipe go together so well. If you don’t have a panini maker or an indoor grill, you can easily pan-fry or broil these excellent sandwiches.—Noelle Myers, Grand Forks, North Dakota

Chicken & Caramelized Onion Grilled CheeseMy grilled cheese sandwich combines chicken with sweet caramelized onions, red peppers, Swiss cheese and sourdough bread. It’s oh-my goodness. —Kadija Bridgewater, Boca Raton, Florida


