My family of four have a weekend tradition of making eggs Benedict at home, which was worth the trial-and-error of perfecting my poaching (and the sink full of dishes after). I mean, cut through the middle of one of these open-faced bad boys and try to tell me that drippy yolk covered in hollandaise all over some Canadian bacon isn’t worth a little cleanup. Plus, I am not about to skip out on a decidedly “adult” food that my kids actually adore.
Cue the one-minute video on Facebook showing a test kitchen pro poaching eggs a dozen at a time in a muffin tin. Genius! It looked so simple. Let’s see how it turned out.
While you’re at it, learn about microwave poached eggs too.
Try #1: Total flop
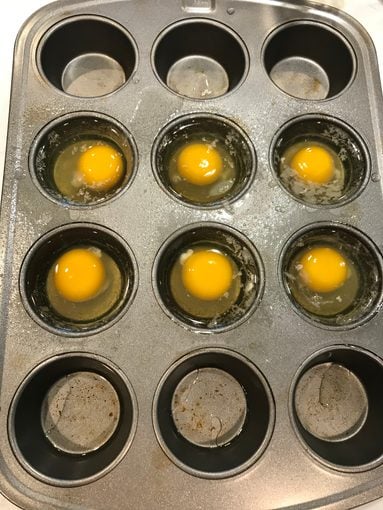
I did as the professional did, pouring a little water into the muffin cups, adding an egg to each and set them in a 350° oven for the recommended 8-10 minutes. At minute eight, they looked completely uncooked. Same at minute 10. I put them back in the oven for 2 more minutes.
When I pulled them this time, the whites (and the yolks!) were fully cooked through—totally overcooked. Major bummer. To add insult to injury, the egg whites were completely cooked on to the tin, making it super hard to clean. First I vowed to reserve my muffin tins for muffins only (OK, cupcakes, too) and stick with old-fashioned poaching, but then I thought better of backing down from the challenge of making poached eggs for a crowd. ( Find out how Gordon Ramsay makes the perfect poached egg.)
Try #2: Success!

I tried to learn from my mistakes and was a little more careful this time. I measured the water for each cup (just one tablespoon, which seems small, but is enough!). I then coated the pan with nonstick spray, to help with cleanup. You could also grease the pan with shortening before adding the water.
Again, I left them in the oven for 12 minutes which lead to a slightly harder poach. But this gave me a good baseline for replicating this another time—I’m thinking 10-11 minutes is just perfect. And the cooking spray? It worked! It looked a little greasy going in, but it made the cleanup super simple.
So what if they look a little like sea scallops? Maybe these eggs benedict aren’t as photogenic as the organic, elliptical shape of traditionally poached eggs, but they tasted every bit as amazing.
Try #3: Perfection!

I liked it so much we had eggs Benedict for dinner tonight, featuring the leftover hollandaise from this weekend. That’s a one-pan dinner, friends (check out these other one-pan dinners for more easy weeknight meals).
What I learned
- The nonstick spray helped!
- Don’t be fooled by the layer of water on top of the eggs—it can make them look uncooked but they’re really ready to go. Take them out before that 12-minute mark and you’ll be golden.
- This method may not be for poaching pros, but for the rest of us, it puts homemade eggs Benedict a little more within reach. Mastering a perfect poached egg the old-fashioned way is still a worthy pursuit—and an accomplishment—but this method eliminates some hands-on time.
- If the eggs aren’t cooked exactly the way you like them, try, try again and figure out the timing for your oven. You’ll be glad you did.
I haven’t made these for company yet, but I’m totally going to impress the pants off my family when they’re here for their annual holiday visit. I can’t wait to share one of our favorite weekend traditions with them. If you prefer your eggs boiled, learn how to make Instant Pot hard-boiled eggs or how to boil eggs the traditional way in a pot.
Love eggs Benedict? Try these variations on the classic.
Eggs Benedict with Homemade HollandaiseLegend has it that poached eggs on an English muffin started at Delmonico’s in New York. Here’s my take on this brunch classic, and don’t spare the hollandaise. —Barbara Pletzke, Herndon, Virginia
Learn the secret to making
easy eggs Benedict.
Eggs Benedict Baked PotatoesThis is a new way to do breakfast potatoes! This baked potato dish would be eggs-cellent for brunch or a breakfast-for-dinner evening! The options are endless, but one thing's for sure: Once you get a taste, you'll want more! —Becky Carver, North Royalton, Ohio
Make-Ahead Eggs Benedict Toast CupsWhen I was growing up, we had a family tradition of having
eggs Benedict with champagne and orange juice for our Christmas breakfast. But now that I’m cooking, a fussy breakfast isn’t my style. I wanted to come up with a dish I could make ahead that would mimic the flavors of traditional eggs Benedict and would also freeze well. Friends, all I can say is, this one fits the bill! —Lyndsay Wells, Ladysmith, British Columbia
Twisted Eggs Benedict SaladSalad for breakfast? Absolutely. You can prep everything except the dressing and chill it overnight. In the morning, dress the salad and poach the eggs. —Noelle Myers, Grand Forks, North Dakota
Be careful you don't make these
egg mistakes!
Eggs Benedict Bake with Bearnaise SauceI've made this recipe for my family every Christmas morning for 10 years—it's a food tradition that we look forward to every year. Part of what makes this dish special is the croissants that make the egg bake extra light and fluffy. —Susan Triplett, Citrus Heights, California
Creamy Pesto ‘n Bacon Eggs BenedictOne of my favorite brunch dishes is eggs Benedict. While I adore the traditional version, I also have fun using other flavors. This is my Italian take using a semi-homemade
creamy pesto sauce. —Jenn Tidwell, Fair Oaks, California
Egg Baskets BenedictA little puff pastry turns Canadian bacon and eggs into a tasty update on eggs Benedict. We use a packaged hollandaise or cheese sauce for the finish. —Sally Jackson, Fort Worth, Texas
Crab Quiche with HollandaiseI discovered this quiche at a diner during a motorcycle road trip with my husband. It was so amazing, I worked to duplicate it back home. Our family loves the results. —Amy Knight, Lake Linden, Michigan
Mushroom & Spinach Eggs BenedictThere are so many ways to experiment with eggs Benedict, and this is my favorite version. The earthy flavors of mushroom and spinach blend beautifully in this new twist on an old classic. —Elizabeth Dumont, Madison, Mississippi
Crescent Egg Bake with Hollandaise SauceWhat's better than eggs mixed with bacon and cheese over a fluffy crust and topped with hollandaise sauce? You also can use egg whites instead of yolks if you like. —Gidget Gorgone, Mableton, Georgia
Poached Eggs & PolentaWe have a bed and breakfast in Gettysburg where I serve creative dishes like these poached eggs with polenta, our twist on eggs Benedict.—Paulette Lee, Gettysburg, Pennsylvania
If you don't love 'em poached, learn
how to cook eggs every way.
Eggs Benedict BurgersTo feed my daughter’s hungry cowboy friends after a rodeo, I created these with leftover burgers, hollandaise and bacon. They were a huge hit! —Bonnie Geavaras-Bootz, Scottsdale, Arizona
Reuben Eggs BenedictWhen it comes to food, two of my all-time favorites are Reuben sandwiches and eggs Benedict. So naturally I combined them into this incredible breakfast dish. I serve mine with bacon on the side, but hash browns and fresh fruit go great, too! —Jessica Rehs, Akron, Ohio
Eggs FlorentineI wanted to impress my family with a holiday brunch, but keep it healthy, too. So I lightened up the hollandaise sauce in a classic egg recipe. No one could believe this tasty dish was good for them!
—Bobbi Trautman of Burns, Oregon
Southwestern Eggs Benedict with Avocado SauceI frequently make this spicy spinoff of classic eggs Benedict for my husband, who loves breakfast. I like the heat from the jalapenos and also that the avocado sauce is a healthier substitute for the usual hollandaise sauce. —Kara Scow, McKinney, Texas
Eggs Benedict CasseroleThis overnight eggs Benedict casserole features layers of English muffins and Canadian bacon in a savory egg filling. It’s a delicious recipe for holidays and Sunday brunches.
Eggs Benedict with Dill SauceHere's an extra-special way to make eggs Benedict— this recipe has all the richness but the sauce is much easier to make than a traditional Hollandaise.—Mary Louise Lever, Rome, Georgia


