


Here’s a Perfect Gingerbread House Template

Updated: Mar. 14, 2024

Get into the holiday with this gingerbread house template and step-by-step guide!
From gumdrop paths and candy cane fences to snow-covered roofs and marshmallow snowmen, gingerbread houses are a festive, hands-on activity that doubles as a great way to decorate for the holiday season. If building a gingerbread house has felt daunting to you in the past, use this gingerbread house template and guide to make and assemble a gingerbread house from scratch. And, who knows, you may just be inspired to host your own gingerbread house decorating party next year!
Can’t get enough gingerbread house ideas? Check out our complete guide for gingerbread cookies, houses, cakes and more.
Gingerbread House Template

Here’s an easy-to-use template for your gingerbread house. Using this guide, pull out your ruler and some paper or cardboard to transfer the measurements. Trim each template piece with scissors or a utility knife and set aside.
Your Complete Guide to Making a Gingerbread House
First up, make the gingerbread. This is a perfectly edible dough, so feel free to save the scraps to use for cookies. Here’s how it’s done:
Ingredients
- 2 cups sugar
- 2 cups shortening
- 2 cups dark molasses
- 2 tablespoons ground cinnamon
- 2 teaspoons baking soda
- 1 teaspoon salt
- 9 to 10 cups all-purpose flour
Step 1: Set a Festive Mood
First things first, hit play on your favorite holiday playlist and whip up a cup of hot chocolate. Here are our favorite cocoa recipes for the holidays!
Step 2: Combine Ingredients
Once the festive mood is set, it’s time to begin. In a large saucepan, heat the sugar, shortening and molasses on low, until the shortening is melted and sugar is dissolved, stirring constantly. Remove from heat; add the cinnamon, baking soda and salt. Stir in flour, 1 cup at a time, until the dough can be formed into a ball.
Step 3: Prepare the Dough
Turn dough onto a lightly floured surface; knead until even in color and smooth (not crumbly or dry), adding more flour if needed. Form into a log. Cut into five equal pieces and wrap in plastic.
Step 4: Roll Out the Dough
Line a baking sheet with foil and lightly grease the foil. Unwrap one portion of dough. Using a very lightly floured rolling pin, roll out dough directly on a baking sheet to a 15×10-1/2-in. rectangle about 1/4 in. thick. Try to roll out the dough as evenly as possible so your panels are flat.
Pro tip: Place a damp kitchen towel under your baking sheet to prevent it from slipping.
Step 5: Cut the Pieces
Position your template patterns at least 1/2 in. apart on the dough as shown. Cut around patterns with a sharp knife or pizza cutter; remove patterns. Feel free to cut out a door or windows into the panels. Remove dough scraps; cover and save to re-roll if needed.
Tip: With remaining scraps, create trees, people, shutters and other architectural details. Grab your Christmas cookie cutters to see if any can be used for decoration, like a snowman or mini snowflake.
Step 6: Bake
Bake at 375° for 10-14 minutes or until the cookie springs back when lightly touched. Remove from oven; immediately replace patterns on the dough. Cut around the edges to trim off excess cookie. Cool 3-4 minutes or until cookies begin to firm up. Carefully remove to a wire rack; cool. Repeat with remaining dough and patterns.
Pro tip: Allow your gingerbread pieces to dry out to room temperature for a few days to ensure extra stability during construction.
Assembling the House
Ingredients & Tools
- Base
- 2 side panels
- 2 roof panels
- 4 chimney panels
- Front
- Back
- Gingerbread house icing
- Decorating bag. We love this product from Wilton.
- Large dot (#12) decorating tip
- Spice jars, or something else to hold pieces in place while drying
Step 1: Trim Gingerbread
Before we get started assembling, it’s a good idea to test your cookie pieces to make sure they fit together snugly. If the edges of the cookies are misshaped or rounded, file carefully with a serrated knife or a Microplane grater to ensure a precise fit. Check out 9 more ways to make the most of your Microplane.
Step 2: Prepare Icing
Fill the decorating bag two-thirds full with icing. If you’ve made your royal icing in advance, give it beat with a hand mixer to restore its smooth, fluffy texture.
Pro tip: If you don’t have a decorating bag, opt for a zip-top food storage bag with cut a hole in the corner. This will give you more control than a knife or spoon would.
Step 3: Start Assembling
Beginning with the front panel of the house, squeeze a wide strip of icing onto the bottom edge. Position on the cookie base, about 3 in. from the front edge of the base. Prop it upright with spice jars for 2-3 minutes or until icing hardens.
Step 4: Add Sides
To add the sides, squeeze icing on the lower edge of one side piece and side edge of the front panel. Align pieces at a right angle, making sure they are as tight as possible. Repeat with the other side.
Pro tip: Try using a cereal box as a guide to ensure you have a 90-degree angle at the corners of your house.
Step 5: Add the Back
To add the back, squeeze the icing on the bottom and side edges of the back piece; position with the other assembled pieces. For added stability, squeeze icing along the inside edge of all pieces and corners. Once dry, remove any spice jars you’ve used to prop up the panels.
Step 6: Add the Roof
To assemble the roof, work one side at a time. Squeeze icing along the top edges of the right side of the house and carefully place a single roof panels on top. Align it so that the upper edge of the roof meets the very center of the house. (There will be an overhang of 1/2 in.) Try using a prop (or recruiting another set of hands) to hold up the roof while it dries. Repeat with other side of the roof.
Step 7: Add the Chimney
With a serrated knife, cut the chimney pieces at an angle to align to your roof, then attach with icing. Hold in place to dry.
Decorate
There are no rules here—just have fun! Make memories by hosting a decorating party for friends and family. Here are some decorating ideas for inspiration:
- Decorating with icing: Use your icing to outline windows, doors and decorative elements. Adding extra icing to the seams provides a good base for adding candy. The icing also works well for adding snow to the roof or the yard (just use some water to thin it out!)
- Add a few tenants: Don’t forget to add the gingerbread people! Decorate them with colored icing and candy eyes, and use a marshmallow to create a kickstand to help them stay upright.
- Design a rooftop: Add texture to your roof with edible shingles. Anything from breakfast cereal to Necco wafers will work! Just remember to start at the bottom and layer the rows as you work your way to the top.
- Get landscaping: Coconut flakes or cotton candy are great for snow! Add a pathway to the door, trees and bushes around the house and people or animals to complete the look. Green gumdrops work for bushes, while pretzel sticks can pass as a log pile. For trees, try covering ice cream cones with icing and green candy, or use your Christmas tree cookie cutter.
No matter how you decorate your gingerbread house, it’s sure to be a fun and festive activity for the holiday season. Happy building!

Gingerbread Lodge
Gingerbread house ideas can be as varied as the homes in our neighborhoods or favorite destinations. With a little effort, a basic A-frame gingerbread house kit becomes this snowy ski lodge. We used candy rocks for the exterior, rolled wafer cookies for exposed beams and a heaping helping of royal icing and coarse sugar for the snow-kissed rooftop.


Gingerbread Cabin
Who wouldn't want to curl up in this cozy gingerbread cabin? A basic A-frame kit gets dressed up with shredded wheat cereal, pretzel rods and candy rocks. Our favorite embellishment is the mounted candy "antlers" on the front door, made from a chocolate disc and broken pretzel pieces.

Gingerbread House with Chimney
Santa will be happy to land on the rooftop of this cute gingerbread house made from an A-frame kit. The impressive chimney made from graham crackers, icing and red chewy candy is just big enough for him to slide down.


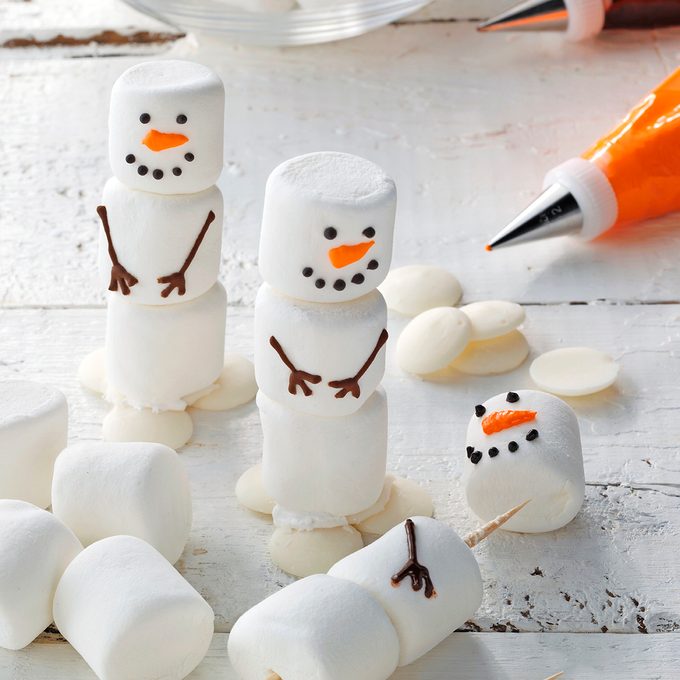
Marshmallow Snowmen
No winter village is complete without a few snowmen! Add these marshmallow decorations to your list of gingerbread house ideas. Use a skewer to stick a few marshmallows together, then pipe on the eyes and nose. To create snow piles next to your snowmen, use white chocolate chips!

Originally Published: November 26, 2018