How to Make a Gingerbread House

Updated: Dec. 19, 2023
Whether you’re building the house from scratch or using a kit, these step-by-step instructions will show you exactly how to make a gingerbread house.
After the holidays, my dad and I always try to build a gingerbread house—and we always fail. Some years, the frosting is too runny. Other years, the roof won’t stay put. And almost every year, we eat half of the candy before we have a chance to decorate. (These homemade Christmas candies are almost impossible to resist!) Though the experience is always fun, I wish we were able to build a Pinterest-worthy house instead of something that deserves a spot on “Nailed It.”
In the name of research (and for the sake of this year’s cookie cottage), I chatted with our Test Kitchen to learn how to make a gingerbread house. I got gingerbread house ideas from the experts regarding both made-from-scratch houses and houses that come in a kit. Follow along as I share my newfound expertise in the form of step-by-step instructions, so-smart hacks and creative decorating tips.
Head over to our complete gingerbread guide for tips on baking and decorating gingerbread cookies, houses and cakes.
Want to Make a Gingerbread House Quick? Try This.
Graham crackers are the ultimate shortcut to making a cute house design.
How to Make a Gingerbread House from Scratch
You’ll Need:
For the Cottage:
- 2-3/4 cups all-purpose flour
- 1/2 teaspoon salt
- 1 tablespoon baking powder
- 1 teaspoon ground ginger
- 1/8 teaspoon ground cloves
- 1 teaspoon ground cinnamon
- 1 large egg
- 2/3 cup molasses
- 1/2 cup canola oil
- 1/3 cup packed brown sugar
For the Icing:
- 3-3/4 cups confectioners’ sugar
- 4 to 5 tablespoons warm water
- 3 tablespoons meringue powder
- 1/2 teaspoon cream of tartar
Other:
- Tracing patterns
- Cardboard
Step 1: Prepare the Patterns
When making a gingerbread house, the most important step is building a strong, sturdy base—and the best way to do that is with a balanced structure. You need to ensure that the walls can support the roof. The exact proportions can be tricky to calculate—which is why we went ahead and played architect for you. All you need to do is print and cut out the patterns (you can download them here). Before you prep the dough, preheat the oven to 300°.
Step 2: Make the Dough
Gingerbread is the classic house-building cookie for two reasons: it’s delicious and it’s sturdy. You wouldn’t want to use a dough that’s too soft or crumbly, otherwise, the house wouldn’t be able to support itself. To make our gingerbread dough, start by greasing a 17x12x1-inch pan. We love this edgeless cookie sheet, which makes trimming and handling the gingerbread much easier.
In a large bowl, whisk together the flour, salt, baking powder, ginger, cinnamon and cloves. In another bowl, whisk together the egg, molasses, oil and brown sugar. Gradually combine the wet ingredients with the dry ingredients, mixing well. Pour the batter into the prepared pan and bake until golden brown, about 25-30 minutes.
Pro Tip: Not sure exactly when to pull the cookies from the oven? Here’s an easy trick: Lightly touch the top of the dough, and if it springs back, it’s done!
Step 3: Cut Out Shapes
Immediately after removing the gingerbread from the oven, place your prepared patterns on top of the dough. Use a sharp knife (or pizza cutter!) to trace and cut out each shape. Discard paper patterns and place each cut-out on a wire rack. If your dough is still a little soft at this step, it’s okay. The cookie will harden as it cools.
Step 4: Make the Icing
While the cookies are cooling, prepare the icing. Start by beating confectioners’ sugar, water, meringue powder and cream of tartar with a mixer on a low speed until it’s well-blended. Then, beat on high for 4-5 minutes, or until stiff peaks form. Immediately transfer to a pastry bag fitted with a pastry tip. Cover any excess icing with a damp paper cloth, and if necessary, beat the icing on high to restore its texture before adding to the piping bag.
Pro Tip: Don’t replace this recipe with a basic frosting or icing recipe. Our royal icing hardens as it dries, acting as a glue that will hold the pieces of your house together. If you’re having trouble finding meringue powder at your local grocery store, you can buy it here.
Step 5: Assemble the Base
To assemble the gingerbread house, pipe along the base and edges of the front wall and one side wall. Position the pieces at a 90° angle and place on the cardboard base. Prop up the pieces with small jars or cans. Repeat the process with the back wall and a second side. Let royal icing dry for 30 minutes. The exact time will depend on how thick the icing is applied, but it should be dry to the touch.
Pro Tip: If your cookies don’t align at a perfect 90° angle, use a Microplane to slowly grate away crumbs until the pieces are level.
Step 6: Attach the Roof
To attach the roof, pipe icing along the peaked edges of the front and back walls. Position roof pieces into place and let fully dry before decorating.
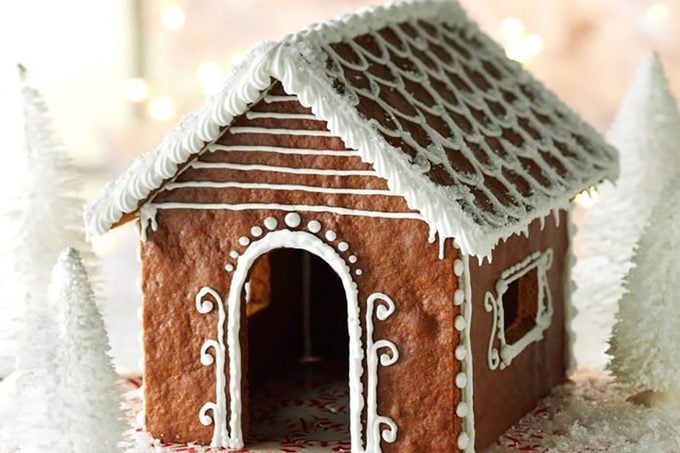
Step 7: Decorate
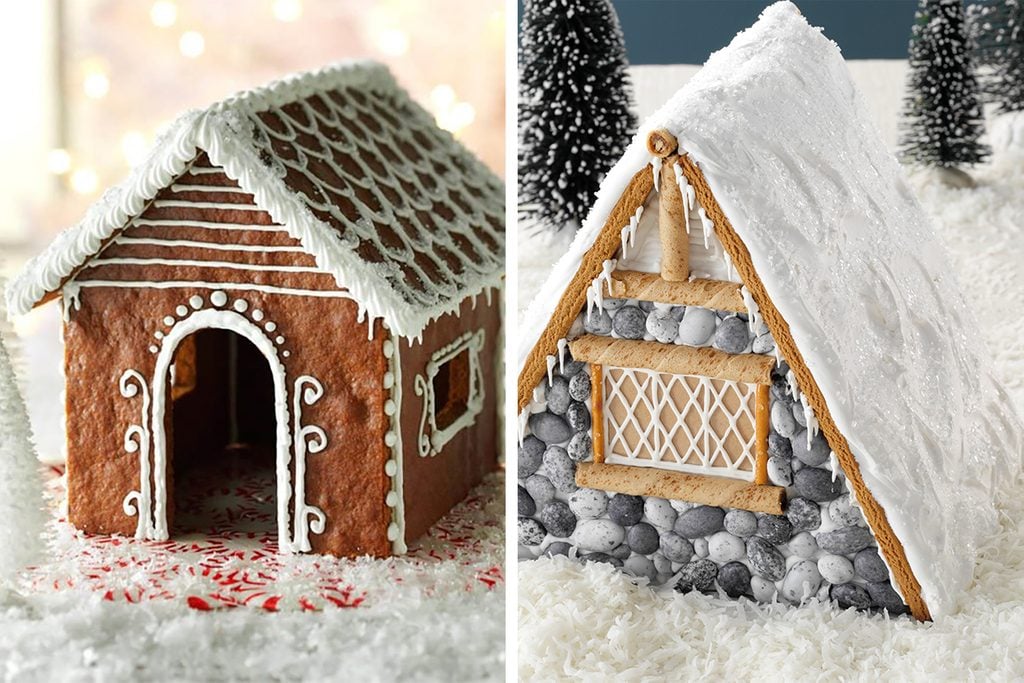
Now that your house is assembled, it’s time to decorate! For a simple, elegant house, use the remaining royal icing and some coarse sugar to create a snow-kissed cottage. For a traditional house, use vintage candies like peppermints and gumdrops. And if the kids are getting involved, let them use an array of brightly colored candies. The way you decorate your house is entirely up to you!
How to Make a Gingerbread House from a Kit
You’ll Need:
- A gingerbread house kit (We suggest the Wilton Ready-to-Decorate Gingerbread Giant A-Frame House).
- Additional candies, if desired
Step 1: Unpack the Kit
Start by unpacking the kit. Place the candies, icing, decorating bags and decorating tips off to the side. Unwrap the gingerbread house pieces and make sure they have no cracks or chips.
Step 2: Assemble the House
The exact instructions for assembling your house depend on the kit you purchased. We recommend following the manufacturer’s instructions for the best results.
Step 3: Decorate
When your house is assembled and dried, it’s time to decorate! Feel free to use the kit’s included candy, or scour your pantry for other decorations. If you want to take your kit to the next level, try one of these fun ideas:
Add Dimension
Your gingerbread house looks great as is, but if you want to add an extra element, build a chimney, adjoining room or window out of graham crackers. Use the crackers and icing to build a basic frame, and let dry. Then attach the addition to your house with icing. Decorate as desired.
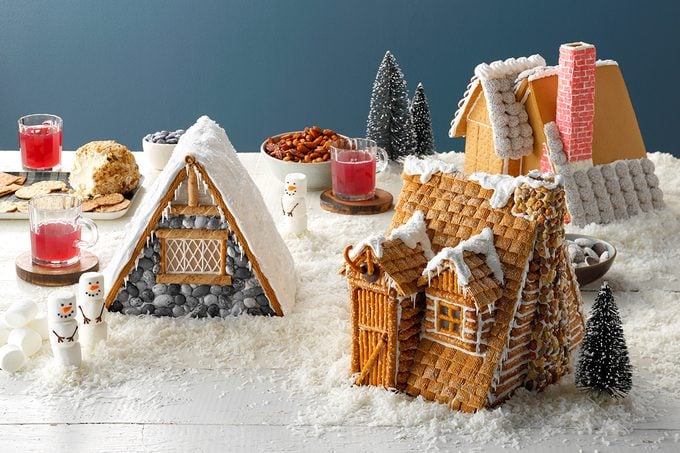
Create Texture
Pantry staples can add a lot of visual impact to your gingerbread house. Try using shredded wheat cereal to create a thatched roof, pretzel rods to form a log cabin or candy pebbles to make a stone facade.
Set the Scene
By itself, your gingerbread house looks a little lonely, but a few smart additions can make it stand out. Start by covering the base of your creation in shredded coconut—it looks just like snow! Then, build a few snowmen out of jumbo marshmallows and tinted royal icing. Finally, add a few small bottlebrush trees to complete the scene.
A few dashing gingerbread men are also a nice touch. Find our top recipes here.
And there you have it! Though it takes some time, learning how to make a gingerbread house (the right way!) is a fun, family-friendly activity. We hope you give it a try this holiday season. Good luck!
Originally Published: November 26, 2018