12 Best Vegetables to Grow in Your Indoor Vegetable Garden

Updated: Dec. 22, 2023
Spinach, green beans, scallions and more! Here are the best vegetables to grow in your indoor vegetable garden.
A lurking winter doesn’t mean you have to give up homegrown veggies. Take advantage of a sunny window to create an indoor vegetable garden that can provide everything you need for a salad. And with supermarket inflation, the savings from growing your own veggies will be worth the extra effort.
Most of the time you can use almost any container as long as it has good drainage. For housebound plants, look for potting mix designed specifically for indoor growing. As for hydration, be mindful of the differences between watering plants outdoors and in. Add your favorite seeds and away you grow!

Scallions
Scallions and green onions are virtually interchangeable. They both derive from the same onion family, making them both super simple to grow. The next time you buy a bunch at the grocery store, leave an inch or more of the white scallion attached to the roots. Place the ends in a straight sided jar or glass and submerge just the roots in water. The scallion greens should start growing again even just sitting on a counter.
When the greens are several inches high, transfer the scallions to a container filled with damp potting mix. The greens will continue to grow. To harvest, cut to the root line. That way, the scallions can grow repeatedly for stir fries and your next batch of scallion and cheddar biscuits.
Do you know that with good light and smaller varieties, you can successfully create an indoor vegetable garden and some fruits after you’ve put your outdoor garden to bed?

Lettuce
Lettuce is a light lover, so pick your sunniest south facing window. Indoor success is more likely with loose-leaf or baby leaf lettuces that don’t need to develop substantial heads. Any well-draining container can support lettuce growing, just fill it with moistened indoor potting mix. Sprinkle seeds like you’re seasoning a soup. They’re tiny, but try to spread apart by an inch. (Don’t worry about overseeding—seedlings can be thinned and added to salads.) Spritz the seeds and top layer of soil with water.
Place in a spot that gets at least five hours of sun, but be wary of hot summer light creating too much direct heat. Most lettuces like bright but cool conditions. If leaves are stretching, supplement with grow lights. Spray soil with water when it begins to dry. Clip outside leaves first when they reach several inches and protect your harvest with the right type of lettuce keeper.

Radishes
We love a fully edible plant! From top to bottom, radishes reward indoor growers. You can eat the greens raw or sauteed, or add the bulb to salads and dinner dishes. Radishes worship the sun, so look for a window that offers six to eight hours. In lieu of nature, try a grow light for at least 12 hours a day.
Use at least a 6-inch deep container that is also wide to give radishes space to develop. Fill with damp potting mix, scatter several pinches of the tiny seeds across a container. Cover with a shallow layer of damp soil. While they need water, swampy conditions could result in disease so make sure there’s plenty of drainage. Once seeds have sprouted, thin the seedlings to about an inch apart. Depending on variety and conditions, radishes can be ready to enjoy in a month or two. Gently remove dirt around the root to check its size.
Once your crop is ready, experiment with these fun radish recipes, or keep it as simple as possible and munch on radishes with butter and sea salt (aka the world’s easiest appetizer).

Green Beans
Like other garden faves, green beans need a solid six hours of direct sunlight or grow light equivalent. They come in two varieties: Avoid the challenge of super leggy pole beans in favor of stockier, self-supporting bush beans. Also look for seeds that are self-pollinating.
In order to grow enough green beans to make a harvest worthwhile, look for a larger pot with drainage. Space beans at least two inches apart. Plant two seeds at a time, pushing them in damp potting mix past your first knuckle (an inch). Cover the hole and keep the soil evenly moist. Within a couple of weeks, sprouts should form.
If two plants emerge, you can pull the weaker one out. Turn the pot weekly for even sun exposure. After the plant flowers and fruits, make sure to harvest all the beans. Leaving them attached can shorten the plant’s life since it will think it produced the seeds necessary for reproduction.
There are dozens of delicious ways to eat green beans, but if you have a bumper crop, these pickled green beans are the way to go. They’re fantastic on their own and even better as a Bloody Mary garnish!

Sprouts
Sprouts are among the fastest growing indoor crops. They add great texture to salads and sandwiches. The most important growing tips are to be especially mindful of cleanliness and to use only seeds, grains and beans intended for sprouting. Others may pose health risks—particularly if eaten raw.
From alfalfa to lentils, the guidelines for sprouting remain consistent. Sprouts will do better away from direct window light. A bright countertop will work. Use a specific sprouting container or a wider jar that allows for air flow. Clean equipment and your hands with hot soapy water and rinse. Soak seeds in water up to 12 hours in a dark spot to jumpstart germination. Place them in your growing container. Rinse and drain thoroughly with cool, fresh water two to three times per day.
Depending on varietals, sprouts will emerge between three and six days. Start a batch every few weeks for a constant supply.

Garlic
For anyone who has ever planted garlic in the garden in September for a spring/summer harvest, it might surprise you to learn it can absolutely produce deliciousness in your indoor vegetable garden. Instead of growing bulbs, focus on greens! Like fast growing indoor herbs, each garlic clove can sprout greens.
To start, break a head of garlic into separate pieces. It can be hard neck or soft neck. Fill a 6-inch container with moist potting mix and ensure the drainage hole remains clear. Plant several cloves at least halfway down as close together as you would like. (Note: the pointy end should face up, the flat side faces down for roots to grow.) Place the container in a bright spot and green shoots should emerge in a week or two. They’re ready to clip when several inches high. The cutting encourages several rounds of growth before the bulb is exhausted.
Growing garlic bulbs indoors is possible, but requires much more planning and patience. Chilling the bulbs for at least a few weeks to replicate winter is required. Then it could still take up to nine months to harvest.

Spinach
Spinach is well-suited to growing indoors since the less intensive light fits its cooler climate personality. Try a wider and deeper container with plenty of drainage. A 6-inch depth should do the trick. Fill with dampened indoor growing medium, and plant seeds about 1/2-inch deep and at least three inches apart to give space for mature plants. Place in a sunshine-filled window.
They will germinate between 50° and 80°F, but if nothing happens after a week or so, a heat mat can kickstart the seeds. Keep the soil evenly moist but not saturated, and avoid watering the leaves. Baby spinach can be harvested anytime, being mindful to take the outer leaves first. The plants with six leaves are mature.
In addition to being incredibly healthful, spinach is versatile. Sauteed spinach offers a cooked alternative to crisp spinach salads. You can also wilt it into soups and stews or blend it into spinach pesto.

Peas
Ever consider growing peas indoors? These delicious veggies are among the healthiest vegetables you can eat. Of course, unless you have tons of space, it may be difficult to harvest a crop large enough for an entire side of creamed peas or spring pea soup, but they are fun and the pea shoots are also edible.
Most peas should flower and fruit on their own, but always check a seed packet. You can plant several in a larger pot, or one or two in something smaller. Push pea seeds about a half inch into the damp potting mix. Cover the hole and place in an area with at least eight hours of direct sun.
As with other indoor growing vegetables, grow lights can supplement what nature isn’t providing. A trellis for growing helps with air flow, but shoots can hang as well. Harvest greens on demand or wait for the pods to develop.

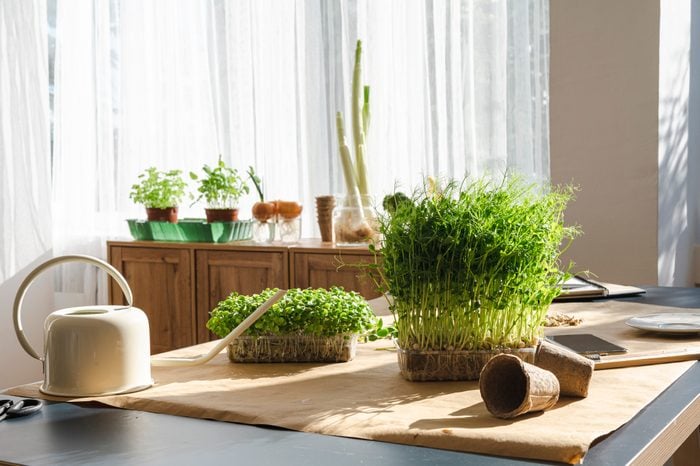
Microgreens
Microgreens are the small but powerful starts to what would be larger plants like broccoli and kale if you let them grow. But you don’t. And with a little attention, they can produce plenty of produce for your salads.
Shallow trays and organic potting mix are the best way to start your microgreen mini farm. Make sure all of the equipment is sterilized first. They grow in a damp environment and bacteria is always a risk. Although technically any seeds can be grown in micro fashion, try to find seeds or mixes that are sold as microgreens. This helps to ensure success and to avoid consuming something not meant to be an edible leaf.
Begin by soaking seeds overnight. Scatter seeds on damp potting mix and cover with another thin layer. Some microgreen dishes have a cover to help with germination. If a sunny window ledge results in slow growing or spindly greens, place under a grow light. Use a sprayer to water, and check the soil daily. Some greens might regenerate after cutting.

Hot Peppers
If you can’t get enough of the heat of jalapeno recipes, try growing your own at home! Plentiful sunshine and warm temperatures are key. In this case, it may be easier to start with plants from a nursery. Because they thrive in gardens that get sun all day long, try to replicate that with at least six hours of direct sun and bright light for the rest of the day.
If the peppers look listless in your window after some time, add a heat mat or a grow light. Look for smaller varieties of hot peppers that have a greater chance of succeeding. As they grow, they will need to be transplanted into larger pots—10 to 12 inches or beyond. Keep watering regularly but not enough that you start noticing soggy roots. It may take several months to see mature fruit.

Basil
If you have a south- or east-facing window, you can grow basil. No window? No worries. A grow light can suffice. Look for basil varieties that match the recipes you plan to cook—sweet basil or sweet Genovese seeds are commonly available.
Fill the container of choice with damp potting mix. Sprinkle seeds evenly and cover with a thin layer of more damp soil. Until those seeds sprout and root, consider spraying rather than pouring water and disrupting tiny roots. Small basil cuttings can top soups and salads. Or, to encourage longevity, allow the basil to grow until several sets of leaves are established. Cut just above leaf nodules to encourage branching and more production.
Pro tip: Hydroponic and soil-based plants, like basil, are often sold in grocery produce sections. Place hydroponic plants in a container with water covering the roots. They will continue to grow. Potted plants can be maintained as is until you notice the soil isn’t absorbing enough water. Learn when and how to repot plants to keep them healthy. Water when the top inch or two is dry.

Chives
If you learn how to freeze herbs, you can preserve all the flavors of summer. But you can also bring seasonal favorites like chives to grow indoors to enjoy fresh any time of the year. Transplanting from a grower pot is a great way to get started. Just make sure the upgraded container is about one size bigger (or an inch larger in circumference). Fill it with damp potting mix, and make a depression to match the size of the root ball. After placing it in the container, top off with soil to a half inch below the lip.
To grow chives from seed, fill a 6-inch container with pre-moistened potting mix. Ensure water can drain freely. Sprinkle seeds across the top and cover with a thin layer of more damp soil. Locate in an area with six to eight hours of bright light. Keep the soil damp but not drowning. Chives should start growing within two weeks.
Originally Published: November 20, 2023