Upside-down turkey? You heard us right! Find out why you should flip your bird for a delicious holiday dinner.

How to Cook an Upside-Down Turkey
When it comes to holiday turkey, we understand not wanting to change up your recipe too much. You don’t want anyone to be disappointed with an unfamiliar main dish. But just because the flavors aren’t new, doesn’t mean you have to prep your turkey the exact same way. It turns out, giving your bird a quick flip can be a real game-changer. We’ll show you how to cook an upside-down turkey and explain why you might want to give this method a try.
Why You Should Cook Turkey Upside Down
We know, changing up the turkey routine is hard, but giving the bird a flip has it’s benefits. According to Peggy Woodward, Taste of Home Senior Food Editor, making turkey upside down creates perfectly cooked turkey breast. The idea is that the breast won’t get overcooked while you wait on the thighs to cook (that’s where you take the temperature to determine if your bird is fully cooked).
Also, by roasting upside down, all the juices will run down the bird and into the breast. White meat, like breast meat, tends to cook up a bit drier, so this can help make it a bit more succulent. Since we’re all longing for juicy turkey, this is a great technique to try to impress the whole fam.
What You Should Know Before Trying This Technique
This reverse technique isn’t challenging, but there are a few things to know before you buy your turkey and start cooking.
- The recipe is the same: If you want to roast turkey upside down, take comfort in knowing you can use your recipe of choice. (Here are different ways to season a bird.) The only thing changing with this technique is how you place the turkey in the roasting pan.
- It’s beginner-friendly: Even if you’re new to cooking turkey, cooking upside-down turkey isn’t challenging. Again, the only change here is which side is facing up.
- Test the temperature in the thigh: Whether you roast your turkey in the oven right-side-up or upside-down, grill, fry or smoke it—you should test the temperature in the thigh. This is the part of the turkey that takes the longest time to cook. You want the temperature to be about 170ºF.
- Coordination is required: To carve the turkey, you’ll want the bird to sit the traditional way so you can slice the breast meat. So once it comes out of the oven and rests (yes, you should rest your turkey), you will need to turn it over. This is not a job for Grandma or little Aunt Rita. Enlist a family member or guest that’s capable of lifting and turning a heavy turkey—ideally one that hasn’t had too many Thanksgiving cocktails.
How to Cook an Upside-Down Turkey
To cook a turkey upside down, you can use any turkey recipe you like. The spices, herbs and aromatics are all up to you, though if you’re looking for a good go-to for Thanksgiving or other special occasions, this roasted sage turkey is always a winner. Here are the ingredients you’ll want to gather:
- 1 turkey (14 to 16 pounds)
- 1 tablespoon salt
- 1 teaspoon ground sage
- 1/2 teaspoon garlic powder
- 1/2 teaspoon pepper
- 1 large onion, chopped
- 3 celery ribs, chopped
- 3 medium carrots, chopped
- 1-1/4 cups water, divided
- 3/4 cup white wine
- 3 tablespoons canola oil
- 4 fresh thyme sprigs
- 3 fresh sage sprigs
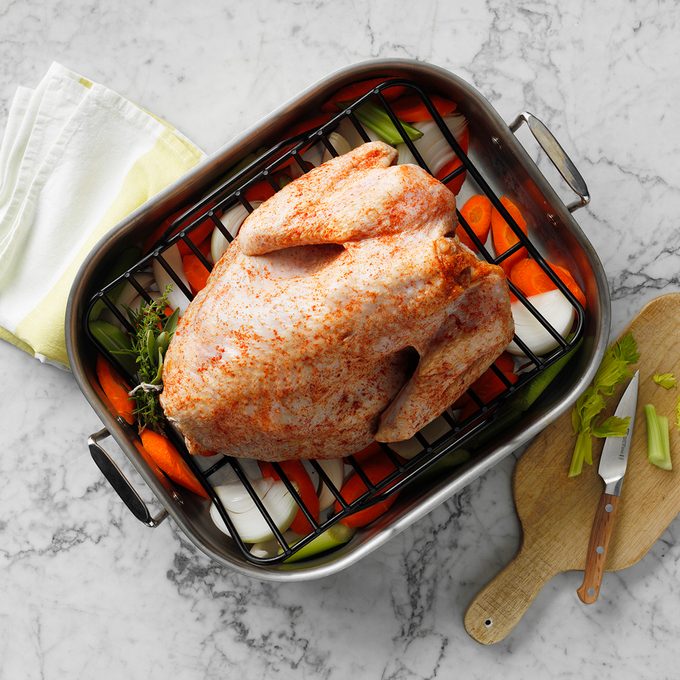
Step 1: Prep Your Turkey
Just like with any turkey recipe, you’ll want to prep your turkey. That means removing the neck and giblets from the cavity. You can save them to make gravy or discard them. Then secure the skin to the neck cavity with toothpicks, tie the drumsticks together and pat the turkey dry.
Next, mix together the seasonings: salt, sage and garlic powder. Rub this mixture everywhere on the outside of the turkey. Refrigerate, covered, overnight.
Step 2: Get Ready to Roast
Grab your favorite roasting pan and place the onion, celery and carrots at the bottom. Pour in a half cup of water. Then place the turkey, upside down, onto the roasting rack. Rub the outside with oil and sprinkle with pepper and any additional herbs and spices you might enjoy.
Next, pour the wine and remaining water into the cavity. Then, fill the cavity with the fresh herbs. You can also add other aromatics as well. Citrus fruits, herbs, onions, fennel and even apples can add flavor and moisture.
Step 3: Cook the Turkey
Place the turkey in a 475ºF oven and roast uncovered for 40 minutes. Then reduce your oven’s temperature to 350ºF and continue to cook for about two more hours. You’ll want to follow our turkey cooking guide for exact times, and always, always rely on a meat thermometer to ensure your turkey is cooked to a food-safe temperature. Check your turkey’s temp in the middle of the thigh for best results.
Editor’s tip: If you see that your turkey is getting a bit too crisp on the outside, you can always tent with foil.
Step 4: Rest and Carve
Don’t dive right in and slice your turkey right away. Instead, let it rest, uncovered, for 20 minutes before carving. This will help all the juices reintegrate into the turkey so it’s nice and moist. When you are ready to cut, flip the bird over and carve as normal.
How to Serve an Upside-Down Turkey
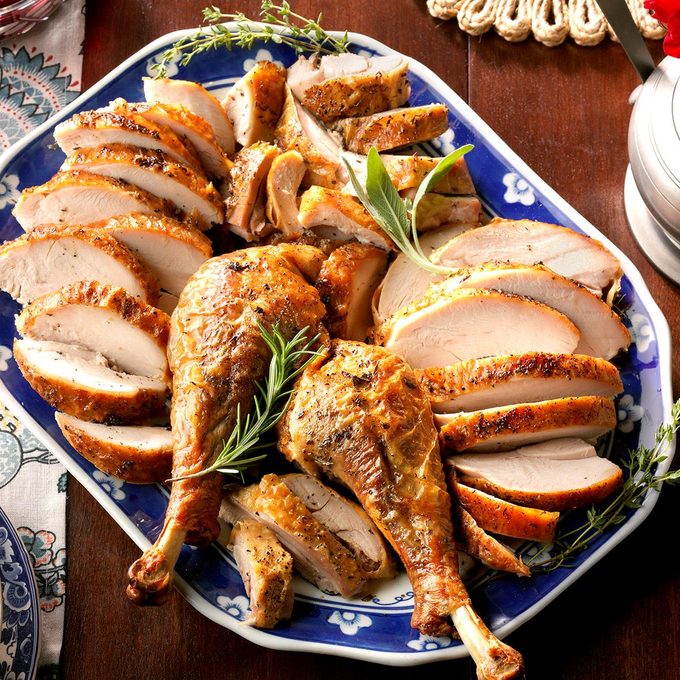
Because this turkey is cooked differently with the breast facing the bottom of the pan, it will not look like your traditional turkey. Our Test Kitchen doesn’t recommend serving an upside-down turkey whole on the table. Instead, carve and slice the turkey before serving it up at your diner table with your favorite Thanksgiving sides.
Use your prettiest serving tray and garnish with fresh herbs. It’s still a gorgeous presentation (and is much easier than carving the turkey at the table!).
The result of cooking your turkey this way is a juicier bird that’s just as flavorful and tasty as your traditional method. Plus, you can impress all your guests with your new skill!
Peggy Woodward and Rashanda Cobbins, Taste of Home Food Editors, contributed to this article.