How to Clean Grout—We Tested 5 of the Best Methods

Updated: Apr. 30, 2024
Cleaning grout is a pain, but it doesn't have to be daunting, difficult or expensive. Use this guide to figure out how to clean grout, plus which products are the best to keep handy.
Grout seemingly lines most places in our homes: kitchen backsplashes, tile floors, showers, tubs and countertops. And, inevitably, the grout gets dirty. So, learning how to clean grout is essential to a clean home.
When cleaning grout, there are many variables to consider before getting started. What type of grout do you have? Is it sanded, unsanded or epoxy? What types of cleaners are safe to use near the surrounding tiles? Then, of course, you’ll also want to know which grout cleaner is the best product to use in terms of effort, time, cost and effectiveness. If you’re going to go through the hassle of cleaning all this grout, you want to make sure you’re doing it right. Right?
Luckily, this guide will help walk you through all of these conundrums and more. We put five popular methods for cleaning grout to the test and share all of our best tips and tricks for bathroom cleaning and getting a sparkly kitchen.
The Testing Method
As with any experiment, we made sure to put some controls in place to ensure each product was being tested on a level playing field so we could assess their effectiveness fairly.
First, and this may sound obvious, we made sure to follow the package directions for each product to a T. One of the biggest cleaning mistakes people make when using a new product is to assume they can all be used the same. This will only set you up for a big cleaning fail. Make sure to follow the directions using the manufacturer’s guidelines so you get the best results possible and you don’t accidentally create a dangerous mix of cleaning chemicals. Safety first!
Second, we tested all products in two settings. The first area had a light-colored, sealed, sanded grout on a kitchen backsplash. In our space, the dirtiest, most discolored grout was around our range hood, so we focused our efforts there. We also tested all cleaners on a ceramic tile floor that had light-colored, unsealed, sanded grout.
Lastly, since we are all looking for the path of least resistance when it comes to a good grout cleaning hack, we limited the “active scrubbing” time to five minutes in a single area. One caveat to this rule was if a manufacturer recommended allowing the product to sit on the grout prior to scrubbing. In those instances, we followed those guidelines to ensure the product could clean the grout lines with its full effectiveness.
Ratings
Each method for cleaning grout is rated on a scale of one to five. Ratings were awarded based on how affordable the cleaning product was, how long it took each product to remove dirt and stains, how much extra elbow grease was required (the less scrubbing, the better) and overall effectiveness.
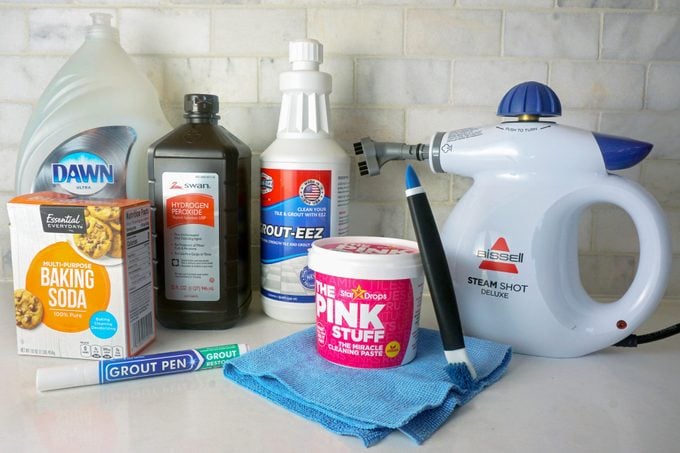
5 Methods for Cleaning Grout
Grout Pen
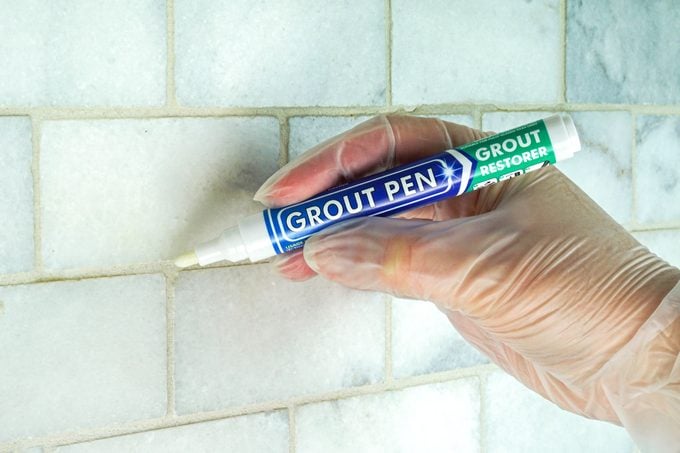
Benefits: Grout pens are super affordable, come in an array of colors and offer a super simple, low-mess application.
How it works: The first thing you need to know about most grout pens is that they don’t actually clean your grout. While some grout pens may contain additives that kill mold and mildew, grout pens are essentially just fancy paint pens that simply cover dirt and stains rather than remove them. Think of grout pens as a temporary band-aid rather than an actual cleaning solution.
What happened: While we loved the ease of application and that no scrubbing was required, we couldn’t help but feel like we were cheating with this method. While the pen did effectively cover any discoloration, it did not remove any of the grease build-up or actual dirt on the grout. Additionally, the pen was not an exact match for our backsplash or tile floor grout. After using it, the area we “cleaned” no longer appeared dirty, but it didn’t match the surrounding grout lines, either.
Bottom Line: We think grout pens are best used for a small section of grout that remains stubbornly stained with food even after attempting to clean it with other methods. If you can find a pen that matches your grout color exactly, it can be a great way to refresh and touch up discolored grout.
Rating: 1/5
Steam Cleaner
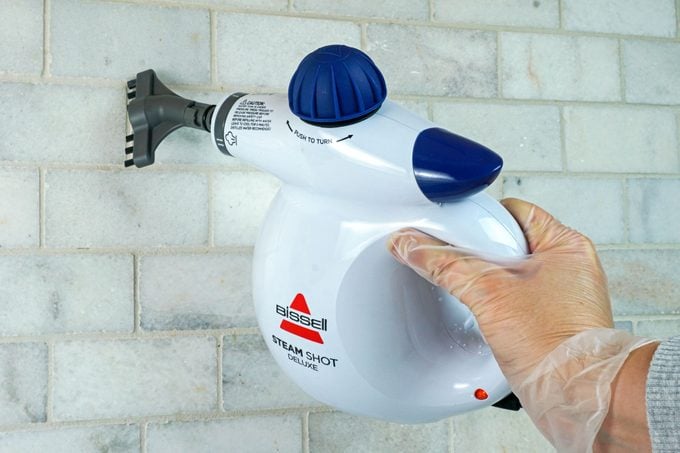
Benefits: Steam cleaners with grout attachments, like the Bissell SteamShot we used in testing, offer a chemical-free cleaning alternative with no harsh fumes or residues. It’s a great choice for those with pets, small children or surfaces like marble that do not tolerate highly abrasive cleaners.
How it works: Steam cleaners work by using pressurized steam to clean and sanitize surfaces. The model we tested came with a grout-cleaning nozzle and brush, and a small tank to fill with distilled water. In about five minutes, the unit heats and pressurizes the water, and then you direct the nozzle of the unit to the area you wish to clean. Pull the trigger to release hot steam and then scrub away dirt and stains. It’s one of the easiest ways to kill bacteria.
Editor’s Tip: Be careful! Hot steam can burn, so don’t overfill your unit, make sure everything is properly sealed and attached, and do not direct the steam toward anything other than the surface you wish to clean.
What happened: Once filled and ready to use, we found the steam cleaner to be a bit heavy to hold steady and scrub effectively due to its size, weight and angle of the grout nozzle. With that being said, it did remove all the dirt and grease from the grout we tested (and very quickly too). However, it did not do as well on the set-in stains, which remained in the grout after our test. For more on this product, you can read our full review on the Bissell SteamShot.
Bottom Line: For routine cleaning, a steam cleaner is a great option. We love that these units don’t use any harsh chemicals to disinfect and clean, especially for kitchen areas where food safety is top-of-mind. While a bit heavy and awkward, the unit cleaned the grout super quickly despite leaving a few stains behind. The steam shot is our go-to choice for day-to-day grout cleaning and maintenance.
Rating: 3/5 for deep cleaning but 5/5 for light, routine cleaning
DIY Grout Cleaner
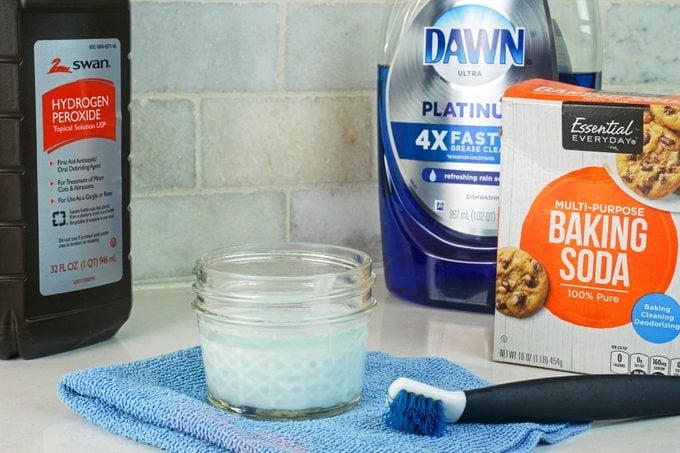
Benefits: This is an easy and affordable grout cleaning option that uses everyday ingredients you likely have on hand already. You’ll need baking soda, dish soap and hydrogen peroxide for this method.
How it works: To make a homemade grout cleaner, mix 1 tablespoon liquid dish soap with 1/2 cup baking soda and 1/4 cup hydrogen peroxide in a shallow dish or a squeeze bottle. Apply the solution to the grout lines and allow it to stand for 5 to 10 minutes. Then, use a brush with stiff bristles to scrub the lines until clean. Rinse with cool water and repeat.
What happened: This method worked like a charm on both the ceramic tile floors and the backsplash. If you didn’t try it when the tile floor cleaning hack went viral, you’re definitely going to want to try it now. Afterall, baking soda isn’t really a viral trend; it’s been around for ages for good reason! Here are all the other ways you can clean with baking soda.
Bottom Line: Upon mixing up the DIY cleaner, it formed a light foaming paste that worked to gently lift away dirt, kill bacteria (thanks to hydrogen peroxide) and remove stains. With that being said, the foam solution was much easier to apply to a flat surface, so it’s great for cleaning the floor, as opposed to a vertical backsplash.
Since the solution requires soaking, the paste slid down the backsplash while it soaked, which likely inhibited its effectiveness. Additionally, this method required quite a bit of elbow grease. Since it is weaker than commercial-grade cleaners with harsh chemicals, you need to use some muscle to get it to clean effectively.
Rating: 4/5
Grout-EEZ
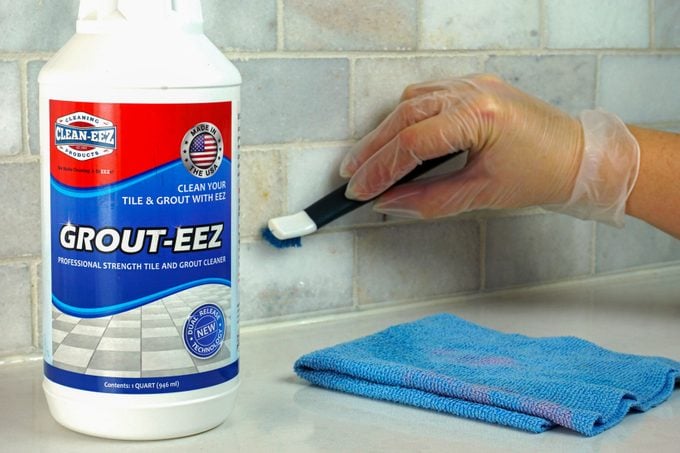
Benefits: This is a heavy-duty professional strength grout cleaner that’s effective on even the most set-in stains.
How it works: Grout-EEZ is a liquid 2-in-1 cleaning solution that first works to release and clean away everyday dirt and then soaks down deep to lift and remove tough stains and restore grout’s original color. First, apply the cleaner to the grout and let it set for 5 to 10 minutes, then agitate with the included brush. To finish, rinse with warm water and let dry.
Editor’s Note: This cleaner is only for ceramic and porcelain tiles. It is way too harsh for marble and granite, so do not use it on grout lines between natural stone.
What happened: This stuff does not mess around (don’t forget to wear a pair of rubber gloves). We had high hopes for this cleaner, and it did not disappoint as it removed dirt and even the darkest stains on our ceramic tile grout lines. While super effective, it had the strongest chemical smell of all the methods we tested, and its thin consistency is definitely best suited for flat surfaces (although the manufacturer says it can be applied to tile showers and backsplashes).
Bottom Line: While Grout-EEZ worked quickly and effectively, it missed a top score for a few reasons. First is its price. Coming in at around $20 a bottle, it is one of the more expensive Amazon cleaning products we tested. Second, its liquid form and bottle make it better suited for floors and countertops. Using Grout-EEZ on backsplashes and shower walls, while possible, is not as easy as other methods we tried.
Finally, due to its industrial-strength properties, it can only be used on ceramic and porcelain (but we’d be curious to test their Stone-EEZ product for natural stone). For the price, we’d like it to be more of an all-in-one product. However, if you do not have any natural stone in your home, then this may be a great option for you.
Rating: 4/5
The Pink Stuff
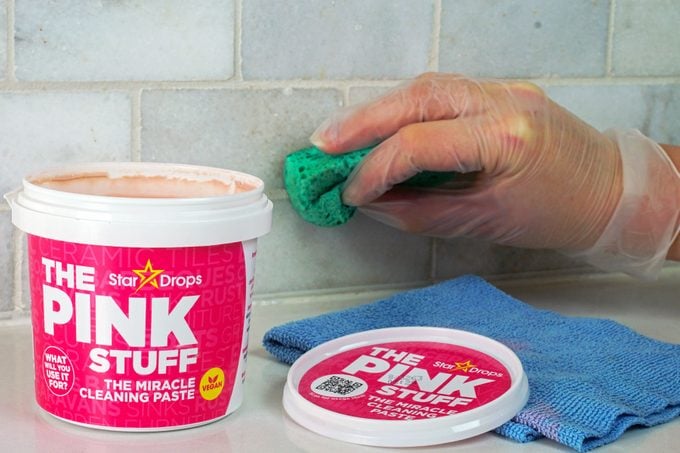
Benefits: At $5, a little tub of The Pink Stuff is super affordable and works quickly to remove dirt and stains.
How it works: Touted as a miracle cleaning paste, The Pink Stuff is easy to apply to grout using a soft cloth or sponge. Simply rub and scrub, and then rinse with hot water. As a mildly abrasive cleaner, the paste has a little grit to it, which helps scrub away dirt and debris from grout and surfaces.
What happened: This stuff is truly magical. Using a small dime-sized amount on a microfiber cloth was all we needed to remove dirt, grease and set-in stains from our grout lines (it also works wonders when cleaning chrome). The consistency of the paste made it easy to spread and scrub on both the floors and the backsplash, and while some elbow grease was needed, it was less than what was needed for the DIY cleaner mentioned above.
Editor’s Tip: We found conflicting claims online about whether or not The Pink Stuff is safe for marble and natural stone surfaces. While it did not damage our marble tiles, we would highly suggest testing it on an inconspicuous area if you wish to give it a try.
Bottom Line: This was the most affordable, effective and versatile cleaner we tried. The Pink Stuff (here’s a full review) is easy to apply, requires minimal scrubbing power, costs around $5 and removes everyday dirt and set-in stains. We also appreciate that (at least in our test) we were able to use it on grout lines near both ceramic and marble tiles.
Rating: 5/5
Tips and Tricks for Cleaning Grout
How do you keep white grout clean?
According to fellow Taste of Home writer and cleaning expert Erica Young, the best way to keep white grout clean is to seal it (unless you have an epoxy grout). The right sealant will prevent stains and increase moisture resistance. Grout should be sealed immediately after installation once it dries and cures and then resealed periodically to maintain its integrity.
How often should you clean grout?
Just like any other deep cleaning job, you’ll want to clean grout regularly to ensure you’re not faced with an overwhelming job. We recommend scrubbing grout about once a month. It’s not necessary to clean your grout every day, but if you spill spaghetti sauce on the floor or splatter oil on your backsplash, clean it up right away, so it doesn’t have time to set. Learn more with our kitchen cleaning guide.
Do steam mops clean grout?
For floors, steam mops are highly effective for cleaning grout. Just like the handheld steam cleaner we tested, a steam mop can clean and sanitize your tile and grout without resorting to harsh chemicals.
Originally Published: January 11, 2023