This recall is a must-read if you buy laundry detergent pods. The U.S. Consumer Product Safety Commission (CPSC) has shared a recall from Procter & Gamble that affects its popular laundry detergent packets, aka Tide Pods and Gain Flings.
Here’s what to know before your next load of laundry.
What laundry detergent is being recalled?
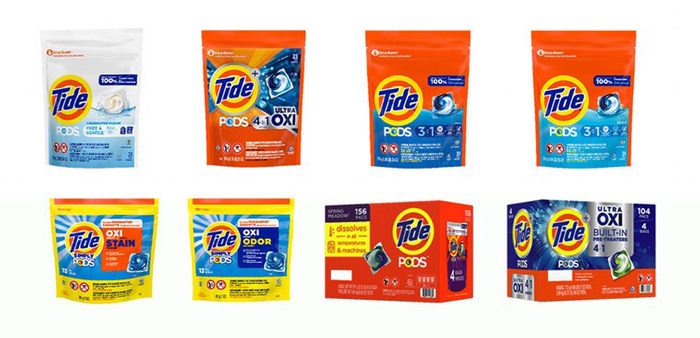
Tide recall
- Tide Pods Original
- Tide Pods Spring Meadow Scent
- Tide Pods Light
- Tide Simply Pods Plus Oxi Boost
- Tide Pods Clean Breeze Scent
- Tide Pods Free & Gentle
- Tide Pods Oxi
- Tide Pods Ultra Oxi
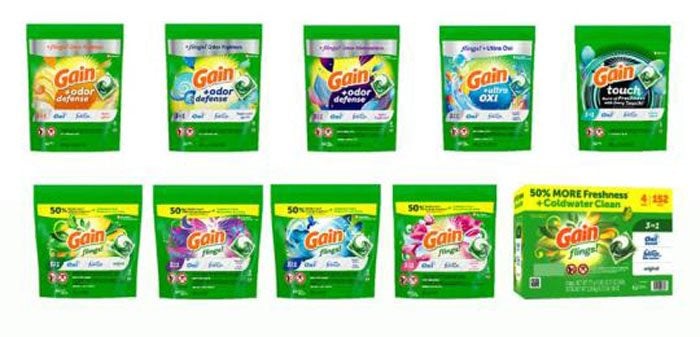
Gain recall
- Gain Flings Original
- Gain Flings Moonlight Breeze Scent
- Gain Flings Blissful Breeze Scent
- Gain Flings Spring Daydream Scent
- Gain Flings Plus Ultra Oxi
- Gain Flings Plus Odor Defense
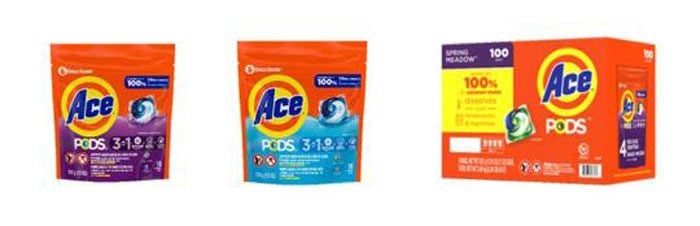
Other brands
- Ace Pods Clean Breeze
- Ace Pods Spring Meadow
- Ariel Pods Alpine Breeze
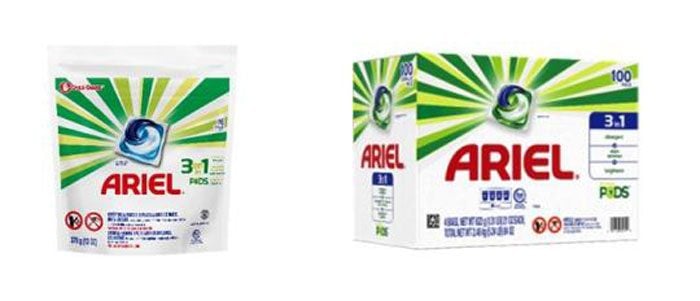
This recall affects only laundry detergent pods sold in bags. The products in hard plastic tubs are fine.
Why is Procter & Gamble recalling detergent pods?
P&G says the packaging can split open near the zipper track, posing a risk of injury to children and vulnerable adults if they accidentally eat the laundry detergent packets. It happens—so far, four curious kids have accessed the liquid laundry packets, three of which reported ingestion.
How do I know if I bought recalled pods?
To see if your specific Tide, Gain, Ace or Ariel bag is part of the recall, check the lot code on the bottom of the bag. Recalled lot codes will be listed at pg.com/bags.
What should I do next?
The laundry detergent itself is still safe to use, but store the bags out of sight and reach of kids. If you have a Tide Pods or Gain Flings tub handy, transfer the packets to that tub. Then, contact Procter & Gamble via pg.com/bags for a full refund and a child-resistant bag to store the product.
Pizza ovens continue to offer people the opportunity to get creative with cooking pizzas at home. You can use an outdoor pizza oven in the yard or on a deck, or even cook restaurant-quality pizza at high temperatures in an indoor pizza oven, such as the Ooni Volt. As a former bakery owner and pizza enthusiast, I have tested 9 different pizza ovens across a variety of brands, including the Ooni pizza ovens, Solo Stove pizza oven, Blackstone pizza oven and the Gozney Roccbox.
While Gozney pizza ovens have been available for several years now, the brand came out with a new pizza oven—the Gozney Arc—in March 2024. It combines the features of both the compact, portable Roccbox with the eye-catching, larger Gozney Dome to crank out pizzas in 60 to 90 seconds. Here’s what we learned as we put it to the test.
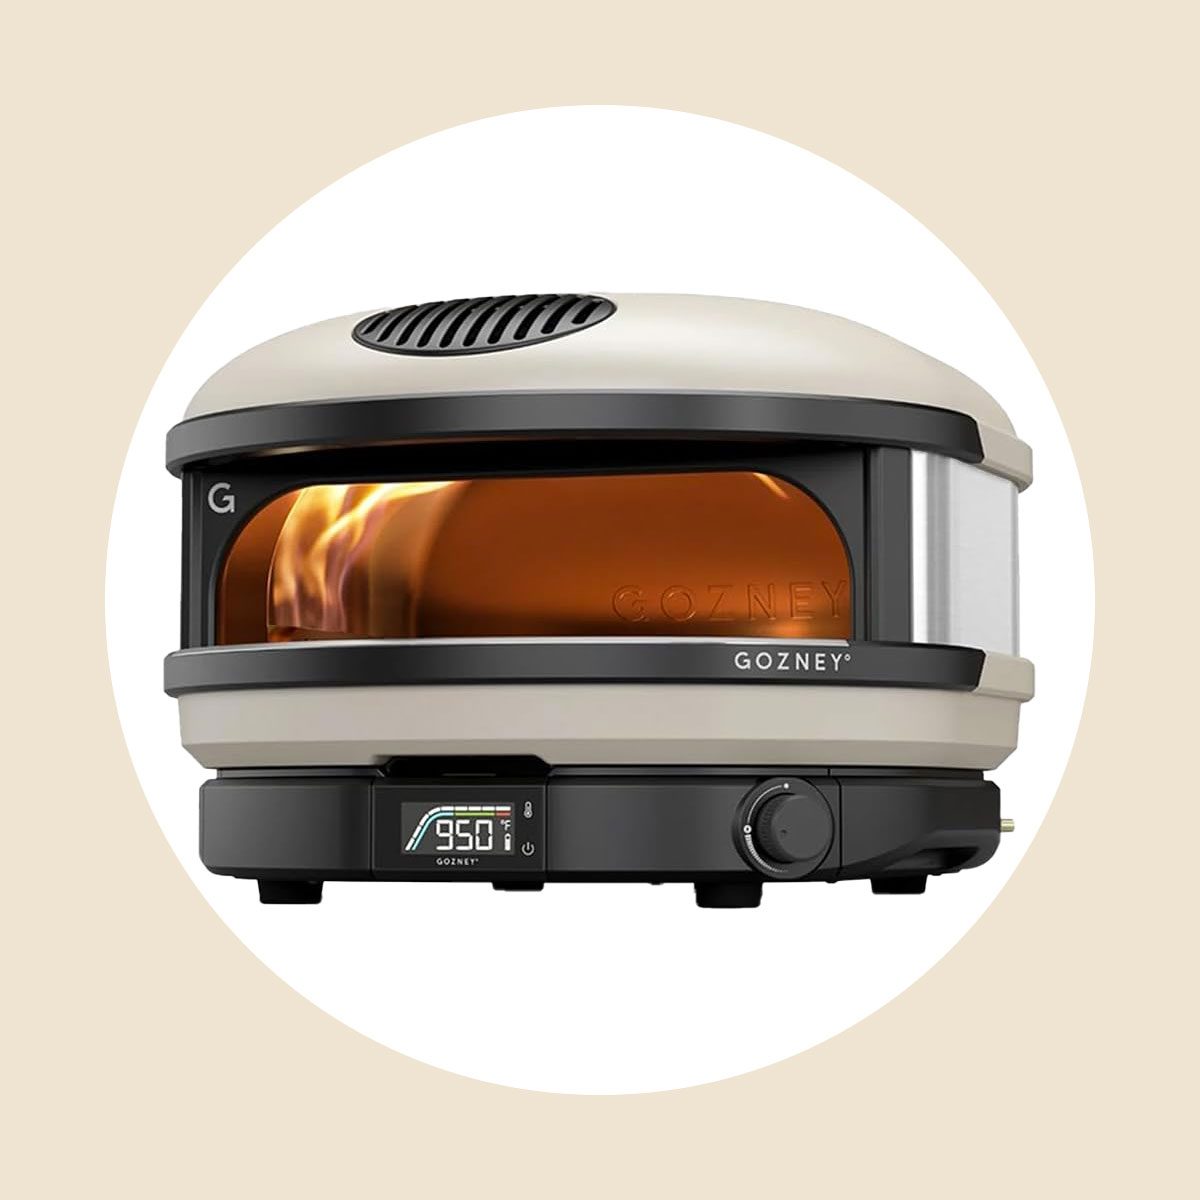
What Is the Gozney Arc Pizza Oven?
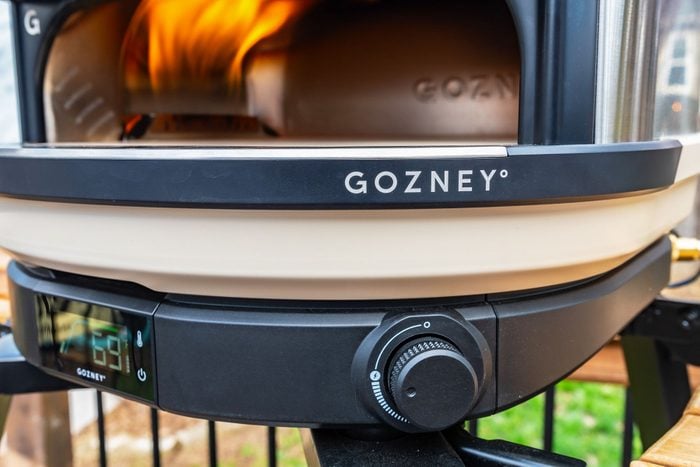
The gas-powered Gozney Arc pizza oven is the latest addition to Gozney’s line-up, following its popular Gozney Roccbox and statement-making Gozney Dome pizza ovens. The oven has a similar dome style shape and design, but a smaller footprint. It takes up far less space, allowing you to easily set it on a heat-safe table or on Gozney’s Arc stand, which is sold separately.
It has a durable bone white outer coating and black detailing, including a flue outlet on the top. The oven is two-way insulated, with a pizza stone at the base. The pizza oven’s ignition gauge and heat dial are on the front right, with a battery-operated digital thermometer on the front for easy temperature reading. The oven weighs 47.5 pounds with an opening of 14.8 inches by 3.74 inches, allowing space for cooking 14-inch pizzas.
 VIA MERCHANT
We Tried It
Gozney Arc Pizza Oven
Get set up to enjoy homemade pizza with ease, whether you're hosting pizza parties or firing a pie for Tuesday night dinner.
How We Tested It
Set-Up
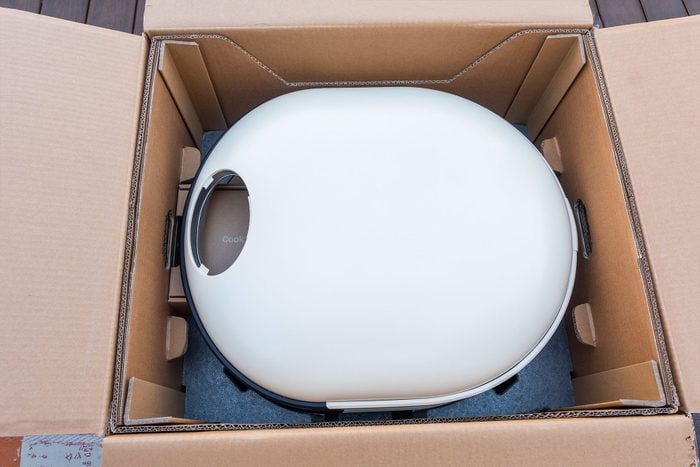
The Gozney Arc came in a well-packed box, with very little assembly required. All I needed to do was pull the oven out of the box. The stone was already secured in the pizza oven, so all that was left to do was remove the battery tab from the thermometer and hook the hose up to a propane tank to make the entire unit ready to light and use.
Cooking Pizzas
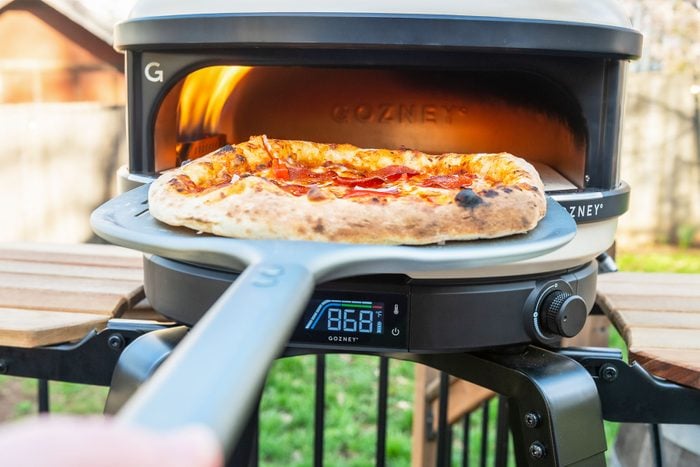
Firing up the Gozney Arc with its front-side ignition dial is simple. While cooking multiple pizzas across multiple days, I found it took about 25 to 30 minutes for the oven to preheat, reaching a temperature of 850 to 900 degrees in that time. Of course, that allows for plenty of time for gathering and chopping toppings ahead of making and launching pizzas.
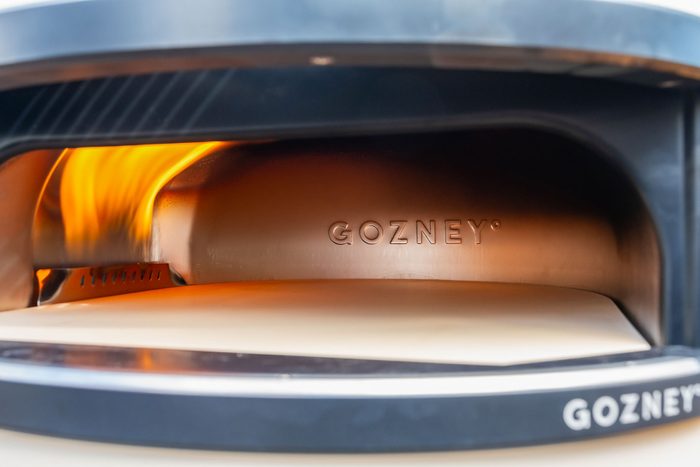
The most significant difference of the Arc design is its large, rolling flame on the left side. It absolutely cranks out heat, with my oven reaching close to 950 degrees. The flame rolls up and over the inside of the oven, which is how it got its name the Arc. The hot stone cooks the base of the pizza, while the arcing flame evenly cooks the pizza on the top.

Of course, it will still be hotter on the side with the flame, so keeping watch and turning the pizza while cooking is necessary. However, with its smaller flame footprint, I didn’t feel like I needed to constantly turn the pizza so frequently for an even cook. The supreme heat retention and flame design helped me consistently cook beautiful, delicious pizzas in under two minutes every time. It’s important to note I did try cooking pizzas on a particularly windy day, with high wind gusts, and found that the flame would sometimes blow out and needed to be reignited which didn’t take long.
The only thing I was disappointed with was the pizza peel and turning peel. The handles on both are incredibly long, which made it difficult for someone like me, with short arms and small hands, to maneuver the pizza as easily as I’m used to. Gozney sells other pizza tools including shorter perforated pizza peels and turners, which I think would suit me better for this particular oven. Of course, just like how you prefer to cut your pizza, whether with a pizza cutter or rocker, those tools are all up to personal preference.
Cleaning

After making several pizzas, I had a small amount of burnt flour residue left on the stone. Abrasive materials and soap should not be used to clean a pizza stone. Instead, it was simple enough to leave the oven on full flame to cook off residue on the stone. There was a very small amount of soot on the front of the oven near the flue, but wiping it with a damp cloth cleaned it up quickly and effectively.
Gozney Arc Pizza Oven Features

Gozney is known for its large Dome pizza oven, which mimics that of a restaurant pizza oven. The Gozney Arc is very similar to that well-loved oven, just shrunk down while maintaining quality. The Gozney Arc is 18.9 inches wide by 13.5 inches high with a depth of 22.2 inches. It provides plenty of space, with a wide opening, without taking up too much room outside wherever you plan to use it.
Its sleek bone white exterior is eye-catching, with contrasting black detailing including the front-right temperature dial and large print digital thermometer. The top flue is helpful for allowing heat to purposely escape before getting out through the front of the oven, which makes for better temperature regulation. The gas hose and regulator hooks up in the back, and the regulator makes it easy to plug and play. The stone is nestled tightly into the floor of the pizza oven, but it does come with a stone adjustment tool in case you need to move or remove the stone.
Pros
- Reaches over 900 degrees to cook pizzas in 90 seconds
- Compact design doesn’t take up much space
- Unique arc flame provides even cooking and heat retention
Cons
- Necessary tools such as pizza peel sold separately
Product Comparison
This pizza oven is modeled after Gozney’s Dome pizza oven, which was designed as a professional grade oven. The shrunk down Arc version is almost 10 inches smaller in width and allows for the same excellent flame power and heat retention, but in a more compact size. It’s not quite as portable as the Gozney Roccbox, which has folding legs and a strong carry strap, but it is small enough to move around as needed. The Roccbox also has a rolling flame at the back, rather than the left-side arc flame in the Gozney Arc.
In comparison to Ooni pizza oven options like the Ooni Koda 16, this oven performs similarly. However, the Koda has a large L-shaped flame on the left interior, which can make the learning curve of avoiding burning pizzas a bit steeper. With all of the pizza oven testing I’ve conducted, I’ve never seen the design and operation of a flame quite like this. It allows for consistently great pizza every time, without worrying too much about constantly turning the pizza or getting too much char on one side.
Final Verdict
Gozney sought to combine performance with a compact design in this pizza oven, while also offering a user-friendly option for those looking to master making pizza at home. And they definitely succeeded.
The pizza oven is sleek and eye-catching, yet won’t take up too much space on your deck, patio or anywhere else in the backyard. It’s simple to set up, gets incredibly hot and holds heat well and is easy to use. It’s gas-powered, so there’s no learning curve for cooking with wood, and the temperature dial makes it easier to know if your oven is hot enough to start cooking pizzas to perfection in no time.
Where to Buy the Gozney Arc Pizza Oven
The Gozney Arc pizza oven retails for $699 and is available on Gozney’s website, Amazon and Home Depot. Get set up to enjoy homemade pizza with ease, whether you’re hosting pizza parties or firing a pie for Tuesday night dinner.
 VIA MERCHANT
We Tried It
Gozney Arc Pizza Oven
Get set up to enjoy homemade pizza with ease, whether you're hosting pizza parties or firing a pie for Tuesday night dinner.
Leftover rice is one of life’s simple pleasures. It’s ideal for making fried rice and easy to incorporate into other rice recipes, like stuffed peppers and rice pudding. Like any cooked food you’re saving for another day, an expiration date looms. How long does rice last in the fridge before going bad? Not as long as you’d hope.
How long does cooked rice last in the fridge?
According to the National Health Service (the publicly funded healthcare system in England), cooked rice has a surprisingly short shelf life: It should be reheated and eaten within one day.
Why is the shelf life so much shorter than other refrigerated foods? The answer has to do with a specific bacteria you don’t even realize could be lurking, which causes something called “fried rice syndrome.”
Bacillus cereus, a spore-forming bacteria, is commonly found in the environment and can contaminate food, including uncooked rice. “B. cereus spores, and some of the six toxins they produce, can survive cooking,” explains Vanessa Coffman, PhD, program director at Stop Foodborne Illness. “These toxins are a real danger to human health.”
The FDA estimates that there are 63,400 illnesses linked to B. cereus in the United States each year. Most people who become ill from a B. cereus toxin will have a mild, upset stomach, with symptoms that resolve in 24 hours. For those who are immunocompromised, however, consuming the bacteria, spores or toxins can be deadly.
The key to prevention? Refrigerate cooked rice immediately.
“B. cereus multiplies and thrives at room (and body) temperature, meaning the longer cooked rice is left unrefrigerated, the more likely it is unsafe to eat,” says Coffman. “To help protect yourself and those you are cooking for, serve rice as soon as it has been cooked. If storing cooked rice, cool it within one hour and do not keep cooked rice in the fridge for more than one day.”
Freezing rice is another option, but again, you must do so immediately after cooking. Freezing food actually helps stop bacteria growth from forming, so this may be an even better choice than refrigeration.
How to Tell If Rice Has Gone Bad
Since you can’t see or smell B. cereus, assume that rice has gone bad if you haven’t refrigerated it within one hour of cooking or if it’s been in the fridge for more than 24 hours.
If you keep the rice around longer, you may eventually notice mold develop. But you should use or toss rice long before that happens!
How to Reheat Rice
“When reheating rice, make sure it is steaming hot all the way through,” says Coffman. “A better option, when possible, is to make a fresh batch of rice with each meal.”
Consider rice a one-time-reheat food—don’t keep reheating the same rice over and over. Either use up those leftovers once within 24 hours or cut your losses and make a fresh batch. (Yes, even if you made the most perfectly fluffy rice ever, sniffle.)
To reheat rice, add a little water to leftover white or brown rice, cover it and place it in the microwave. Aim for the rice to reheat to a temperature of 165°F.
I’m guilty of buying more peppers than I need, especially when they’re on sale and the deal is just too good. I’m also the one tossing uneaten, rotten peppers in the trash a week later. So much for savings! I finally got smart and learned how to freeze peppers. This guide works for peppers of all kinds, from sweet bells to the spiciest jalapenos and habaneros.
The USDA states that freezing fresh produce does not destroy nutrients, so rest assured your frozen peppers will still be high in vitamin C. You’ll want to add peppers to your list of frozen produce you should always have on hand.
The Best Way to Freeze Peppers
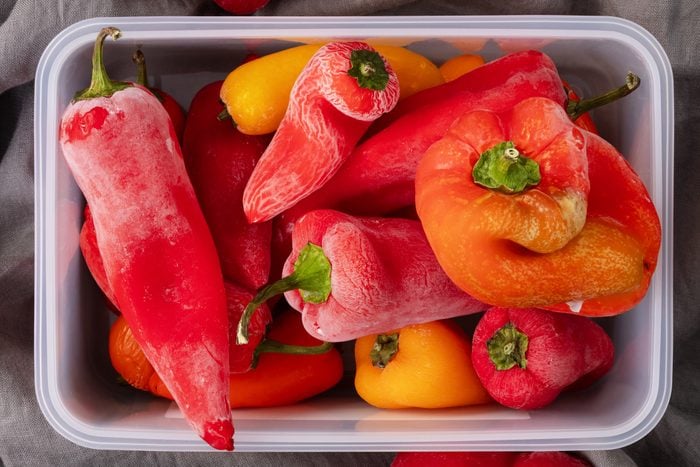
Unlike other vegetables like asparagus and broccoli that require blanching—a process that involves steaming or boiling vegetables briefly to partially cook them—peppers require no special treatment. All peppers, from the spiciest to the sweetest, can be frozen. Smaller varieties like habanero and jalapeno are best frozen whole while larger ones like bells can be sliced or kept whole depending on how you want to use them later.
Prior to freezing, all peppers should be firm and vibrant in color. You want to freeze produce when it’s at peak flavor and ripeness. Once you’ve looked them over, give them a good scrub with a vegetable brush beneath running water. With a clean dish towel, dry them well to prevent freezer burn.
How to freeze whole peppers
My jalapeno plants are prolific producers, making them impossible to consume before they rot. Freezing them is the perfect way to ensure I have hot peppers for salsas all winter long. Simply leave them whole, tops and all, and place them in a single layer in a freezer-safe resealable bag. Be sure to label the bag with the date and the variety. Once full, lay the bag flat in the freezer to avoid clumping. This method works for all small peppers, both sweet and spicy.
For bell peppers, slice the tops off to remove the core and seeds. Wrap each bell pepper individually in plastic wrap. Place the wrapped peppers on a baking sheet and place in the freezer for at least one hour. Once frozen, transfer the peppers to freezer bags, removing as much air as possible. Label and date the bags and return them to the freezer.
How to freeze cut peppers
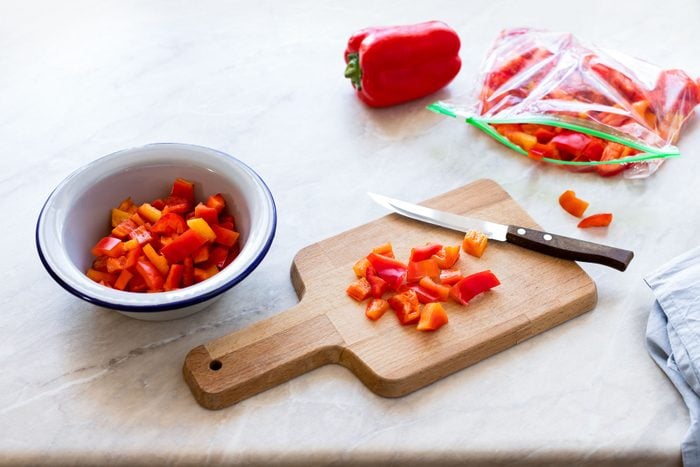
Whether you chop or slice them, the process for freezing peppers is the same. Just be sure to remove stems, cores and seeds. On a baking sheet lined with parchment, lay your pepper pieces in a single layer. Freeze them for at least an hour before transferring to resealable freezer bags. Remove as much air as possible from the bags and label and date them before returning the peppers to the freezer.
How long do frozen peppers last?
For best quality and highest nutrient retention, frozen peppers should be eaten within six to eight months.
How to Thaw Frozen Peppers
To defrost frozen peppers, place them in the refrigerator. If you’re short on time and need them sooner, place the peppers (bag and all) in a bowl of cool water. Once they’re soft to the touch, they’re ready to use.
How to Use Frozen Peppers
Peppers lose their crispy crunch after being frozen, so they work best in cooked recipes. Despite the texture change, they still pack a peppery punch. Add thawed peppers to soups, sauces, salsas, casseroles and other bell pepper recipes. For something fun and unique, try this easy hot pepper jelly on crackers with cream cheese.
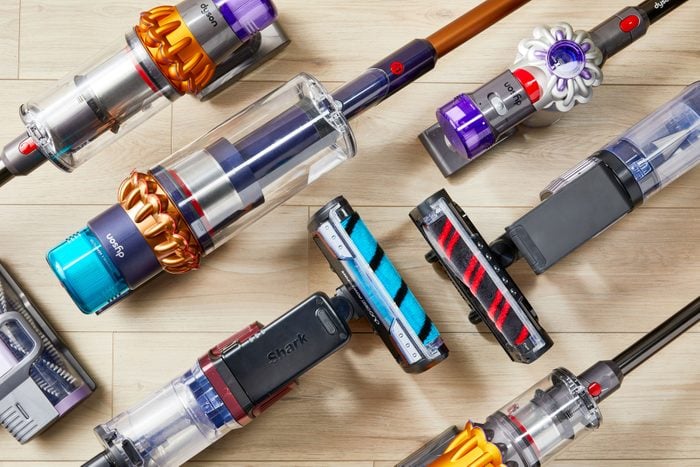
Delving into the world of cordless vacuum cleaners means coming across two of the most popular vacuum brands on the market: Shark and Dyson. Both companies are practically synonymous with quality, offering high tech cleaning machines that eliminate all allergens in their path. As a result, those looking for a new cordless vacuum often find themselves wondering where they stand in the Shark vs Dyson discourse.
Further complicating things, cordless vacuums that last for years are an investment, and both brands boast sizable price tags. Because of this, the question of Dyson vs Shark is as hotly argued as the old HexClad vs All-Clad debate. What’s more, it’s not like you can just head to the store and test each vacuum prior to purchase. Or can you?
Conflicted cleaners, unite! Our Product Testing Team did the hard work for you. We put a handful of the most popular models from both brands to the test—15 tests, to be precise—in order to help you pick the vacuum that offers the best bang for your buck. Dust bunnies, wave the white flag. It’s time to meet our vacuum bag.
What’s the difference between Shark and Dyson?
When it comes to Shark vs Dyson, determining which brand is better isn’t as simple as looking at reputation. Both well-trusted brands in the cleaning space, Dyson and Shark boast thousands of loyal fans each.
Founded in 2007, Shark pioneered their No-Loss-of-Suction vacuum technology, making them a hit in U.S. households. From there, the brand released more than 25 different Shark vacuums including cordless, handheld and upright models. The brand now operates in nine countries nationwide. Their partner brand, Ninja, manufactures trusted small appliances, the most popular of which is the viral Ninja Creami.
On the other hand, Dyson, first launched in Japan in 1991, debuted the first bagless vacuum cleaner on the market. After winning the 1991 International Design Fair prize, the company expanded to the U.S. Their innovative cyclone technology quickly boosted the brand into a household name. Now, Dyson products sell around the world, and they’re not limited to cordless or upright vacuums, either—just take a look at the popular Airwrap and blade-free air purifier fans.
All About Shark
Shark vacuums tout themselves as “lighter, longer-running, more maneuverable, and more powerful” than other vacuum cleaners on the market. Their lineup of cordless vacuums includes a whopping nine different models, each offering different features for pets, allergies and emptying. A few models, like the newer Shark Wandvac System, come in several different shades to fit a variety of home aesthetics.
Shark’s main focus is offering lightweight vacuums that tackle common household problems like pet hair. Several of their models, like the Shark Pet Plus, convert into handheld vacuums. This offers additional convenience for de-crumbing couches, dusting upholstery and squeezing into tight spaces like stairs and underneath beds.
How We Tested Shark Cordless Vacuums
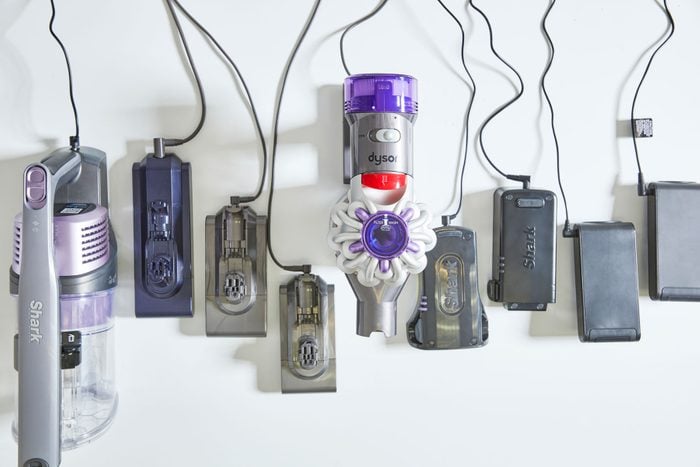
For the Shark vs Dyson debate, we chose to test five vacuums from Shark’s cordless vacuum lineup: Shark Stratos, Shark Vertex Pro, Shark Cordless Pro, Shark Pet Plus and the Shark Pet Cordless. We spent an estimated 40 hours on these evaluations, including researching, sourcing, intaking and testing the products.
Our evaluations are based on several test categories, including packaging and setup, specs and features, performance, accessories, cleaning and emptying and, finally, value. We rated each category out of five possible points, for a maximum total of 30 points overall.
Packaging and Setup
Overall, each of the Shark vacuums we tested came well packaged with its own Quick Start Guide. Note that this is different from the product manuals, which are available online rather than in print. That said, they gave a good overview of how to set up the vacuums and start cleaning.
Assembling all of the vacuums was really intuitive and took less than two minutes each. The lengthiest part of the process was unboxing and familiarizing ourselves with the clips, buttons and functions. From there, we charged up each cordless vacuum. All the Shark vacuums we tested took at least two hours to charge. The Vertex, Pet Plus and Pet Cordless vacuums took closer to three hours to reach full charge.
Specs

Each Shark vacuum we tested is relatively lightweight. Most average out at just over seven pounds with the battery installed. The Stratos model weighed significantly more at over eight pounds. However, it’s still lightweight enough to glide across the floor with little effort. Considering that cordless vacuums are pretty top-heavy, every little ounce counts!
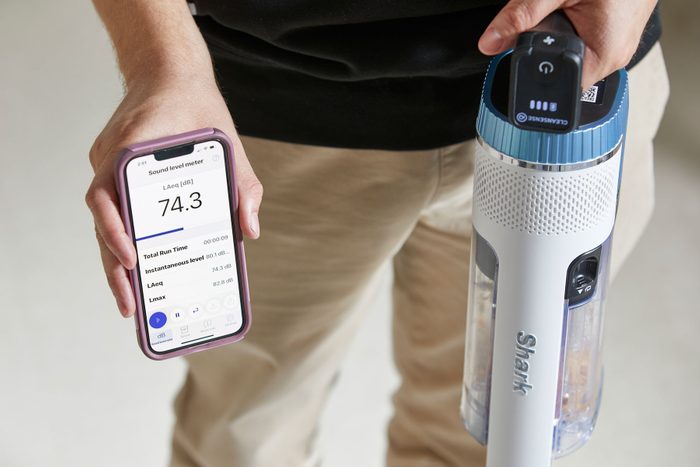
In addition to weight, another important consideration is noise level. At their highest settings, most of the Shark vacuums (aside from the quieter Pet Cordless model) put out about 80 dB of noise. That’s comparable to heavy traffic or a noisy restaurant. On low power, most put out around 75 dB, which is the typical noise level of most vacuums. The outlier is the Pet Cordless model, which topped out at only 73 dB at its highest setting. While none of these options are exactly quiet, we recommend opting for this one if you’re sensitive to noise.
Features

Notable features include a flexible head on the Stratos that makes getting under furniture a breeze. Helpful LED headlights on the Stratos, Pet Plus and Pet Cordless models illuminate dirt and debris in dark spaces like underneath beds and inside closets. Most of the models also offer different modes for a variety of surfaces and soil levels. While the Pet Plus and Pet Cordless models don’t have additional settings, they both boast a pull trigger boost mode for extra dirty areas.
Performance
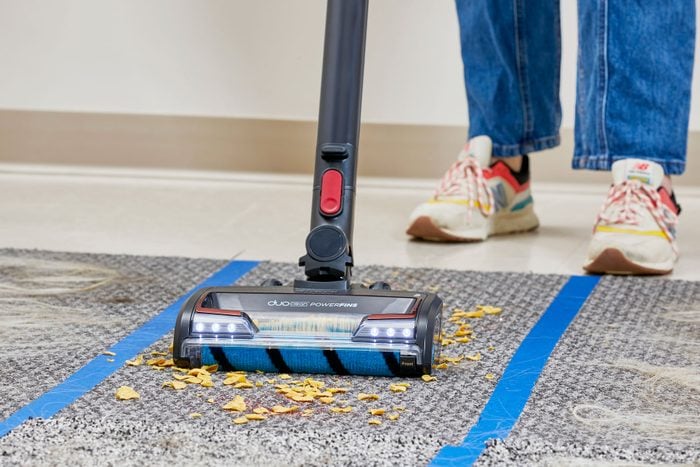
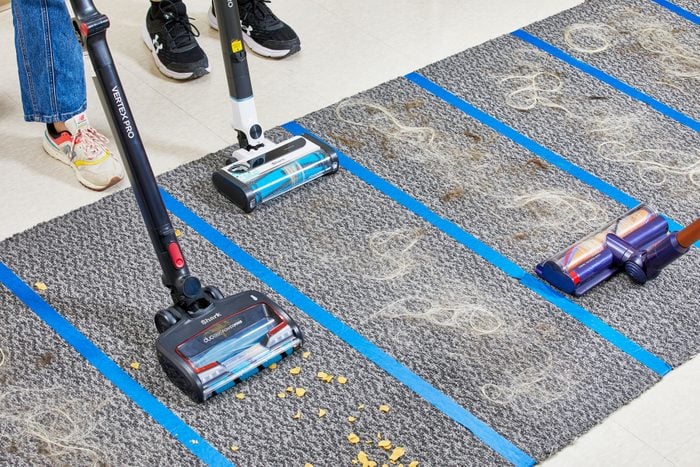
When it comes to performance, we considered battery life, maneuverability, couch clearance, recommended floor type and how effectively each picked up the litter we scattered. We tested several common debris types, including cornflakes, glitter, crumbs and real human hair from a salon—for science, of course! It’s worth noting that each Shark vacuum works on all floor types, though it’s important to use the correct attachment for each surface.
Most of the cordless vacuums lasted around 30 minutes on the carpet setting after a full charge. The Shark Pet Plus and Shark Pet Cordless died much quicker, running for only about 20 minutes before requiring a recharge. That said, the Stratos blew us out of the water with a jaw-dropping 42 minutes of incredible suction power.
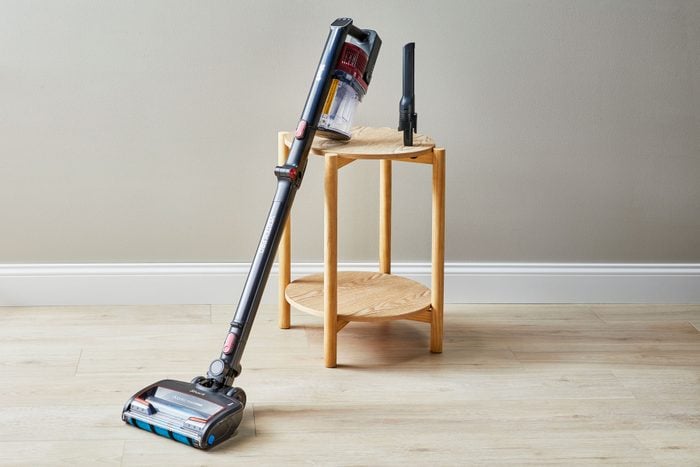
In terms of maneuverability, Shark gets high marks across the board. Some models like the Shark Cordless Pro offered slight resistance over carpet. That said, each of the vacuums is easy to guide around furniture and glide along the floor. Clearance is similarly impressive, with Shark beating out Dyson for the top two spots. The best clearance ratings belong to the Stratos at just shy of three inches and the Vertex at 3-1/4 inches.
Most of the Sharks performed beautifully on both carpet and tile. However, most also struggled while picking up glitter on carpet, leaving a few specks behind even after a few passes. The two pet vacuums, the Pet Cordless and Pet Plus, performed best on carpet and kitchen rugs. We’d recommend springing for the latter, as the Pet Cordless unfortunately underperformed on the hair tests—not ideal for a vacuum marketed towards pet hair. Those with houses that have a majority of hard surfaces should stick to one of the other models.
The Stratos again impressed us with its performance, simultaneously killing it on both the cornflake and glitter tests while also snatching up a majority of the hair on our carpets. We attribute this to its CleanIQ, which automatically adjusts the vacuum’s suction level based on the amount of debris it detects.
Accessories
While not as tech-forward as Dyson, Shark vacuums boast myriad attachments. Each vacuum includes a crevice tool, but the other attachments vary based on model. The most impressive accessory is the two-in-one multipurpose pet attachment on the Cordless Pro. This tool lifted so much dust and debris off one of our dining table chairs that the fabric turned an even brighter white. While it’s not the best choice for delicate materials, the results are impressive.
We also enjoyed using the anti-allergen brush that comes with both the Pet Plus and Stratos models. Not only does it attach in a snap, but it also easily dusts neglected shelving in mere seconds.
Cleaning and Emptying
Cleaning a Shark vacuum is incredibly easy. Each of the models we tested cleans up nicely with plain water. Simply run the emptied dust cup under the faucet and dry thoroughly before replacing. The filters are similarly easy to clean using plain running water. Again, ensure that these thoroughly dry prior to replacing.
Our only hang-up regarding the cleaning process is that the filters don’t clean entirely under running water. For the most part, the filters looked grayish after the first use, and no amount of water fixed that. In addition, the dust cup on each vacuum is oriented in a way that it can be easily opened and spilled onto the floor by accident. It’s worth being extra careful not to hit the release button while cleaning!
Value
For the price, you really can’t beat the value of Shark vacuums. Even the Shark Pet Plus and Shark Pet Cordless models, which accumulated the fewest points, still offer pretty decent suction and performance for the lower price point.
The Vertex and the Stratos seemed like markedly higher quality, so although the Cordless Pro performed quite well, we were still surprised to see it was the same price point as the Vertex. In our opinion, those looking for the best performance should consider springing for the slightly costlier Stratos.
If you have a lot of area rugs, the Pet Cordless may be the best budget vacuum for you. The single brush roller has a higher profile that works well with carpet. However, it may not clean hard surfaces as well as other Shark models with the dual roller system.
Pros
- Includes our top performer, the Shark Stratos
- Relatively affordable
- Easy to maneuver
- Tons of attachments
- Performs equally well on carpet and tile
- Decent battery life
- Five-year machine warranty
- Two-year battery warranty
- Lots of different models
Cons
- Easy to accidentally open the dust cup
- No product manual in box
FAQ
What is the best performing Shark vacuum?
In our opinion, the top spot goes to the Shark Stratos. It impressed us during our tests with its lightweight design. Rear wheels make it highly maneuverable, as does the flexible bending wand to get under furniture. It stores in an upright position and doesn’t require a wall mount to do so, unlike the Dyson models. With its blend of high suction, impressive attachments and easy navigation, this model boasts high marks across the board and was our favorite vacuum overall.
Is Shark better than Dyson?
Both Shark and Dyson offer cordless vacuums with solid performance. That said, Shark vacuums are typically less pricey than Dyson’s models, and there are a lot more features and attachments to choose from. If you’re looking to tailor your vacuum to your home—taking into consideration flooring and overall use cases—you can’t go wrong with a Shark vacuum.
What Shark vacuum has the most powerful suction?
The Shark Stratos offered some of the best suction power during our Product Testing Team’s evaluations. Only one pass picked up most debris on tile floors, and three passes eliminated most of the glitter and cornflakes on carpet. This was easier to push on the higher-pile carpet than any of the Dyson models because of the large wheels. It also does an excellent job snatching up hair compared to the other models we tested.
 VIA MERCHANT
We Tried It
Shark Cordless Vacuums
All About Dyson
Dyson’s main draw is their luxe look, longevity and scientifically-backed technologies. While they come at a steeper price than other cordless vacuum brands, Dyson vacuums typically last a lot longer, with some folks claiming they’ve used their vacuum for over ten years and counting.
Also offering nine different cordless vacuum models, Dyson’s focus is maintaining suction and offering flexible attachments that streamline cleaning. Even their budget options, like the Omni Glide, have at least one attachment for eliminating dirt and debris in tight spaces. Pricier picks, like the luxurious Gen5outsize Absolute, come with sci-fi-tier technology like a laser light that reveals hidden dust, an LCD screen that detects particulates in the air and a whole-unit HEPA filter.
How We Tested Dyson Cordless Vacuums

In our testing for the the Dyson vs Shark debate, we tried four different vacuums from Dyson: Dyson Gen5outsize, Dyson V15s Detect Submarine, Dyson v8 and the Dyson v12 Detect Slim.
Like the Shark tests, we evaluated each vacuum based on criteria in the following areas: Packaging and setup, specs and features, performance, accessories, cleaning and emptying and, lastly, value. We conducted the tests (including sourcing, researching and product intake) over the course of 40 hours in our Testing Lab. As with our Shark tests, we rated each category out of 5 possible points, for a maximum total of 30 points overall.
Packaging and Setup
All Dyson models arrive in a sleek slide-out box sans any branding, offering a sustainable packaging option. Because it opens up from the side, the box works well for accessory storage. It’s also easy to see everything in the box at a glance without digging, unlike the Shark boxes. Each vacuum also comes with an illustrated quick-start guide and a flyer that prompts you to download the Dyson App—more on this later.
Setup is simple, though it takes a bit longer than the Shark vacuums. We are able to assemble most in about a minute. In terms of charge time, Dyson vacuums took a bit longer than the Shark models, ranging from about three hours for the Detect Slim vs. a whopping four hour charge time for the V15s Detect Submarine.
Specs
In terms of weight, Dyson offers pretty distinct weight differences with each model. The smaller, slimmer v12 Detect Slim and v8 models weigh in at around five pounds, whereas the larger, more robust Gen5outsize and Detect Submarine models are closer to nine pounds. The attachments are also a consideration, with most adding about an additional pound to the total weight of the vacuum.
While the V15s Detect Submarine, v8 and v12 Detect Slim vacuums top out at around 80 db (or the noise level of heavy traffic or a loud restaurant), the Dyson Gen5outsize is a total powerhouse that puts anywhere from 84 dB to 86 dB depending on the setting. For reference, that’s almost comparable to the sound of an MIG welder on steel. Yeowch—that’s pretty loud!
Features

Dyson’s features are likely what tips these vacuums into their higher price point. A slick, easy-to-read LCD screen adorns the top of each model, sans the more basic v8. Most impressive is the Gen5outsize menu, which offers stats regarding the current vacuum session including the types and number of particles sucked up.
While insightful, we had difficulty deciphering some of the more nuanced menus. This is definitely one that you’ll want to read the manual for! Luckily, this model does arrive with a rather large instruction booklet.
Other features worth mentioning include a carpet pile height adjuster on the Detect Submarine and Gen5outsize models. The two other models offer a single mode (the v8) and low or max power settings (v12 Detect Slim). All the models are incredibly sleek, minimalistic and feel sturdy and well-made. Aesthetics is definitely an area where Dyson beats out Shark.
Interestingly, the V15s Detect Submarine requires holding down the power button to turn it on—there’s no option for it to be held down on its own. At first, we weren’t fond of having to constantly hold down the button, but we grew to like it—it’s nice to have the button and have so much control over the on and off. This makes it easy to turn on and off in a second if you have to move something or change floor types.
Dyson App
The Dyson App works for all of Dyson’s cordless models, offering a few extras that help with using and maintaining your Dyson vacuum. Instead of actually connecting and controlling aspects of your device, the app is a replacement for the traditional user guide. Each roller head has its own short video guide for usage and the videos change depending on which model and attachments you have.
It bundles information guides, troubleshooting tips, links to support forums, a Digital Assistant and quick access to a customer service rep. All in all, the app isn’t mandatory for your vacuum, but it is an easy way to access any type of information you would want or need for its operation.
The app itself works pretty well. It’s responsive when scrolling, and videos load fast on decent Wi-Fi. There is a Bluetooth connection option, but it seems to be utilized for their other products like air purifiers and headphones. In fact, we’re not even sure it’s possible to connect your vacuum to the app via Bluetooth. Instead, easily connect any vacuums using the device’s serial code.
Performance

Like the Shark tests, we considered battery life, maneuverability, couch clearance, recommended floor type and how well each picked up the debris. We used the same debris as the Shark test, opting for glitter, cornflakes, crumbs and hair. Battery life for the Dyson vacuums are pretty synonymous with the Shark models minus the Shark Stratos, with all averaging at about 25-30 minutes of runtime per charge.
With such a long charge time, you may assume that Dyson vacuums run for a longer period of time than the Shark models. However, Dyson vacuums averaged at about the same operation time, offering 25-30 minutes of continuous suction before requiring a recharge.
Unfortunately, most of the Dyson vacuums—with the exception of the Gen5outsize—simply pushed around the cornflakes on the vinyl floors. This was rather disappointing, especially given the higher price point. However, all the models performed exceptionally well on low-pile carpets, and save for the two lower-end options, each managed to pick up tons of hair without clogging.
In addition, Dyson’s edge-to-edge feature offers consistent corner-clearing results across all their models. Even the cheapest one still works great in this regard!
Accessories
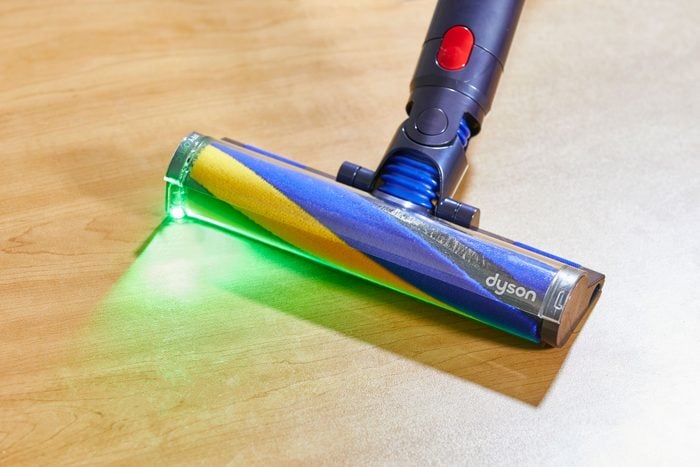
The anti-tangle hair tool on the Gen5outsize and v12 Detect Slim was definitely our favorite attachment. Picking up the hair requires quite a few passes, but we didn’t notice any wrapping up or tangling. It’s super cool to watch the hair work its way through the screw and up the wand. Additionally, on the Gen5outsize model, the “Fluffy Optic” hard-floor cleaner head has a green LED light attached and lights up the ground where you are vacuuming. This really helps show every single speck of dirt on the ground.
That said, there are a few aspects we don’t enjoy. The Gen5outsize requires the crevice tool to convert to a handheld, which makes it very heavy while holding it and bending down due to the oversized dirt cup. The v8’s crevice tool also gave us a few complications. When blocked, the ventilator holes on the side of the crevice tool make the vacuum surge and stop working. This may be a safety feature so it doesn’t start a fire—we can smell it burning when this happens. Yikes!
Similarly, the v12 Detect Slim’s crevice tool only works on the lowest settings. On the highest setting, it behaves similarly to the v8’s crevice tool. It even gives us a pop up warning symbol on the screen when we attempt to use it on high power between cushions.
Cleaning and Emptying
For each model, the rubber portion around the dust cup’s edges really collect a ton of debris. It’s virtually impossible to get fully clean with just a damp rag. That said, everything else wiped clean effortlessly. Those concerned about this should opt for the v12 Detect Slim model. It’s the easiest Dyson dust cup to wipe down because of its orientation.
All of the Dyson filters were relatively simple to rinse, dry and replace. The v8 and Gen5outsize debris chambers were very easy to empty, and there were zero nooks or crannies for crud to collect. On the other hand, both the v12 Detect Slim and the Detect Submarine require a little digging to loosen up the dirt and dust inside, which is rather unpleasant.
Value
One place where Dyson differs wildly from Shark is in the price point of its vacuums. Whereas the most expensive Shark vacuum we tested topped out at $499, Dyson’s cordless vacuum models start at $299.99 for the most basic vacuum and skyrocket up to $1,049.99 for the Gen5outsize. However, the sleek design and myriad features make up for this discrepancy in price.
The performance of the Gen5outsize was by far the best of all the Dysons. The only downside is the bulk. Plus, it isn’t as easy to maneuver, though it does come with tons of useful attachments. A less costly option is the v8, which is more agile than the Gen5outsize with many of the same attachments. However, it has a smaller dirt cup which requires more frequent emptying. Those in smaller spaces should consider the v12 Detect Slim, which offers a smaller profile that easily maneuvers tight areas.
Pros
- Solid, high-quality materials that last
- Vacuums come with a two-year warranty
- Sleek, minimalistic design
- Tons of useful attachments
- Attractive LED navigation menus
- Well-packaged boxes work well for storage
- All vacuums come with a wall-mounted dock
Cons
- Pricier than Shark vacuums
- Crevice attachments gave us some trouble
- Take quite a while to charge
FAQ
Is Shark or Dyson better?
Both Dyson and Shark offer cordless vacuums with solid performance. That said, Dyson vacuums offer a sleeker design, a wider variety of attachments and easier navigation via LED screen menus.
What is the average lifespan of a Dyson vacuum cleaner?
Dyson claims that the average lifespan of their vacuums is around 5 years. That said, some folks use theirs for up to ten years before requiring a replacement, making them an excellent investment.
Should you empty Dyson after every use?
We recommend emptying and cleaning your Dyson after every use in order to preserve the vacuum’s suction and filter integrity.
 VIA MERCHANT
We Tried It
Dyson Cordless Vacuums
The Bottom Line: Shark vs Dyson
So, when it comes to Shark vs Dyson, which brand comes out on top? Well, it depends on your own expectations and needs. Those looking for a budget pick that offers big bang for your buck and tons of flexible attachments should consider a Shark vacuum. On the other hand, anyone seeking style and substance in a machine that’s built to last for years can’t go wrong with a Dyson.
Regardless of the brand you choose, it’s important to look at the features and attachments to ensure that the vacuum you choose will meet the demands of your household.

As a “zillennial” (AKA a late 90s baby caught between the crosshairs of two generations), I’m influenced by my fair share of TikTok trends. I’ve caught myself making girl dinner a few too many times and adding viral products to my Amazon cart. But my all-time favorite craze? Little treat culture.
Yep, there’s a whole generation on the internet who feels the need to reward themselves after the slightest inconvenience or discomfort. Long work meeting? Excuse me while I grab a cookie after. Went to a dentist appointment? Well, I’m stopping for flowers on the way home. In short, these little treats are a way to make the mundane rituals of life a little more rewarding.
In my home, my latest little treat obsession is a quality cup of coffee every. single. day. No more waiting for special occasions to splurge on the good stuff.
As Taste of Home’s Senior Shopping Editor, I’ve had the privilege of testing and reviewing all sorts of gear and gadgets, from coffee gift baskets to my ride-or-die Burr grinder. But at the end of the day, the most crucial component is the coffee itself—and that’s where a Trade subscription comes in.
What is Trade Coffee?
Trade is an online coffee marketplace that matches coffee enthusiasts with fresh beans from across the country. You can buy bags one at a time or opt for a subscription. It’s a great way to try independent brands with a single account. I enjoyed coffees from Michigan, Virginia, Kansas, Tennessee, Massachusetts and New York. I even spotted some local roasters from my neck of the woods in Wisconsin—shout out to Anodyne!
Trade also makes it easy to identify your flavor preferences and choose the perfect grind for your brew method (or opt for whole bean, of course). They also sell coffee tools and gift boxes.
 VIA MERCHANT
We Tried It
Trade Coffee Subscription
Get ready to explore the wide world of coffee! Enjoy fresh beans delivered straight to your door.
How We Tested It
To see if Trade is worth its salt…err, grounds, I tested a subscription over the course of two months. I sampled six bags in total, delivered bi-weekly.
Introductory Quiz
Before you reach for your French press, you have to make a Trade account. This process sets up your initial flavor and brewing needs, so don’t breeze through it. (Of course, you can always amend your preferences later, if desired).
The quiz starts with a lot of the usual suspect questions: How do you take your coffee? What roasts do you typically buy? Do you want whole bean or ground coffee? You’ll then get into slightly nicher asks, like how adventurous you are with coffee flavors. The quiz closes with selections around bag size, shipment frequency and whether you’d like to pre-pay or pay as you go.
It’s definitely one of the lengthier coffee quizzes I’ve encountered, but the thorough process sets you up for success with your very first shipment. And, if for some reason you don’t love that first pick, Trade offers a “first match guarantee” that sends a second bag for free if you’re not happy.
Delivery and Freshness
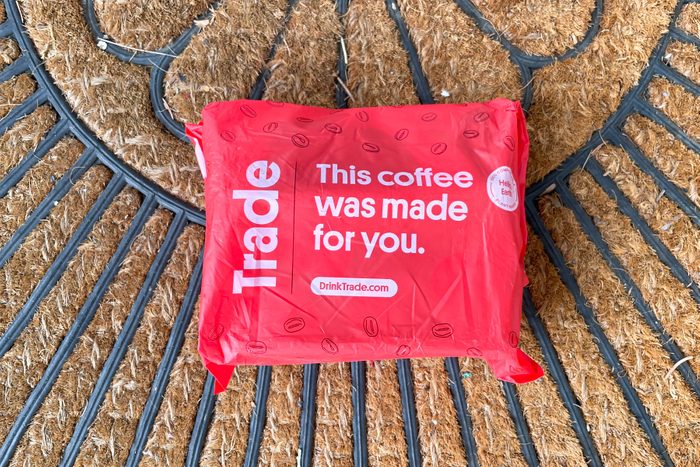
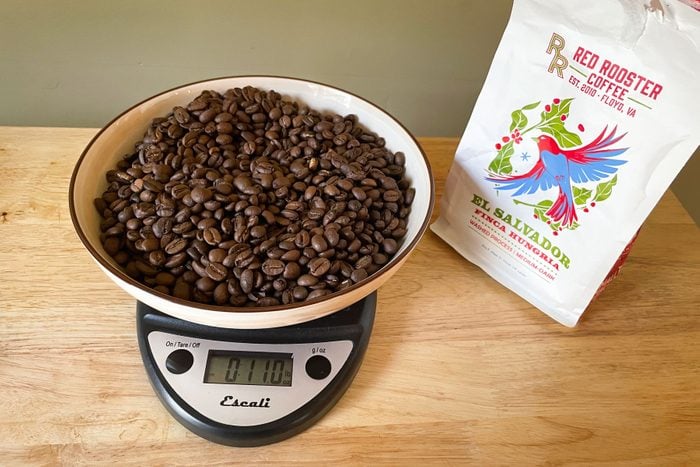
Soon after ordering, my Trade coffee arrived in my mailbox in a bright red bag. After opening, I did a double-take at the roast date—it was just a few days prior! As someone who typically buys grocery store beans or organic coffee from Amazon, I was impressed. Typically, I’m checking that the expiration date isn’t coming up soon! I was very happy to know that the beans hadn’t been roasted and stashed in a warehouse for weeks (or even months) before showing up at my door.
Now, while researching, I had read some reviews saying Trade coffee bags can be a little skimpy, so I measured each bag on my coffee scale. In my experience, each bag weighed in right around 11 ounces, which matches the 10.93-ounce standard bag size Trade advertises.
Brewing and Taste
I was matched with Sparrows High Five Blend for my first order. Followed by Red Rooster El Salvador Finca Hungria, PT’s Flatlander Signature Blend, Common Voice Heirloom, Broadsheet Line Street Blend and Joe Amsterdam. All six bags fit the “classic, smooth medium roasts” identified via the onboarding quiz.
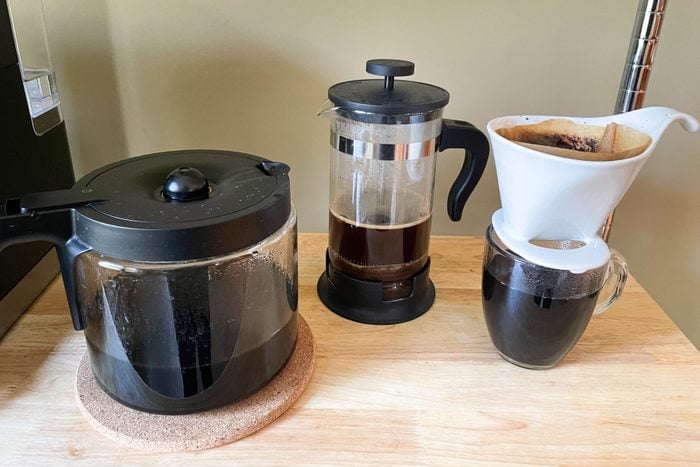
To prep, I tried each bag using my go-to methods: Pour-over and French press. I also made a carafe in the Keurig K-Duo I’m testing for our best Keurigs lineup.
Every bag of beans lived up to my expectations. The freshness really made a difference, and I appreciated that the selections were tailored to my taste. Of the six, PT’s and Joe’s were my favorite. While I did have to supplement with additional coffee between deliveries, I loved knowing that I could bump up my cadence whenever I wanted.
That said, the one downside to Trade (that I could find, at least) was that there wasn’t an obvious option to add decaf selections into your subscription. Maybe I missed it, but I couldn’t find a way to mix caff and decaf bags, which would have been helpful as my husband is trying to cut down on his caffeine intake.
Pros
- Custom coffee experience
- Incredibly fresh
- 450+ coffees in their online store
- Easy to re-order your favorites
- Ability to choose desired cadence
- Multiple bag size options
- First match guarantee
- Ability to pre-pay or pay as you go
- Easy to pause or cancel
Cons
- On the pricey side, especially for an 11-ounce bag
FAQ
How much is Trade Coffee per month?
It depends on the subscription, but most coffee bags cost between $15 and $20.
Does Trade Coffee offer free shipping?
Yes—if you pre-pay for your coffee subscription. Otherwise, orders incur a nominal (about $2 per bag) shipping fee.
Is Trade Coffee freshly roasted?
In my experience, yes. Every bag I received on my Trade subscription came with a roast date within mere days of ordering. This is truly some of the freshest coffee you can order online.
Product Comparison
I’ve tested many coffee subscription boxes, and Trade stands out as the best of the bunch. It gives you total control of your coffee selections—and there are hundreds of brews to choose from! This differs from other services, like Atlas Coffee Club, where there’s only one new blend each month. I also love that you can easily add (or remove) coffees from your queue, which sets it apart from a more curated service, like Bean Box.
Final Verdict

If you enjoy trying new coffee, a Trade subscription is the best way to experience beans tailored exactly to your tastes. In my testing, I was most impressed with the attention to detail, freshness and flavor. Trade makes it easy to upgrade your day. Plus, it makes a wonderful gift.
Where to Order a Trade Coffee Subscription
You can sign up for a subscription on the Trade website. Plans start at around $20 per bag. While pricey, yes, the quality and convenience make up for it—and it’s still cheaper than a daily coffee shop run. Plus, remember, it’s OK to treat yourself.
 VIA MERCHANT
We Tried It
Trade Coffee Subscription
Get ready to explore the wide world of coffee! Enjoy fresh beans delivered straight to your door.

When my kids were small, we spent hours at the local U-pick berry farm filling basket after basket with ripe fruit. By the time we got home, we had more berries than a family of four could eat. Fortunately, there’s an easy way to preserve that summertime sweetness. Whether you got carried away at the U-pick farm or scored a great deal at the grocery store, you’ll want to know how to freeze blueberries to get the most bang (and vitamins) for your buck.
Before getting started, you’ll want to learn how to pick the best blueberries. This will ensure they’ll taste good whether you’re making recipes with frozen blueberries or thawing them to eat on their own. You’ll also want to freeze the berries at peak freshness. This will lock in all the healthy attributes of the berries like vitamin C and dietary fiber.
Should you wash blueberries before freezing them?
It’s always a good idea to wash blueberries if you’ll be eating them right away. But for freezing, hold off on the washing step until after you’ve thawed them. That waxy white film on fresh blueberries known as “bloom” keeps pests and bacteria at bay, and also locks in their juiciness.
How to Freeze Blueberries: 3 Steps
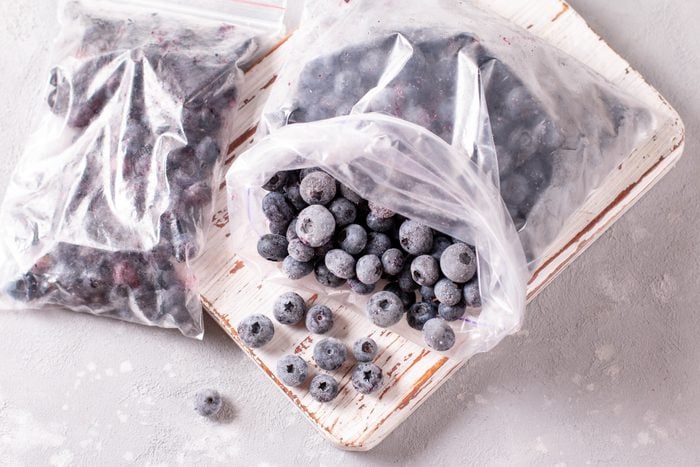
Step 1: Remove the bad ones
Spread your berries on the counter and give them a good once-over. Remove any berries that appear soft or have wrinkled skin. Be on the look-out for stems and remove those too. You want only the best, most flavorful berries for freezing.
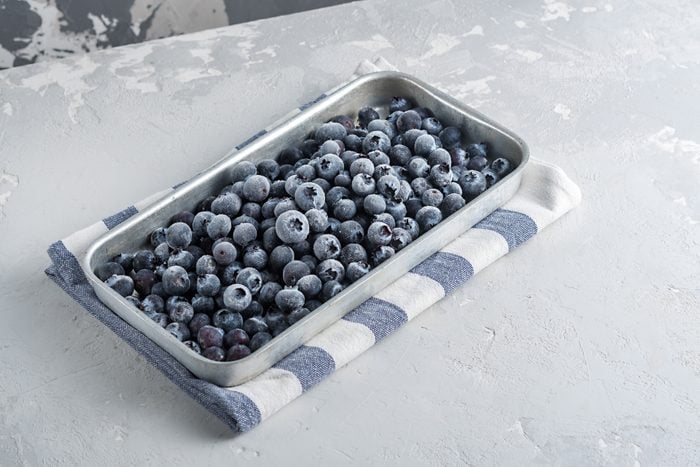
Step 2: Spread on a baking sheet
Line a baking sheet with parchment paper and spread your unwashed berries in a single layer, leaving space between them so they don’t freeze in clumps. If you have a lot of blueberries (or if you’re also freezing strawberries with the blueberries), use several parchment-lined baking sheets.
Step 3: Freeze
Freeze the blueberries for at least two hours. Once frozen, label freezer bags with the date and add your berries. Place the full, labeled bags in the freezer.
How long do blueberries last in the freezer?
While they may only be good for a few days on the counter, freezing berries adds some serious longevity without sacrificing flavor or nutritional value. Blueberries are at their best within six months of freezing, but they’ll still be delicious up to 10 months.
How to Thaw Blueberries
Whether you’ll be using them frozen or thawed, give the berries a quick rinse in a colander as soon as you remove them from the freezer.
For immediate use in your favorite fruit smoothie recipe, simply toss the frozen blueberries in a blender and blend away! (Frozen bananas are another tasty smoothie ingredient.) Frozen blueberries also work really well in muffins, as they don’t turn the batter blue like thawed berries do.
For things like pancakes and pies, thaw the blueberries on the counter in a bowl to catch the juice. Once they reach room temperature (about an hour), they’ll be soft and ready to use.
Tips for Freezing Blueberries
- Pick the best blueberries for freezing. Wrinkled skin or mushiness is a sign that they’re past their prime.
- Don’t rinse before freezing. That waxy coating helps blueberries stay hydrated and flavorful.
- Don’t crowd. If you have a lot of blueberries, freeze them on multiple baking sheets to prevent clumping. It’s easier to get your recipe measurements right when blueberries aren’t encased in a block of ice.
- Use airtight storage containers or freezer bags that prevent freezer burn.
- Label containers so you know when the berries are still at their best.
There’s an unusual holiday on August 8 for people with overproductive gardens: “National Sneak Some Zucchini onto Your Neighbor’s Porch Day.” This celebration reminds us to share our bounty of produce with friends who live nearby, knowing full well that they also have bumper crop of summer squash!
The tradition sounds silly, but stems from a real problem. What do you do when your plants grow an astonishing amount of zucchini? You learn how to freeze squash.
This guide covers how to freeze summer squash—think zucchini, yellow squash and pattypan squash—as well as winter squash like butternut and acorn. In all cases, pack your squash into freezer-safe bags, and use a vacuum sealer if you have one. Of course, follow best practices to prevent freezer burn. Even though you can safely eat freezer-burned food, the quality is not as good.
Can you freeze squash?
Yes! There are a variety of ways to prepare squash for freezing. The method you choose depends on whether you’re dealing with summer squash or winter squash and how you eventually plan to use the squash.
The Best Squash for Freezing
Choose a squash that’s firm and plump. If a squash is blemished or has soft spots, it’s better for immediate use.
- Summer squash: Unlike their winter cousins, summer varietals are fairly similar in the thickness of their skin and the texture of their flesh. This means that any summer squash you encounter, no matter its shape or size, is an excellent candidate for freezing. Choose squash that are firm, not soft or squishy.
- Buttercup squash: Sweet and delicious, some people compare the flavor of buttercup squash to sweet potatoes. Though all winter squashes freeze nicely, I like to freeze the most flavorful ones.
- Kabocha squash: This winter variety has a bright red-orange exterior and tender, sweet flesh that’s perfect for baked recipes and roasting.
- Hubbard squash: These are delicious and large winter squash, so the best of both worlds when it comes to processing! The larger the squash, the more fruit you can store away for recipes like this Hubbard squash pie.
How to Freeze Squash
Summer squash
There are a few different ways to prepare summer squash for the cold. Here are some favorites:
- Rounds or chunks: If you plan to saute your squash later or use it in stir-fry dishes, choose this method. Cut the squash into thick rounds or chunks, and plunge the pieces into boiling water for 30 seconds to blanch the flesh. When the cooking time is up, drain the squash and drop it into an ice bath to stop the cooking process. Freeze the pieces on sheet pans in a single layer, and when frozen, pop them into freezer-safe bags. Don’t forget to label and date the bags.
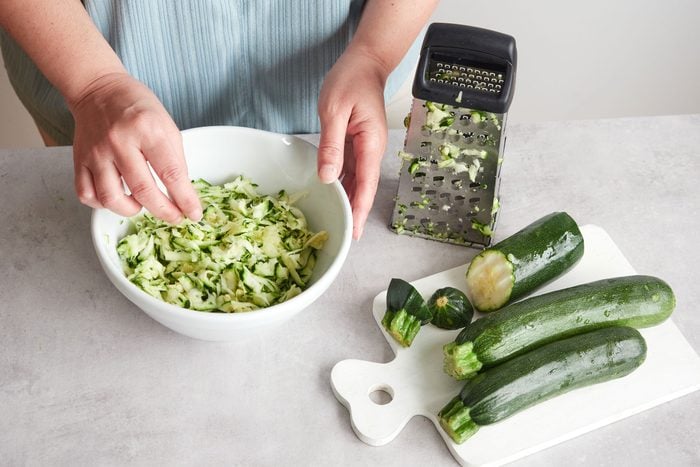
- Shredded: Rinse and shred squash into a colander using the biggest holes on a box grater. Squeeze the squash to remove excess water, and pack it into freezer-safe bags. Voila! The squash will be soft and squishy when it thaws, which makes it perfect for baked goods such as zucchini bread.
- “Squash butter:” To freeze a ready-made product, make sweet or savory squash butter. Grate the zucchini as above, and gently cook it with butter and other seasonings until it has thickened to a jam-like consistency. For the savory version, I use butter, garlic and fresh herbs. For a sweet version, I add brown sugar or maple syrup, cinnamon and any other “pie spices” I happen to have on hand. Either one is a great spread for bread.
Winter squash

Winter squash vary more widely than summer squash, so the best method for freezing a particular type of squash will depend on its characteristics.
- Hard-to-peel squash: These squash—types that have distinct “turbans” or deep grooves—are most easily processed by roasting. Cut the squash in half, scoop out the seeds and stringy bits, and place the halves face down on oiled parchment. Roast at 400°F until tender all the way through. Scoop out the flesh, let cool a bit, pack into freezer-safe bags and freeze. If you’d like perfectly smooth squash, puree the squash prior to freezing.
- Other squash: If you have squash with smooth skins, you can still roast them as above, but you can also peel them and cut them into cubes before freezing. The cubes should be fairly uniform in size so that they’ll cook evenly when it comes time to use them, but you don’t need to blanch them before freezing. Simply spread the cubes on sheet pans and freeze them, then package them into freezer-safe bags.
- Spaghetti squash: Use this guide to freeze spaghetti squash. You don’t even need to thaw it when you’re ready to use it in recipes because it’s been previously cooked.
How to Use Frozen Squash

Frozen summer squash recipes
When frozen summer squash thaws, it gets pretty soft and moisture comes to the surface. If you’re adding chunks or rounds of squash to recipes like soups or zucchini casseroles, you don’t need to thaw them first. If you want to use shredded zucchini in baked goods, thaw the zucchini in the fridge beforehand and squeeze out any excess water.
Fresh summer squash is better for applications that rely on a firmer texture or involve browning the squash, such as a stir-fry or simple saute.
Frozen winter squash recipes
If your winter squash is roasted and pureed, thaw it prior to use. You can season it and eat it as a side dish, add it to baked goods like drizzled butternut bread or use it to make a pie filling. It’s also a perfect starting point for silky squash soup. Most winter squash, with the exception of spaghetti squash, are interchangeable in recipes, so feel free to use buttercup if a recipe calls for butternut or kabocha if a recipe calls for pumpkin and so on.
If your squash is in cubes, take it directly from the freezer and cook it. No need for thawing! Squash cubes are great for roasting, adding to squash and chicken stew and making eggplant curry.
Whether you stood over the stove simmering a delicious batch of homemade chicken broth or sprang for a carton at the grocery store, you definitely don’t want to waste a drop. While some recipes use up a whole box of chicken broth, more often than not, you’ll have leftovers. So how long does chicken broth last in the fridge? Here’s the timeline you should follow to ensure your chicken broth is safe for consumption, plus tips for storing it and ideas for using it up.
And by the way, though technically chicken broth and chicken stock are slightly different, the rules for storing and freezing are the same for both.
Is there a difference between homemade and boxed chicken broth?
It really depends on the type of boxed chicken broth you buy. While our top-rated store-bought chicken broths generally use natural, whole food ingredients, like real chicken and vegetables, they still usually contain more sodium than homemade broth. Most boxed or canned chicken broths also contain some preservatives. This means that store-bought broth will keep a bit longer in the refrigerator than homemade.
Homemade broth has the simplest possible list of ingredients: chicken meat or bones, vegetables and aromatics. If you like to use up leftover veggie scraps to make broth (a very thrifty idea!) then the broth is already operating with older ingredients. It’s still safe and delicious, but you’ll want to eat it a bit more quickly.
How long does homemade chicken broth last in the fridge?

Homemade chicken broth will keep for up to four days in the refrigerator. Allow it to cool slightly before popping into the fridge (boiling-hot broth might warm up the whole refrigerator, which can make other food spoil). Once it’s cooled off a bit, transfer the broth to an airtight container.
How long does boxed or canned chicken broth last in the fridge?
Once opened, boxed chicken broth will keep for up to five days in the refrigerator. You should store it directly in the box.
Canned chicken broth will keep for up to four days. For the best flavor and freshness, transfer the broth from the can into a food-safe glass or plastic storage container with a lid.
Tips for Saving Chicken Broth
Here are a few ways to make sure your chicken broth doesn’t go to waste:
- Store it properly: When refrigerating chicken broth, store it in a clean container with a lid that closes tightly. Try to minimize how much air is in the container; it’s best to use one that just fits the broth.
- Label with dates: Whether refrigerating or freezing, it’s smart to label broth with the date it was made (or opened). This way, you’ll never toss a carton too soon or use it too late.
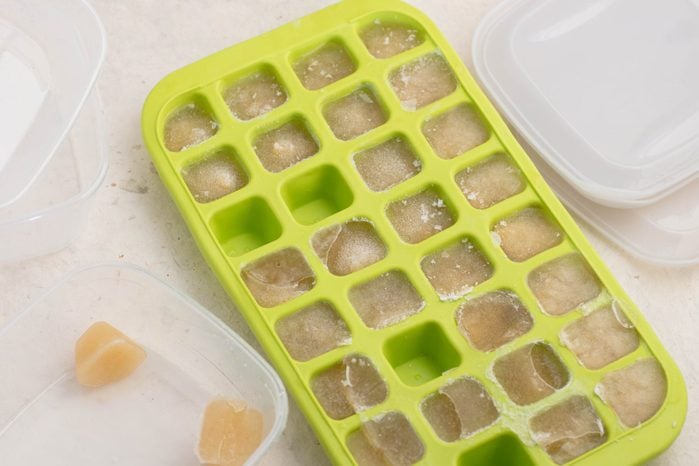
- Freeze: Homemade chicken broth will keep for up to six months in the freezer, and store-bought broth will last for four months. There are a few tricks to freezing broth. First, allow it to cool completely before transferring it to the freezer. Second, choose the right container. If you don’t have much broth left, freeze it in an ice cube tray, then store the frozen cubes in a plastic bag. Pull one or two out whenever you need a touch of flavor in a recipe. For a lot of leftover broth, store in gallon resealable plastic bags or in Mason jars. If you opt for using glass jars, leave at least 1-inch of headspace at the top so the soup can expand as it freezes.
- Use smaller amounts: You can use broth in more than just soup! There are lots of ways to use up leftover broth and leftover stock. Replace some or all of the water in a pot of rice, quinoa or other grain. Simmer red or brown lentils in broth. Deglaze a skillet with a splash of broth. Smooth out mashed potatoes with a little bit of broth. The possibilities are endless!
Colossal is excited to announce that Favorite Chef 2024 is here, and the prize package for this year’s champion has risen to new heights. Culinary creators, professional chefs and home cooks are invited to show off their skills all while supporting the James Beard Foundation (JBF).
The Favorite Chef Prize Package
This year’s Favorite Chef will receive $25,000, appear on the cover of Taste of Home magazine, and enjoy a cooking experience with celebrity chef Carla Hall in the bustling culinary hub of New York City. What makes this year’s prize so delectable?
- A cash prize of $25,000 is sure to have anyone’s mouth water, whether the champion anticipates furthering their culinary education or opening their own restaurant.
- A passionate chef will take the spotlight on the cover of Taste of Home and be featured in an exclusive interview, sharing their culinary journey in the pages of a publication cherished by cooking enthusiasts everywhere. What better platform to showcase their story than in a magazine dedicated to celebrating the world of food?
- An exclusive cooking experience with Chef Hall will be held at Platform by JBF, a modern kitchen and educational space in the city that never sleeps.

Carla Hall Presents Colossal’s Favorite Chef
Chef Carla Hall, a Food Network fan favorite and host of the new HBO Max series “Chasing Flavor,” has graciously returned as the presenter of the 2024 competition. And guess what? Competitors have the chance to win the coveted title of “Carla’s Pick” by showcasing their plated presentation skills. It’s a showdown of flavor, finesse, and a dash of flair!
Industry-Pro Workshops
Participants will also feast on a smorgasbord of culinary wisdom with workshops tailored to chefs, including the art of plating with Chef Hall, leadership with Kris Moon, catering secrets with Chef Terry Matthews, and social media strategies with Melissa Anaya. These workshops are sure to tantalize taste buds and ignite creativity!

Colossal x James Beard Foundation
The allure of this competition extends beyond just the prizes and workshops. Colossal has proudly raised over $4.7M for the James Beard Foundation (JBF) through the annual Favorite Chef competition. This campaign cultivates a community of chefs supporting chefs—bolstering JBF’s transformative programs that promote inclusivity and sustainability. The James Beard Foundation provides critical resources and initiatives such as mentorships, leadership programs and advocacy efforts for America’s food and beverage professionals.
Favorite Chef is operated by Colossal as a fundraiser on behalf of DTCare, a nationally registered 501(c)(3) charitable organization. Funds raised during the Favorite Chef competition go to DTCare, which will subsequently issue a grant to the James Beard Foundation after the conclusion of the competition.

2023 Favorite Chef – Karen ‘Chef Kay’ Jenkins
Chef Kay is not your typical home cook; she’s a culinary artist who believes in the power of food to heal the soul and bring people together. The lifelong Virginian‘s journey has been marked by challenges and triumphs, but her love for cooking has been a constant source of comfort and joy. Chef Kay’s passion for Southern cuisine shines through in her cooking style, which centers on dishes that warms the soul.
“It’s about the impact we’ve been able to have on others, including up-and-coming cooks.”
Along with pocketing $25,000, Chef Kay shared the kitchen with Chef Hall in New York City as the 2023 champion.
Colossal has turned up the heat this year by adding the cover of Taste of Home to the prize package. Who will be the next Favorite Chef? The kitchen is calling!
Frequently Asked Questions
Who is Colossal?
Colossal is a nationally registered professional fundraiser that inspires people to advocate for themselves and those in need. Through online competitions like Favorite Chef, Colossal offers participants the opportunity to make their mark while also making a big impact. Who’s Next?
To learn more, visit colossal.org.
Does Taste of Home magazine operate Favorite Chef?
No. Colossal Management, LLC operates Favorite Chef on behalf of charitable grantmaker DTCare.
How is the winner selected?
The “People’s Choice” winner of the Favorite Chef competition is determined through public voting. Carla Hall will also select one eligible competitor’s plated presentation submission as “Carla’s Pick.”
Where does the competition money go?
The grant to the James Beard Foundation will come from “Donation Votes” cast through the competition. 100% of donations go directly to DTCare, which will subsequently grant the donation (minus competition fees/costs) to the James Beard Foundation at the end of the competition.
If you have questions about Favorite Chef, please learn more here.
Roughly two-thirds of us have an air fryer on the counter at home. It circulates hot air around food to crisp it up, which is super convenient—when it works. But like all appliances, air fryers can malfunction. If your air fryer happens to be a certain model from Best Buy, you may have an appliance that overheats, melts or—yikes—even catches on fire.
That’s the reason for this Best Buy air fryer recall.
Why did Best Buy issue the recall?
The Insignia air fryers can overheat, causing the handles to melt or break, posing fire and burn hazards. The Insignia air fryer ovens can overheat and the glass on the door can shatter, posing fire, burn and laceration hazards.
So far, Best Buy has received 24 reports about overheating, melting or glass shattering, including six reports of air fryers catching on fire.
How do I know if I have a recalled product?
Best Buy’s air fryer recall involves 187,400 Insignia Air Fryers and Insignia Air Fryer Ovens sold in the U.S., plus 99,900 air fryers sold in Canada. The products were all sold between November 2021 and November 2023.
In the U.S., affected model numbers are:
- NS-AF34D2
- NS-AF5DSS2
- NS-AF5MSS2
- NS-AF8DBD2
- NS-AF10DBK2
- NS-AF10DSS2
The brand name INSIGNIA will be on the top or front of the unit. Look for a product rating label on the underside of your air fryer to find the model number. The air fryers and air fryer ovens have plastic or plastic and stainless steel bodies in black and stainless steel finishes.
What should I do next?
If you have a product that’s part of this Best Buy air fryer recall, stop using it ASAP. Then, register at Best Buy’s recall site to arrange a return through a pre-paid shipping box. (Don’t return your air fryer directly to a Best Buy store—you won’t get a refund that way.) You’ll have to submit photos of the recalled air fryer and the model number.
Expect to receive a refund in the form of a check (if you have a receipt) or a Best Buy store credit (if you don’t have a receipt). Looking for a replacement? Taste of Home‘s Test Kitchen found the best air fryer for your cooking style.
I like to keep a pound of carrots in my crisper drawer. This vegetable is packed with key nutrients and all kinds of health benefits. I chop and saute carrots with celery and onion to make a mirepoix, serve them as a crunchy afternoon snack or incorporate into a relish tray. If you’ve ever wondered how to store carrots to make them last as long as possible, read on for our best tips.
How to Store Whole Carrots
For long-term storage of fresh carrots, keep them whole and unpeeled. Wrap the carrots in a dry paper towel and place them in an airtight food storage container. Place the container in the coldest part of your refrigerator (32-40°F), typically the crisper drawer. When stored properly, whole and unpeeled carrots should remain fresh for three to four weeks.
Although carrots do not produce ethylene gas (which can hasten ripening), they are sensitive to it. Be sure to store your carrots away from fruits such as pears and apples. When exposed to ethylene, carrots will turn bitter in taste.
Editor’s Tip: For carrots harvested from your garden or purchased at your local farmers market, the first step is to trim the greens. This is important because the greens will take moisture (and nutrients!) from the carrot if left attached. Next, lightly rinse the carrots in water to remove any excess dirt. Let the carrots sit out in the open air for a few hours to allow them to dry completely before storing in your refrigerator.
How to Store Peeled Carrots

Peeled carrots will dry out at a faster rate than unpeeled carrots. To help retain moisture, wash the carrots and store them submerged in water in an airtight container in the refrigerator. Change out the water every one to two days; rinse the carrots again before eating. When stored this way, peeled carrots should remain fresh for up to three weeks.
How to Store Baby Carrots
Baby carrots are perfect on their own for an afternoon snack or as a vehicle for dill dip, Parmesan yogurt dip or hummus. There are also plenty of baby carrot recipes that turn this mini vegetable into a whole meal. You can treat baby carrots the same way as peeled carrots. Rinse, submerge in water and store in an airtight container in the refrigerator. To help maintain freshness, change out the water every couple of days. Baby carrots should remain fresh for up to three weeks. (Ever wonder about the white stuff on your baby carrots?)
How to Store Shredded Carrots

Shredded carrots make for an easy salad topping and—even better—as an ingredient for carrot cake. To store shredded carrots you’ve made fresh in your food processor, first rinse and dry completely. Then store in an airtight food storage container in the coldest part of your refrigerator.
Store-bought shredded carrots can be stored in the refrigerator in their packaging. Once opened, they should be transferred to an airtight container and returned to the fridge. Shredded carrots should remain fresh for five to seven days.
How to Store Cooked Carrots
Allow cooked carrots to cool completely. Transfer them to an airtight container and store in the refrigerator for up to five days.
How to Freeze Carrots

For best results, blanch the carrots before freezing. Blanching will help to retain the carrots’ texture, color and flavor. To blanch peeled, cut or shredded carrots, place them in boiling water for two to three minutes. Use a slotted spoon to remove them and immediately place them into an ice bath for another two to three minutes.
Set the blanched carrots on a towel to dry completely. Lay the carrots out in an even layer on a baking sheet covered with parchment and freeze for two hours. For long-term storage, place the carrots in freezer bags or freezer-safe food containers. Add the date to the container so you know when to use them by. Carrots can be frozen for up to 12 months.
To thaw the carrots, place them in the fridge overnight. For a quicker thaw, submerge the carrots in their container in cold water, replacing the water every 30 minutes.


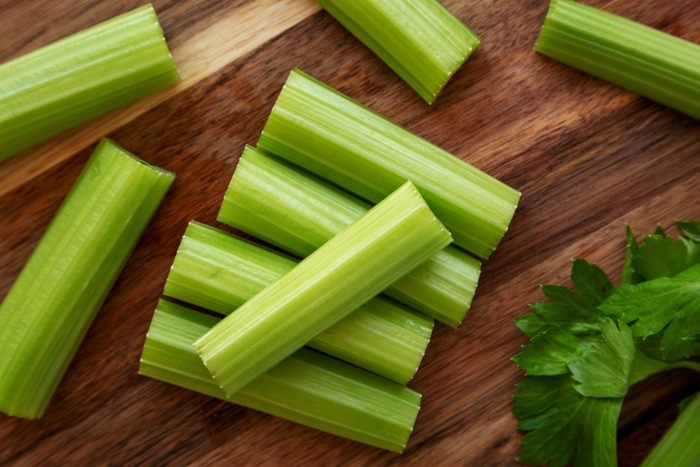
Unassuming celery is truly a powerhouse in the kitchen. Whether part of a mirepoix in a soup or stew, cooked with an old-fashioned pot roast or served as a garnish for a zesty Bloody Mary, celery is a great vegetable to keep in the crisper. But we can’t be the only ones who buy a bag of the stuff because our soup recipe called for two ribs and then forget about it. Weeks later, we’ll find it loosing its color and going limp. Here’s how to store celery the right way to keep it fresh for longer!
How to Choose Celery

Look for celery that is pale green in color, has tightly-packed ribs and is rigid to the touch. Avoid purchasing celery that has any bruises or discoloration.
If you’re afraid you won’t use the whole bundle of ribs, here are plenty of celery recipes to explore. Oh, and note to all gardeners, you can chop off the bottom and re-grow your celery from the scraps.
How to Store Celery Stalks
First thing’s first: Once home, get that celery out of its plastic bag. The plastic retains ethylene gas, which means the celery will continue to ripen if it’s left in its original packaging. To help prevent the celery from drying out, wrap whole celery tightly in aluminum foil, leaving the ends unfolded to allow the ethylene gas to escape. Store the wrapped celery in your refrigerator’s crisper drawer. It should stay crisp for two to four weeks.
How to Store Cut Celery
Once cut, celery loses its moisture at a faster pace. While its best to cut celery right before using it, if you like to prep celery for snacking (like these apricot-ricotta stuffed celery bites), submerge the celery in water, cover and store in the refrigerator. The celery should remain crisp for several days.
Don’t like the stringy bits? This is how to peel celery.
How to Freeze Celery
The key is to blanch the celery first. This will help preserve the celery’s texture, color and flavor. To blanch the celery, place chopped celery in boiling water for two to three minutes. Remove with a slotted spoon and immediately place in an ice bath for another two to three minutes. Let it cool completely, and dry. Place the celery in a freezer bag or freezer-safe container and store it in the freezer for up to two months.
Celery that has been frozen is best used in stew or soup recipes, as its texture will be soft when thawed. You can add the frozen celery directly to the recipe without thawing.
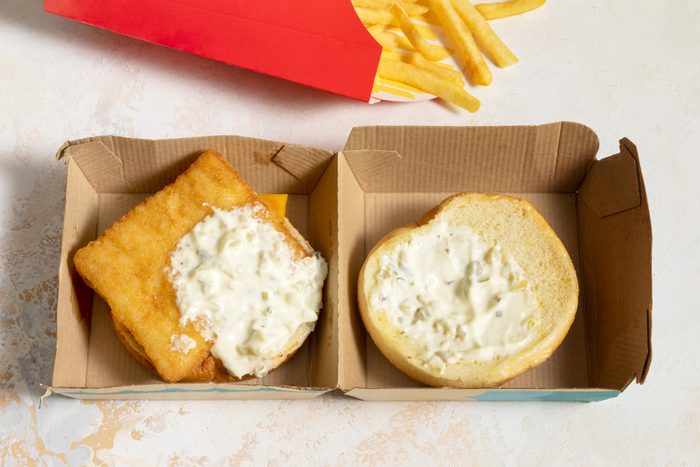
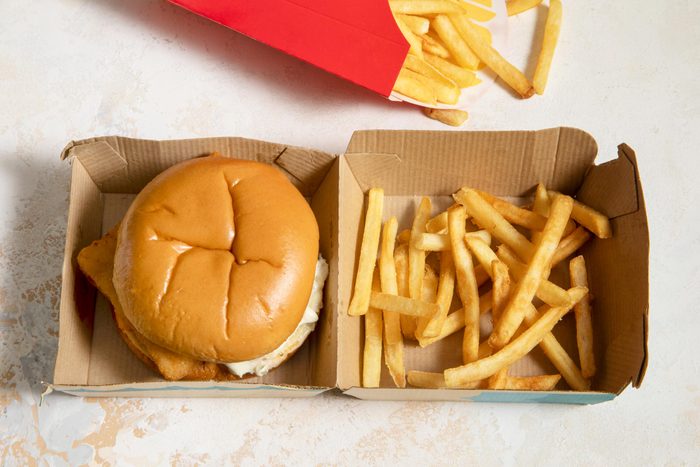
There are the Big Mac lovers. The McNugget lovers. And then, there are the Filet-O-Fish lovers, the McDonald’s customers that can’t seem to get enough of that breaded fish sandwich with tangy tartar sauce.
If that’s you, Filet-O-Fish lover, then you likely are already aware of how the sandwich seems to always be a little off-center every time you open the box. The tartar sauce or the cheese isn’t centered, and the fish always seems to be sliding out of the bun. Why?
Turns out, there are a variety of factors to explain why your fish sandwich never seems to be centered. From the way the tartar sauce is added to how it’s assembled, and even the ingredients used, McDonald’s employees explain why your sandwich is never perfectly straight.
Why is Filet-O-Fish tartar sauce off-center?
It has to do with how the sandwich assembled and how fast the cooks are going in the back to prep your meal. Here are the secrets from McDonald’s employees that explain what’s happening.
The tartar sauce gun is wonky
McDonald’s employees on Reddit admit that the gun used to squirt the tartar sauce onto the bun for the Filet-O-Fish can be, well, a little wonky.
“I swear the tartar never comes out of the tartar gun perfectly from the center, I always put the thing directly over the bun and it shoots to the … top of the bun and gets in the box,” writes Reddit user u/TwoWeak9365.
“The tartar sauce launches to the side half the time when you put it on,” writes another employee.
Filet-O-Fish goes in a box, not a wrapper
Unlike most of the burgers or chicken sandwiches on the McDonald’s menu, which are sealed in a wrapper to keep things together, the Filet-O-Fish is put in a box. Not only that, but the sandwich is actually assembled in the box. Hence why the sandwich is typically off center when you open up your lunch.
According to former McDonald’s chef Mike Haracz, the sandwich is assembled as follows: the two halves of the steamed bun are placed in the box. The bottom half gets the slice of cheese, the top half gets the tartar sauce. Then the sandwich is slid to the next employee where the breaded fish is placed on top of the tartar sauce. The box is then closed and bagged up for the customer.
The size of the box also matters; it’s too big for the sandwich. “When we assemble it we flip the bottom onto the top when we close the box. Since the box is too big for the bun/sandwich, stuff just slides around,” Reddit user u/WaluigiGoesWaa writes. “Really we just need a smaller box.”
Having to actually place the sandwich together would require an extra step. For a fast-food establishment that serves an average of 69 million customers a day across the world, that step seems time-consuming and unnecessary.
Haracz also points out that other sandwiches in boxes are assembled this way, hence why your Big Mac might be a little off-center, too.
The bun is steamed
If this is such a problem, why not put the sandwich in a wrapper? The reason for using the box for the Filet-O-Fish has to do with the choice of bun.
“We can’t wrap it like a cheeseburger cause of the steamed bun,” u/WaluigiGoesWaa continues.
With the combination of the steamed bun and the ingredients being added so quickly, it makes sense that some of those ingredients would slide right off. It’s a hot sandwich!
Make your own Filet-O-Fish at home
If you’re in the mood for a fish sandwich but aren’t took keen on getting a Filet-O-Fish that is, well, a little off-center…why not make your own? These Fish Po’Boys make it easy to have a breaded fish sandwich at home, with a creamy homemade sauce that you’ll want to eat by the spoon. (Feel free to add a slice of cheese, just like the Filet-O-Fish!) Want something more complex? This Breaded Fish Sandwich has you breading and grilling the fish yourself, topped on a bun with extra shredded lettuce and carrots.
Up Next: See how the Filet-O-Fish compares to other fast-food fish sandwiches.
Peak peach season generally falls between May and August. Around this time, I eagerly wait for the tender, tangy stone fruit to pop up at my local grocery store or farmers market.
Fresh peaches are simply delicious eaten raw but can also be baked into peach dessert recipes like peach pie, peach crumble and peach upside down cake. They’re also tasty tossed in salads or even as a pizza topping! The options are endless, which is why you’ll want to learn how to store peaches and savor that sweet, tangy flavor for as long as possible.
How to Store Ripe Peaches

It’s best to eat ripe peaches right away. Once peaches have been picked, they tend to bruise easily due to their delicate skin. Perfect juicy peaches will last less than a week stored on the counter. If you have an abundance of ripe peaches that you aren’t able to use, store them in the refrigerator. The cold air will slow down the ripening process but also dehydrate them, making them wrinkly after a few days.
How to Store Unripe Peaches
If you have very firm peaches that aren’t quite ripe, store them unwashed and stem-side down at room temperature. Be sure to place them in a single layer to avoid bruising. If the peaches are on the harder side and you want to speed up the ripening process, place them in a paper bag on your countertop. The natural ethylene gas they give off will ripen them right up.
How to Store Cut Peaches

Like storing avocados, cut peaches will likely turn brown due to oxidization. However, if you coat them with lemon juice or lime juice, the citrus will help keep the peaches looking fresh for a few days. Once covered in citrus juice, store in an airtight container or bag in the fridge. (In case you don’t know, here’s how to peel and pit peaches.)
How to Freeze Peaches
To enjoy ripe peaches all year long, store them in your freezer. Freezing peaches locks in that fresh taste and makes baking a breeze. Baking with frozen fruit cuts down on prep time since the fruit is already peeled, pitted and sliced.
To freeze peaches, rinse the peaches and pat them completely dry. You don’t need to peel the peaches, as the skins will slip off easily once thawed. I recommend slicing the peaches prior to freezing since it’s faster to defrost small slices rather than the whole fruit.
Simply cut the peach open, remove the pit, and slice. Line the slices up on a parchment-lined sheet pan and place in the freezer until solid. Place the frozen peach slices in a freezer bag and store for up to six months. To defrost, place the frozen peaches in the refrigerator and let them thaw.
Editor’s Tip: For added protection against freezer burn, wrap the freezer bag of frozen peaches in another airtight bag or grocery bag.
This guide will help you determine when to use fresh vs. frozen peaches! In short, fresh peaches are best eaten raw or topped on salads and frozen peaches work great for smoothies, muffins and other baked goods.
How to Use Overripe Peaches
There’s nothing quite like a summer peach. One day it’s so juicy you have to eat it over the sink, and the next, it’s turning soft and brown. Thankfully, there are tons of ways you can put those peaches to good use. Blend overripe peaches into a peach smoothie, preserve them in bourbon peach jam, puree them into peach margaritas or bake up a healthy peach crisp.


You’re going to love the curiously-named Irish potato candy. It’s curious because the candy is not an Irish dessert and not made with potato! They are, however, a unique and delicious candy, one that’s easy to make and perfect for sharing.
Made from a mixture of coconut, sugar and cream cheese, each bite is rolled into a potato shape and coated in cinnamon and cocoa. When finished, Irish potato candy looks like a heap of mini russet potatoes.
What is Irish potato candy?

This recipe is from Philadelphia, where it’s been a regional favorite for over a century. Historians believe that the candy was first created and sold in the late 19th century by Irish confectioners who immigrated to Philadelphia.
Shaping and coating the candy to look like potatoes makes them an easy sell for St. Patrick’s Day. In the weeks leading up to the holiday, boxes of the sweets can be found in candy stores all over the city. Commercially produced Irish Potato Candy, such as Oh Ryan’s, is made with powdered sugar, coconut and other ingredients like buttercream or fondant. But when made at home, the recipe calls for butter and cream cheese, which makes them even more delicious.
The candies are rolled in cinnamon, which adds a spicy contrast to the sweet filling—and makes them look like fun-size, freshly-dug potatoes. Some people even give the potato candies “eyes” made from pine nuts.
Irish Potato Candy Recipe
The recipe makes about 50 little, potato-shaped candies. In this recipe, the candies are coated in a blend of cinnamon, cocoa powder and powdered sugar—for a deeper flavor and a color more like russet potatoes.
Ingredients

Filling:
- 4 ounces softened cream cheese
- 1/4 cup unsalted butter, softened
- 1-1/2 teaspoons vanilla extract
- 1/4 teaspoon salt
- 4 cups powdered sugar
- 2-2/3 cups shredded coconut
Coating:
- 2 tablespoons ground cinnamon
- 1 tablespoon cocoa powder
- 1 tablespoon powdered sugar
- Optional: Slivered almonds or pine nuts, for eyes
Directions
Step 1: Begin the filling

Place the softened cream cheese and butter in the bowl of a stand mixer. (Or in a large mixing bowl if using a hand mixer.) Mix them together on medium-high speed until they’re blended and smooth. Add the vanilla extract and salt and mix.
Step 2: Mix in the coconut

Pour the shredded coconut into a mini chopper or food processor; pulse the machine several times to chop the coconut shreds into small pieces. Then, add the coconut to the mixing bowl and blend it into the cream cheese-sugar mixture.
Editor’s Tip: Pulsing the coconut shreds into smaller pieces in a food processor makes a smoother, finer textured filling.
Step 3: Shape the candy
Line a large cookie sheet with wax or parchment paper. Scoop a level tablespoon of the candy filling. (If you have a kitchen scale, each scoop should weigh about 1/2 ounce.) Roll the filling between your palms to make a smooth ball. Then, roll the ball into an oblong, potato shape—it should be about 1-1/2 inches long.
Place the candy on the lined cookie sheet, and continue with the rest until all of the filling is used.
Step 4: Coat with cocoa

To remove lumps, sift the cinnamon, cocoa powder and powdered sugar together onto a shallow plate. Roll the shaped candies in the mixture to coat them completely and make them look like little potatoes. To make the potato eyes: Use a toothpick to poke one or two holes in each candy. Then, insert a piece of slivered almond, leaving it sticking out a little to look like an eye.
Once all the candies are coated, put them into a tightly sealed container or on a plate covered with plastic wrap. Stash the candies in the fridge for at least an hour before serving.

Irish Potato Candy variations
- Add nuts to the filling: Toast a half-cup of chopped almonds, walnuts or pecans in a skillet, let them cool and then fold them into the filling with the coconut. They’ll give the candies a nutty flavor and crunch. (Learn the best way to toast nuts.)
- Try pine nuts for eyes: I use mild-flavored slivered almonds to make eyes in the potato candies, but if you like the flavor of pine nuts, use them instead.
How to Store Irish Potato Candy
Because the candies are made with butter and cream cheese, they should be stored in the fridge, where they’ll last for a week. It’s important to keep the candies tightly covered with plastic wrap or in an airtight container to prevent them from drying out.