6 Smart Painting Hacks You’ll Wish You Knew Sooner

Updated: Jan. 05, 2024
Starting a DIY remodel? Keep things neat and clean with the best painting hacks from TikTok.
Finding the right paint colors can be fun, but all the prep work? Not so much. Your furniture needs to be moved, a drop cloth needs to be laid and strip after strip of painter’s tape should hug every door and window frame, plus the ceiling, shelves and any woodwork you have lining your walls. Oh, one more thing—don’t forget to thoroughly clean walls before painting.
The prep takes so much time, when all you want to do is put a fresh coat of paint on the wall!
But the good news is that there are shortcuts—ones that cut the prep time in half without skimping on quality. Before you start taping up every surface in your room, check out these painting hacks from TikTok user @therenegadehome. She shared two videos with three painting hacks each, which means a total of six handy hacks to make sure you never have a messy paint project again!
@therenegadehome Any others hacks I should try? #painthacks #diyproject #homeimprovement #painting ♬ TWINNEM – Coi Leray
1. Line Your Trim with a File Folder
No need for extra painter’s tape here. Use a file folder to keep things clean as you paint, especially in tough, detailed areas like door frames and trim that connects to the floor or ceiling. You’ll need a file folder, your paintbrush and a steady hand. Place the folder between the areas you are and aren’t painting, and slide it along the surface as you go. The result? Clean lines, without the 45 minutes of laying painter’s tape beforehand.
See what the Property Brothers use instead of painter’s tape.
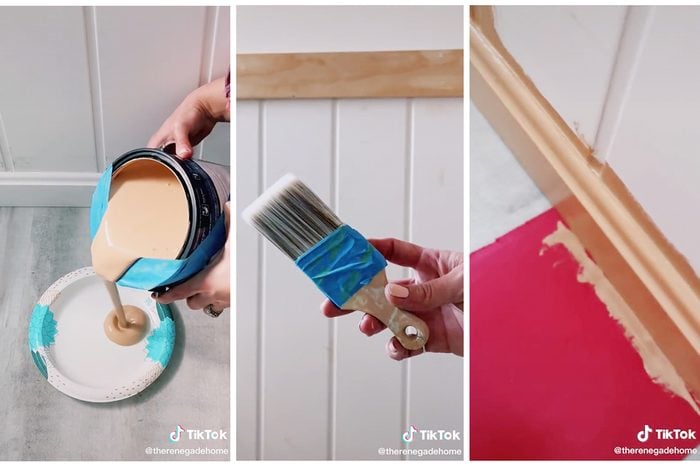
2. Keep the Paint Can Tidy
Take all the painter’s tape you aren’t putting up on your wall and use it on your paint can. It can help prevent the painter’s pet peeve of a messy, paint-covered pail and label. For this painting hack, take two strips of tape and join them at an angle over the top edges of the can. Secure them with a third strip, wrapped around the can right under the rim, and voilà! You’re left with a DIY spout that allows for easy paint-pouring and clean-up. When you’re finished, rip off the tape, cover and store away until the next use.
FYI: Here are the paint colors to skip when choosing your palette.
3. Keep Your Paintbrush Clean
A paint-covered brush handle makes for messy hands and stained clothing if you aren’t careful. To avoid this, simply wrap some painter’s tape around the base of your brush and the handle. If things start to get too messy during the process, you can either wipe the excess paint off with a towel, or replace the tape as you go. And when you’re done with your project, just rip off the tape to reveal an almost brand-new brush—besides the bristles.
If paint does happen to spatter onto your sweater, here’s how to remove paint from clothes.
4. Use a Rubber Band to Wipe Your Brush
There’s nothing worse than trying to put a lid over a can of paint with a messy rim. To keep this from happening, put a rubber band vertically around your can, adjusting it to the center of the can. You can dip your brush in and wipe it off on the rubber band, so paint drips right back into the can.
If you’ve somehow gotten paint on the floor, here’s how to get paint out of the carpet.
5. Use Fabric Softener to Clean Your Brushes
We never want our brushes to become crusty with paint, but sometimes water alone doesn’t do the best job of keeping that from happening. This trick solves that problem in a jiffy—mix some fabric softener with a little water and leave your brushes to soak for an hour. They’ll look as good as new!
6. Use a 6-in-1 Painter’s Tool to Clean Rollers
The curved part of this handy tool can be used to scrape off excess paint, making it super easy to wash the rest out. It also functions as a putty knife, a scraper, a gouger and a paint can opener—is there anything this gadget can’t do? Look for a 6-in-1 tool like this before you start painting.
For more painting hacks, see what painting tips the Property Brothers swear by.
Originally Published: March 24, 2022