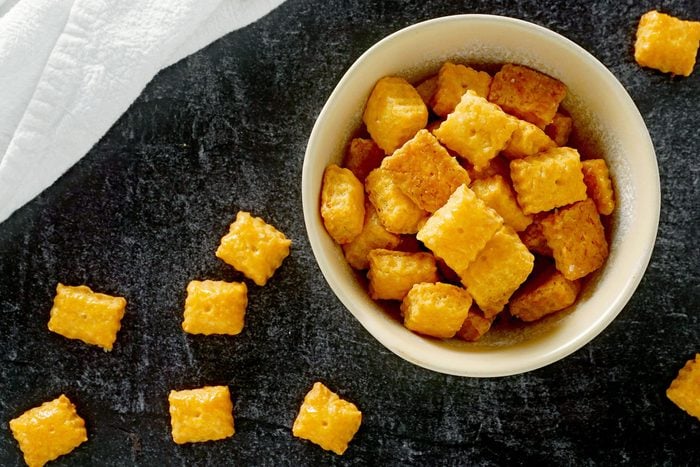
It’s safe to say that we’ve all eaten too many Cheez-Its (along with these other nostalgic childhood snacks) at one point or another. Whether they were a regular road trip snack, the thing in your school lunch box you looked forward to most, or your main form of sustenance during college all-nighters, these cheddar snack crackers are deeply rooted in our memories.
Bring some of that childhood magic back to your kitchen with this recipe for homemade Cheez-Its. It’s a fun and delicious weekend baking project that the whole family can enjoy (and subsequently devour).
What Cheese Is Used to Make Homemade Cheez-Its?
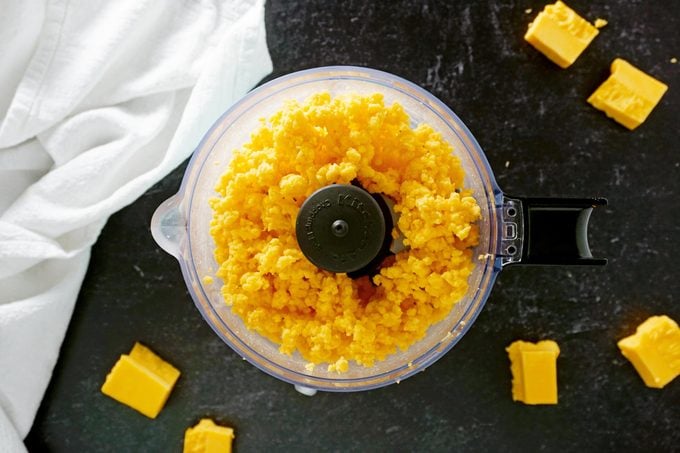
To make Cheez-Its at home, all you’ll need is some good old-fashioned sharp cheddar cheese (or extra-sharp if you want an even stronger cheese flavor).
Sharp cheddar will give homemade Cheez-Its plenty of robust cheesiness and that iconic yellow-orange hue.
In testing, we found that you get the best cheese distribution and even color by using cheese from a block, rather than pre-shredded cheese. (Here’s why block cheese is best.) Pulsing the cheese in a food processor grates the cheese into fine crumbles that melt easily and incorporate seamlessly into the dough.
How to Make Homemade Cheez-Its
 Lauren Habermehl for Taste of Home
This recipe makes 12-14 dozen crackers.
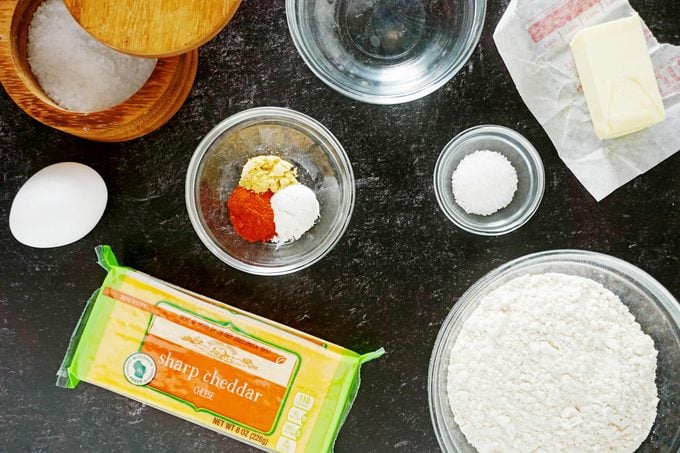
Ingredients
- 8 ounces cheddar cheese (about 3 cups grated)
- 4 tablespoons unsalted butter, chilled
- 1 teaspoon kosher salt
- 1 cup all-purpose flour
- 2 tablespoons ice-cold water
- 1/2 teaspoon paprika
- 1/2 teaspoon ground mustard powder
- 1 teaspoon cornstarch
- 1 egg, optional
- Flaky sea salt, optional
Directions
Step 1: Pulse cheese
 Lauren Habermehl for Taste of Home
In a food processor, pulse the cheese until finely grated. The cheese may have some larger clumps, but that’s OK. They will break up as the butter gets worked into the dough later.
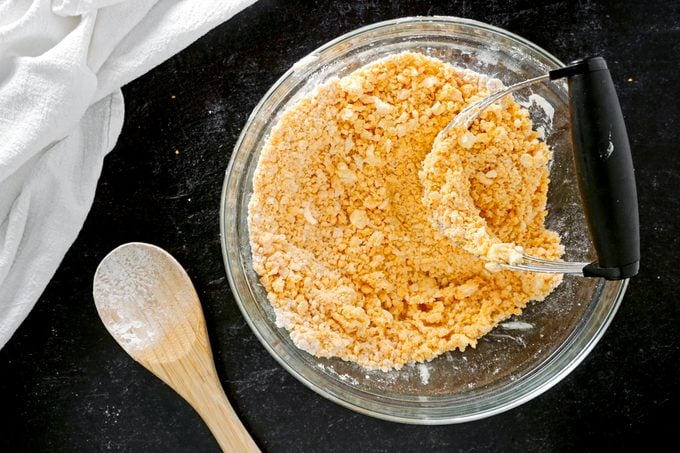
Step 2: Stir together dry ingredients
Transfer the cheese to a bowl with the flour, cornstarch, paprika, mustard powder and salt. Stir until combined.
Step 3: Work in butter
 Lauren Habermehl for Taste of Home
Next, using a pastry blender (or a fork), cut the butter into the flour mixture until it resembles coarse crumbs.
Step 4: Knead dough
Add the cold water and use your hands to gently work it into the dough until it starts to clump and hold together.
Step 5: Chill
Transfer the dough to a clean work surface. Pat into a flattened disk (about 1 inch thick), then wrap tightly in plastic and chill for at least 1 hour, or up to 2 days.
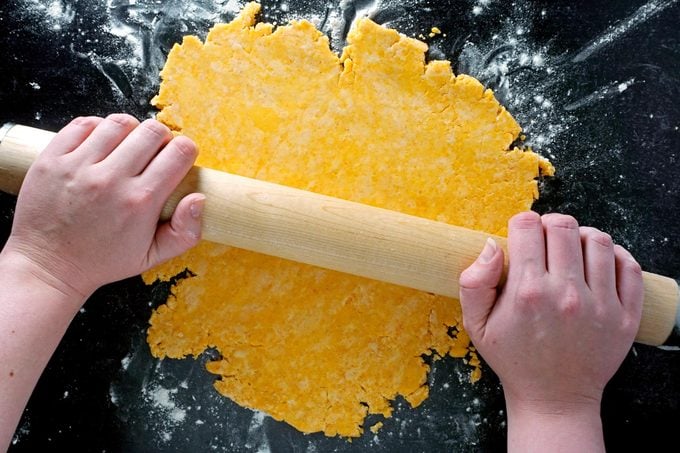
Step 6: Roll
 Lauren Habermehl for Taste of Home
When ready to bake, preheat the oven to 350°F and line two sheet pans with parchment paper.
Unwrap the dough and roll out, using a rolling pin, on a lightly floured work surface. Roll until the dough is less than 1/8-inch thick. The thinner, the better!
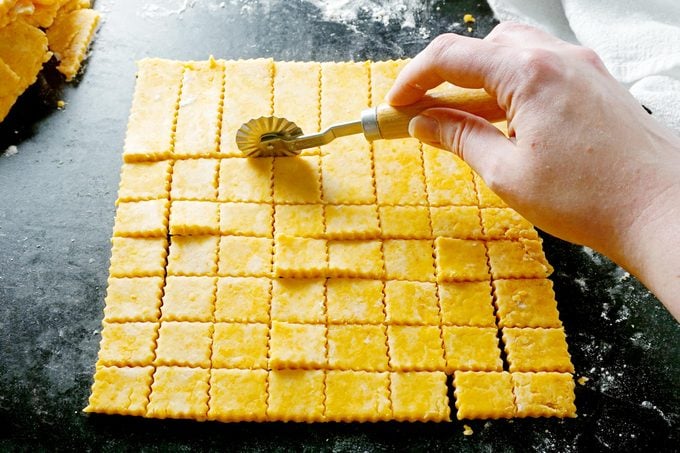
Step 7: Cut and slice
 Lauren Habermehl for Taste of Home
Use a fluted pastry wheel, pizza cutter or sharp knife to trim the rolled dough into a neat square. Then, slice into 1-inch-wide strips before making perpendicular slices across the strips to create 1-inch squares.
Editor’s Tip: Feel free to re-roll the scraps to make sure you don’t waste any of this cheese cracker dough.
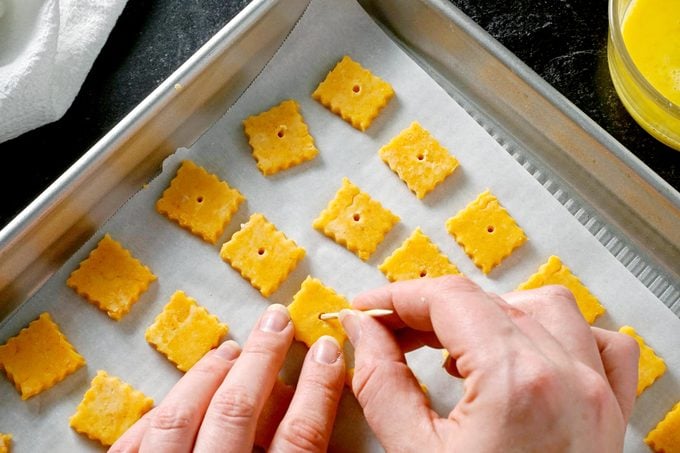
Step 8: Poke
 Lauren Habermehl for Taste of Home
Transfer the squares to parchment-lined baking sheets. Then use a toothpick or skewer to poke a hole through the center of each.
If desired, brush the crackers with a little beaten egg wash to give them some shine.
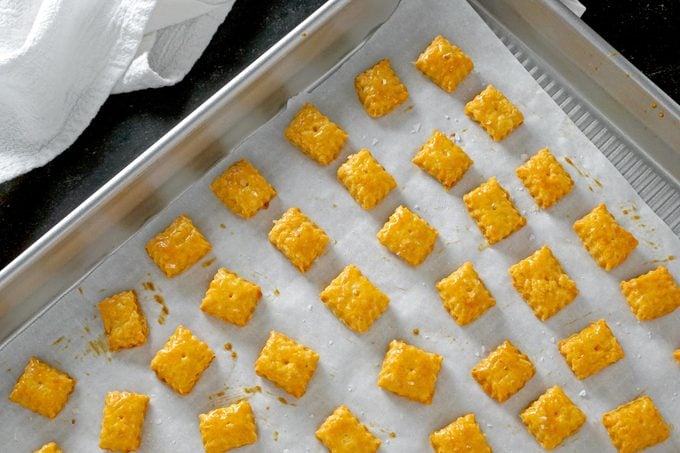
Step 9: Bake
Sprinkle the crackers lightly with flaky sea salt (here’s why it’s the best type of salt for these crackers), then bake for 15-18 minutes, until crisp and golden around the edges. Remove from the oven and allow to cool completely on the baking sheet before serving.
Editor’s Tip: For extra toasty Cheez-Its, let them bake for 20-22 minutes—just keep an eye on them, so they don’t burn.
Tips for Making Homemade Cheez-Its
Making homemade Cheez-Its is an easy, kid-friendly baking project that’s great for bakers of all skill levels. While the recipe is pretty forgiving, here are some of our best tips for homemade Cheez-Its:
Keep ingredients cold
Start with cold butter and water and chill the dough thoroughly before baking. This is important for Cheez-Its (and pie crust), so don’t skip or rush the process. Cold ingredients help make the crackers crisp and flaky, and chilling the dough ensures the crackers hold their shape while baking.
Don’t overwork the dough
Doing so will yield tough, chewy crackers. When mixing the dough, it should act like wet sand where it’s crumbly but holds its shape when pressed together.
Poke holes in your Cheez-Its
It may be tempting to skip poking a hole into every cracker before baking, but the little holes serve an important purpose. They allow steam to escape while the crackers bake, preventing the crackers from puffing too much and helping develop that signature crispiness.
How to Make Homemade Cheez-Its Your Own
 Lauren Habermehl for Taste of Home
Once you’ve mastered making copycat Cheez-Its from scratch, feel free to get creative and make your own recipe with different types of cheese. Here are some of our favorite Cheez-Its recipe adaptations to try:
- Pepper Jack Cheez-Its: Swap the sharp cheddar cheese for an equal amount of pepper jack cheese.
- White Cheddar Cheez-Its: Opt for grated aged white cheddar cheese instead of sharp cheddar.
- Four Cheese Cheez-Its: Omit the sharp cheddar cheese and replace it with 2 ounces each of finely grated Parmesan, Asiago, provolone and mozzarella cheese.
- Spicy Cheez-Its: Add 1/4 teaspoon each of cayenne pepper, onion powder, garlic powder, dried oregano and dried thyme to the original Cheez-Its recipe.
Whole Wheat Cheez-Its
Add extra fiber, iron and protein to these homemade Cheez-Its by replacing 1/2 cup of the all-purpose flour with white whole wheat flour. (Then try some of these other whole wheat flour recipes.)
Gluten-Free Cheez-Its
You can convert this recipe to gluten-free by using your favorite gluten-free 1-to-1 baking blend instead of all-purpose flour. Note that the water may need to be slightly increased, and the baking time for your gluten-free Cheez-Its may need to be adjusted depending on the baking blend selected.
Vegan Cheez-Its
Looking for vegan Cheez-Its? Swap the cheddar cheese for your favorite vegan cheddar cheese and add 1-2 tablespoons of nutritional yeast for extra tangy flavor. Then, opt for 4 tablespoons of your favorite vegan butter (like Earth Balance) or olive oil instead of butter. Prepare and bake as directed in the original recipe
How Do You Store Homemade Cheez-Its?
Homemade Cheez-Its can be stored at room temperature for up to a week. Note that if they’re tightly sealed, they’ll start to lose some of their crunch by day two or three. An empty Cheez-Its or cereal box is a great storage container for homemade cheese crackers.
What Can You Eat with Copycat Cheez-Its?
Of course, Cheez-Its are perfect on their own, but here are more ways to love your homemade cheese crackers.
Try Cheez-Its in These Other Recipes
Blend of the BayouMy sister-in-law shared this recipe with me when I first moved here. It's been handed down in my husband's family for generations. It's quick to prepare, nutritious and flavorful. I've passed it on to my children too.—Ruby Williams, Bogalusa, Louisiana
Oyster FricasseeI oversee the gardens at Colonial Williamsburg. We've learned that the colonists had a ready source of oysters from Chesapeake Bay. I enjoy this rich, creamy casserole, a special dish from this area's holiday recipe collection. —Susan Dippre, Williamsburg, Virginia
Baby Swiss Appetizer CheesecakeThis beautiful cheesecake appetizer can be refrigerated up to 24 hours before serving, so it's the perfect make-ahead recipe for holidays, game days or special occasions. —Marilyn Edelman, Sabetha, Kansas
Parmesan-Ranch Snack MixThis is a quick, easy and delicious snack, especially for kids. No one I've made it for can have just one handful—they always come back for more, and more! So if you’re thinking about cutting the recipe in half to make less, I wouldn’t recommend it. —Tammy Landry, Saucier, Mississippi
Dipped Peanut Butter Sandwich CookiesYou’ll love to give tins of these chocolate-coated cookies to your lucky friends. The shortcut holiday recipe is almost too simple to believe! Here's how to make peanut butter cookies without eggs. —Jackie Howell, Gordo, Alabama
Honey WalleyeMy state is known as the Land of 10,000 Lakes, so fishing is a favorite recreational activity here. This recipe is a quick way to prepare all the fresh walleye hooked by the anglers in my family. —Kitty McCue, St. Louis Park, Minnesota
Snack CrackersOur 13-year-old daughter, Dana, loves to make this crunchy and flavorful snack for us. Her four older brothers finish off a batch in no time. —Sue Manel, Milladore, Wisconsin
Quick Icebox SandwichesMy mother liked making these cool, creamy treats when I was growing up in the States because they're so quick to fix. Then I made them for my three kids.—Sandy Armijo, Naples, Italy
Texas Jalapeno JellyA jar of this sweet and spicy jelly is always warmly appreciated. To add an extra southwestern accent, I trim the lid with a snappy bandanna print fabric. —Lori McMullen, Victoria, Texas
Calico Squash CasseroleI love to try out different recipes for the squash I grow in my garden. It's fun to bring this beautiful casserole to potlucks because I know it'll go fast. Even the little ones like it. —Lucille Terry, Frankfort, Kentucky
Slow-Cooked BroccoliThis family-favorite side dish is quick to fix and full of flavor. Because it simmers in a slow cooker, it frees up my oven for other things. That's a tremendous help when I'm prepping a big meal at home. —Connie Slocum, Antioch, Tennessee
Haystack SupperServed as the main dish at our family reunion buffet, this flavorful layered taco-style dish was a true crowd-pleaser. Folks were pleasantly surprised to find a rice layer, and everyone enjoys the creamy cheese sauce. —Jill Steiner, Hancock, Minnesota
Bacon Cheeseburger BallsThe first time I served these, my husband and kids thought we were having plain meatballs. Then they cut into the flavorful filling inside! —Cathy Lendvoy, Boharm, Saskatchewan
Easy Cinnamon ThinsWhen a co-worker’s husband came home from Iraq, we had a potluck for him. These cookies with coarse red sugar matched our patriotic theme. —Janet Whittington, Heath, Ohio
Scalloped CornThis comforting casserole features sunny corn kernels tucked into a creamy custard. My mom got this recipe and many other excellent ones from her mother. By the time this crowd-pleasing corn dish left the table, my father, sister, brothers and I would have almost scraped it clean. —Sandy Jenkins, Elkhorn, Wisconsin
Cookout Caramel S'moresEasy delectable treats make a playful finish to an informal meal. Toasting the marshmallows extends our after-dinner time together, giving us something fun to do as a family. —Martha Haseman, Hinckley, Illinois
Swiss Mushroom ChickenEveryone enjoys these golden chicken breasts topped with ham, melted Swiss cheese and fresh mushrooms. The entree is easy to prepare but looks and tastes special enough for company. —Jan Baxter, Humarock, Massachusetts
Dirty Banana TrifleWhat could be better than bananas, cookies and Kahlua? You can adjust this to suit your taste, depending on whether you like a stronger or weaker Kahlua flavor. —Laurie Handlin, Ocean View, Delaware
Kiddie Crunch MixThis no-bake snack mix is a delightful treat for kids, and you can easily increase the amount to fit your needs. Place in individual bags, or pour some into colored ice cream cones for a fun presentation. —Kara de la Vega, Santa Rosa, California
Fried Chicken StripsI recently made this recipe of Mom's for my in-laws and they told me it was the "best fried chicken ever." Slicing the chicken breasts into strips cuts down on cooking time and ensures every piece is crunchy and evenly coated. Serve the homemade chicken tenders with your favorite dipping sauce. —Genny Monchamp, Redding, California
Matzo ToffeeOnce you start eating matzo toffee, you may not be able to stop! Matzo crackers are topped with buttery caramel, chocolate and slivered almonds and then baked to perfection. —Sharalyn Zander, Jacksonville, Alabama
Chocolate-Topped Strawberry CheesecakeCreamy and airy, this gorgeous dessert is the perfect special something for a summer dinner party. I love the mix of smooth strawberry cheesecake and crumbly chocolate crust—and how elegant it looks on the table. —Kathy Berger, Dry Ridge, Kentucky
Cheddar-Veggie Appetizer TorteA line forms quickly behind this quichelike torte at family gatherings. The wedges are easy to eat as finger food, and it's delicious hot or cold. — Barbara Estabrook, Rhinelander, Wisconsin
Buttery Sweet Potato CasseroleWhenever we get together as a family for major holidays, my kids, nieces and nephews literally beg me to make this sweet potato casserole. It goes together in minutes with canned sweet potatoes, which is ideal for the busy holiday season. —Sue Miller, Mars, Pennsylvania
Yummy Cracker SnacksThese treats are my family’s favorite. In fact, it seems no matter how many I make, they always disappear too soon! —D. Weaver, Ephrata, Pennsylvania
Creamy Parmesan Spinach BakeMy creamy, comforting side dish wonderfully rounds out any holiday dinner. Just a little of this rich casserole goes a long way. —Jennifer Bley, Austin, Texas
Meat Loaf from the Slow CookerThis simple, easy-to-make meat loaf is one of my personal favorites. I'm often asked for the recipe. —Laura Burgess, Mount Vernon, South Dakota
Summer Squash Mushroom CasseroleThis rich, creamy squash and zucchini casserole, with its crunchy topping would make a wonderful dish to take to summer potlucks and picnics, or to pair up with a wide variety of entrees. You'll love the buttery flavor of these "comfort veggies!" —Jennifer Wallace, Canal Winchester, Ohio
Creamy Tiramisu CheesecakeThe Italian word "tiramisu" means "pick-me-up" and refers to a dessert of ladyfinger sponge cake dipped in coffee, embracing mascarpone cheese. Work that in with cream cheese and you have a guaranteed picker-upper that redefines a classic. —Mrs. Priscilla Gilbert, Indian Harbour Beach, Florida
Jalapeno Popper DipHere's a fantastic way to deliver all that blazing jalapeno popper taste without the work. Whenever I bring this jalapeno popper dip to a party, I'm always asked for the recipe. Serve with corn chips, tortilla chips or butter crackers. —Jennifer Wilke, Collinsville, Illinois
Bacon-Cheddar Potato CroquettesInstead of throwing out leftover mashed potatoes, use them to make this potato croquette recipe. The little baked balls are yummy with ranch dressing, barbecue sauce or Dijon mayonnaise for dipping. —Pamela Shank, Parkersburg, West Virginia
S'mOreosMy son introduced us to this twist on classic s'mores when we were camping. Have a jar of Nutella around? Slather on the inside of the graham cracker halves before you build this one-of-a-kind treat. —Christina Smith, Santa Rosa, California
Chicken & Egg Noodle CasseroleA friend and her family went through a really difficult time, and I felt so awful for them. Bringing over this chicken noodle casserole was the one thing I could think of to help them out in a tiny way and let them know I was thinking of them. —Lin Krankel, Oxford, Michigan
Banana Split Icebox CakeA friend showed me how to make a traditional icebox cake with just cream and graham crackers. I make it special by adding fruit. —Shelly Flye, Albion, Maine
New Orleans-Style Scalloped CornThis colorful casserole is very popular among family gatherings in many New Orleans homes. I started making it years ago, and now my sons include it in their menus.—Mrs. Priscilla Gilbert, Indian Harbour Beach, Florida
Southern-Style Oven-Fried ChickenI call this America’s best-loved oven-fried chicken. The secret is in the breading, which makes the chicken super moist and flavorful, herby and golden brown. —Elaina Morgan, Rickman, Tennessee
Feta-Dill Chicken BurgersI found fresh ground chicken at the butcher and gave it a whirl on our new grill. The result is these saucy burgers. Everybody went nuts—including my sister-in-law, an amazing cook! —Wendy Boughton, Victoria, British Columbia
Pina Colada Icebox CakeThis icebox cake has all the flavors of a pina colada. It takes just one bite to escape to a tropical island! —Rachel Lewis, Danville, Virginia
Jalapeno Mac and CheeseMany years ago after I had had knee surgery, a friend brought me a big casserole of mac and cheese along with the recipe. I have fiddled with the recipe over the years, most recently adding jalapenos at the request of my son. What an awesome spicy twist! —Teresa Gustafson, Elkton, Maryland
No-Churn Blueberry Graham Cracker Ice CreamThis sweet and creamy no-churn ice cream features a fresh blueberry jam swirl and graham cracker pieces. You can use raspberries instead of the blueberries for a different berry flavor. —Heather King, Frostburg, Maryland