How to Make the Best Fried Chicken

Updated: Dec. 08, 2023
Crispy fried chicken from scratch is easier than you'd think.
For many, the smell of fried chicken incites a trip down memory lane. That greasy (and oh, so good) scent brings to mind family picnics and church potlucks. For me, it triggers memories of sitting in the backseat of my parents’ ’98 Dodge Caravan, balancing a super-sized bucket of Kentucky Fried Chicken on my knees. As a kid, I’d beg my parents for that crispy fast food. Now that I’m older I’ve learned to avoid the drive-thru—not just for my health, but because it’s much more delicious (and empowering!) to cook fast-food copycat recipes at home like KFC’s fried chicken recipe.
I’m the first to admit that deep-frying food is nothing near glamorous. It takes some time, determination and a steady pair of hands-but trust me, the end result is definitely worth it. Plus, deep frying is actually much easier than you’d think. Tender, crispy chicken is well within your reach. Say no to car-side chicken and yes to the homemade version with these expert tips from our Test Kitchen. Here are a few tips for making crispy chicken sandwich.
But first a little more reassurance:
Safety first
As with any deep-fried recipe, the elephant in the room is the vat of super-hot oil that will sit atop your stove. (350° to be exact!) The inevitable truth is that oil spits and splashes. Don’t get scared by this; you can tame that beast. Many guides suggest investing in a splatter screen, but the surest way to keep you (and your backsplash) safe is to fry in a high-sided skillet like a Dutch oven or fryer pot. The spitting oil will have a hard time escaping—but if it does, there’s a foolproof way to clean it off any surface.
Insist on using Grandma’s cast iron skillet? Invest in a Frywall ($29) that’ll give you the security of high sides.
Choose cast iron
When things need to be hot and stay hot, we recommend cooking with cast iron. (This is what we use in the Test Kitchen.) The material retains heat very well, ensuring that your frying oil climbs up to the proper temperature which is key to crispy chicken. As an added benefit, our Test Kitchen attests that fried chicken is a great way to reseason a cast-iron skillet, too.
Psst: Here’s how to master cast iron cooking.
Grab a gallon-sized resealable bag
The secret to fried chicken’s crispy crust is a healthy amount of coating. But dredging chicken can get messy. Read: flour in all the wrong places. Save yourself some cleanup by coating your chicken inside a resealable plastic bag. Simply add the coating mix, then the chicken and shake! Your spotless counters say “thank you.” Learn how to make Japanese fried chicken.
Practice makes perfect
Don’t be dismayed if a few pieces burn on your first go ’round. Over time, you’ll acquire the right tools, memorize the basic steps and master the movements. In the meantime, I’m sure you’ll find a few takers for the fried chicken you’ve made to practice.
So what are you waiting for? Slip on your apron, grab a pair of tongs and let’s get cooking! Follow along as we take you step-by-step through our favorite recipe for buttermilk fried chicken.
How to Make the Best Cast Iron Fried Chicken
Ingredients:
- 1 broiler/fryer chicken (about 3 pounds), cut in pieces*
- 3/4 to 1 cup buttermilk
- Oil for frying
Coating
- 1-1/2 to 2 cups all-purpose flour
- 1-1/2 teaspoons salt
- 1/2 teaspoon pepper
- 1/2 teaspoon garlic powder
- 1/2 teaspoon onion powder
- 1 tablespoon paprika
- 1/4 teaspoon ground sage
- 1/4 teaspoon ground thyme
- 1/8 teaspoon baking powder
* Regarding chicken: For this recipe, we use 2 drumsticks, 2 thighs, 4 breast pieces and 2 wings. Save the backbone and wingtips for making chicken stock. You can use packaged cut chicken, buy a whole bird and cut it yourself, or ask your butcher to do the job.
Directions:
Step 1: Soak in buttermilk
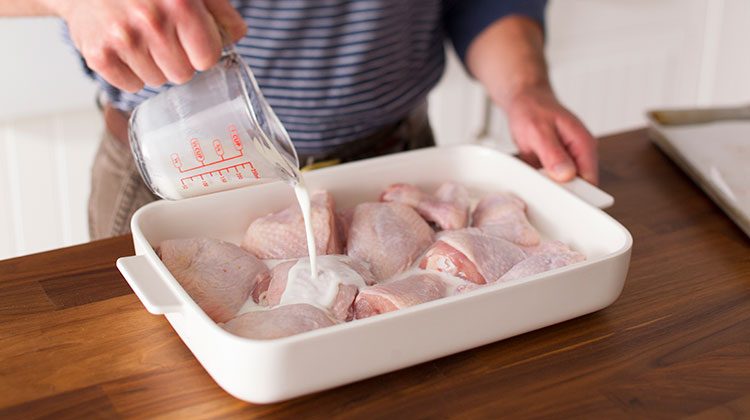
Remove any excess moisture from your chicken pieces by patting them dry with paper towels. Place them in a large flat dish with high sides. Time for a buttermilk bath! Pour the buttermilk over the chicken, then cover and refrigerate at least an hour. (Leaving it overnight works, too.)
Test Kitchen tip: Don’t let the chicken soak for longer than 24 hours. The acid in the buttermilk will turn the meat mushy!
What’s with the buttermilk?
Many recipes for fried chicken will use milk and eggs, but we found that buttermilk gives the chicken an irresistibly tangy flavor that helps brighten up the dish. Also, the acidic composition of buttermilk (or alternatively, plain yogurt) helps tenderize the chicken. Tasty and tender, you say? Count us in.
Step 2: Coat the chicken
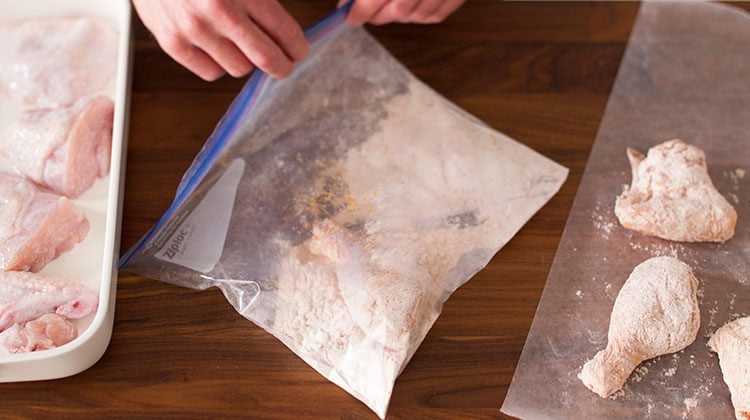
In a large resealable plastic bag, add the ingredients listed for the coating. Give it a shake to combine. Carefully place a single piece of your buttermilk-soaked chicken into the bag. Shake to coat. You’ll want the chicken to have ample coating, so make sure every inch gets dredged. Remove from the bag and lay it on a sheet of waxed paper to dry. Repeat with the remaining chicken.
Test Kitchen tip: Plastic bags work wonders with cutting down the mess, but you can always combine the breading ingredients in a large bowl and toss the chicken that way.
Step 3: Let it rest
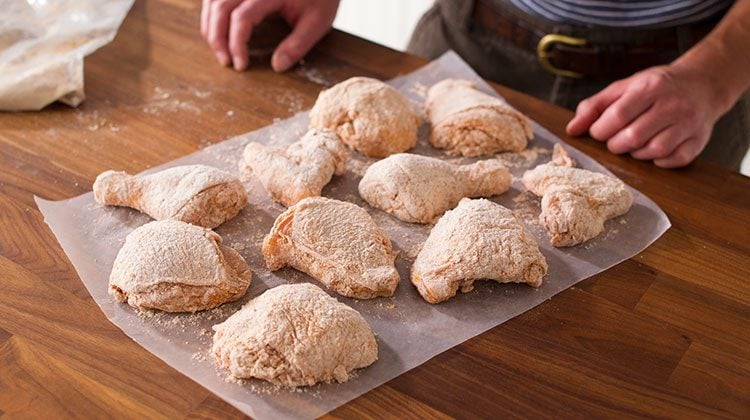
The secret to making that coating stick to your chicken? Patience. Give the chicken extra time to rest after coating (15 minutes should do). During this time the moisture from the buttermilk will become evenly distributed, helping the coating adhere.
Step 4: Fry, fry, fry
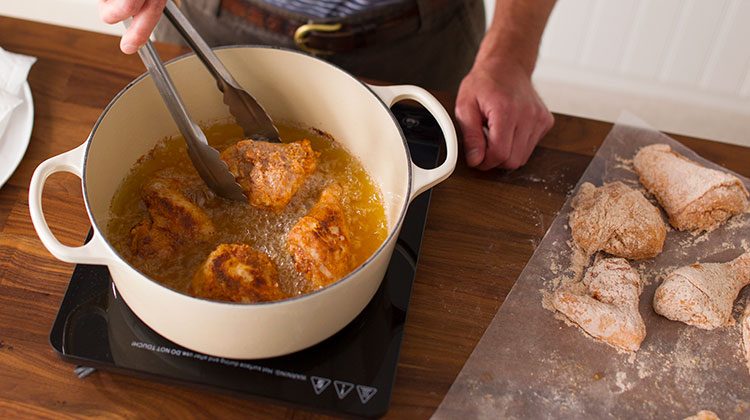
Let’s get frying! Still a little nervous? Read our guide for how to deep fry with confidence.
In a Dutch oven or other deep skillet, heat 1/2-in. of oil over medium heat until it reaches 350°. Carefully add a few pieces of chicken into the oil, making sure not to overcrowd the pan. Cook, uncovered, for 7-8 minutes per side. Turn occasionally until the coating turns dark golden brown and the meat is no longer pink. Remove and place onto paper towels, keeping warm.
Test Kitchen tip: The key to a crispy coat is to fry the chicken 2-3 pieces at a time. If you add too much to the pot, the temperature will drop too quick, giving your chicken a soggy coating.
After frying your first batch of chicken, wait to let the temperature of the oil return to 350° before adding the next batch.
Test Kitchen tip: Don’t panic if the breading browns before the meat is cooked. Place the chicken on a baking pan and bake it in a 350° oven, until completely cooked.
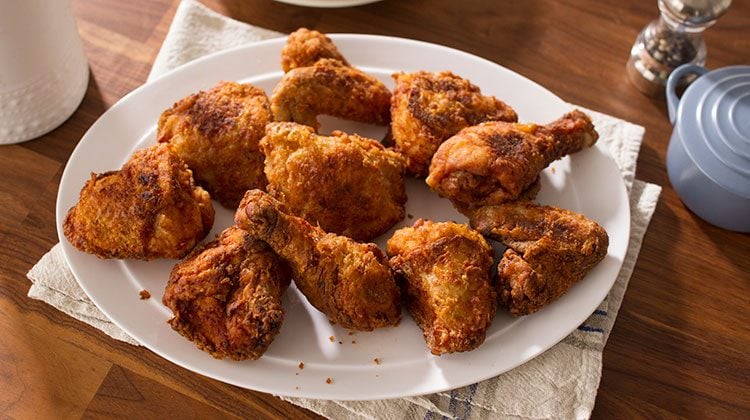
Step 5: Rest, then serve
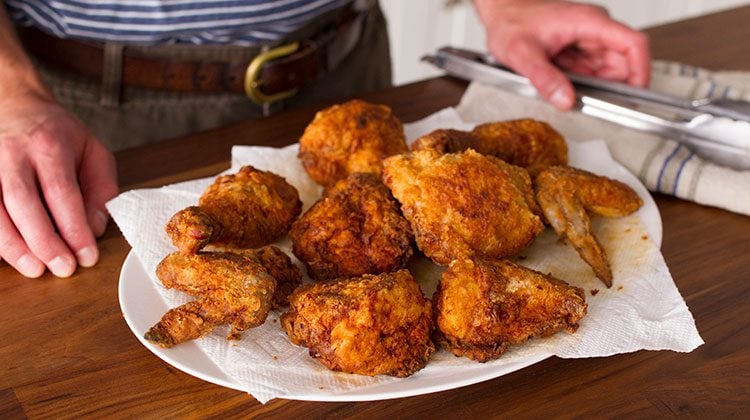
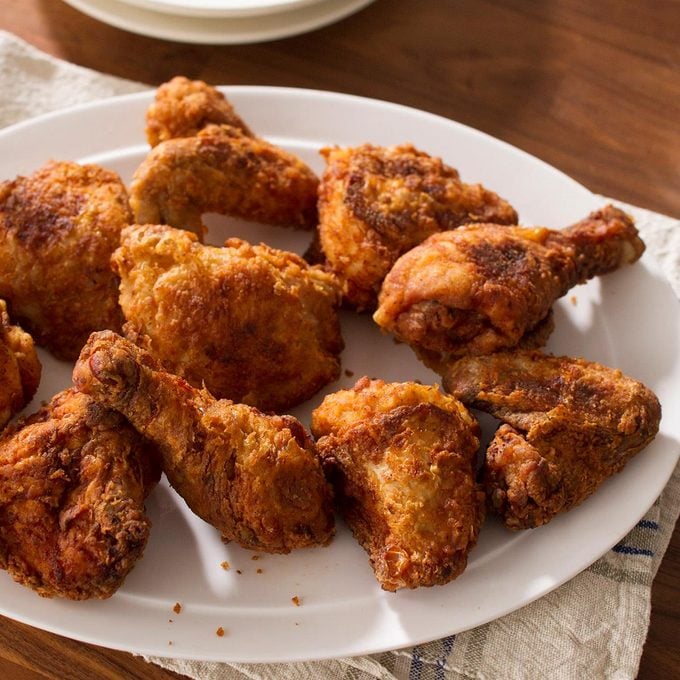
Before digging in, let your chicken rest for a few minutes. This helps the chicken’s moisture redistribute throughout the meat (aka the chicken gets juicier!). Resting also helps the outer coating crisp up and excess oil drain. The result? Perfectly crisp, better-than-any-restaurant chicken you and your family will wolf down. Enjoy! Looking for more? Try our favorite crispy fried chicken thigh recipe.
Wondering what to do with that oil?
Let it cool. Then strain through a fine-mesh sieve to remove residue and store. The easiest place to store oil is in its original container, but spare glass jars work, too. Reuse it for your next Fish Fry Friday.
Make It Your Own
Now that you know the basics, create your own recipe. You can adjust the flavor of the final chicken by adding extra ingredients into the coating. Here are a few options our Test Kitchen can’t get enough of:
- Spices: Experiment with almost any ingredient from your spice rack, but rosemary and cayenne certainly add a kick.
- Hot sauce: Spicy fried chicken, here we come. A few dashes of your fave hot sauce turn up the heat.
- Potato chips: Yep! This snack food adds a secret crunch that’ll take your fried chicken over the top. See what we’re talking about with this recipe for Potato Chip Chicken Strips.
We’ve tested hundreds of tasty ways to fry chicken. Check out our favorites, here.
Once you master fried chicken, our chicken dinner ideas will help you add to your repertoire.


Note: Every product is independently selected by our editors. If you buy something through our links, we may earn an affiliate commission.
Originally Published: February 27, 2019