I Made Silvanas, the Cookie from the Philippines. Here’s What Happened.

Updated: Mar. 31, 2021
Silvanas are popular in the Philippines for a reason. Cashew-based meringue cookies, rich buttercream and cookie crumbs come together to create this truly delicious treat!
My family and I have been lovers of silvanas for as long as I can remember. Made of cashew meringue cookies slathered with delicious buttercream, silvanas are pretty hard to resist. They’re the handy cookie version of another equally famous Filipino cake, sans rival. I was introduced to silvanas as early as my childhood years, but back then it never struck me to be curious about how it’s made. The only important thing to me was that it was delicious!
Many years later, when I first started learning how to bake, I always had the impression that silvanas were difficult to make at home. To my teenage mind, it was such a complex recipe that I decided I would only attempt it when I felt ready. After years of home baking experience, the time has finally come. And as it turns out, it’s not as hard as I thought it would be!
Silvanas Recipe
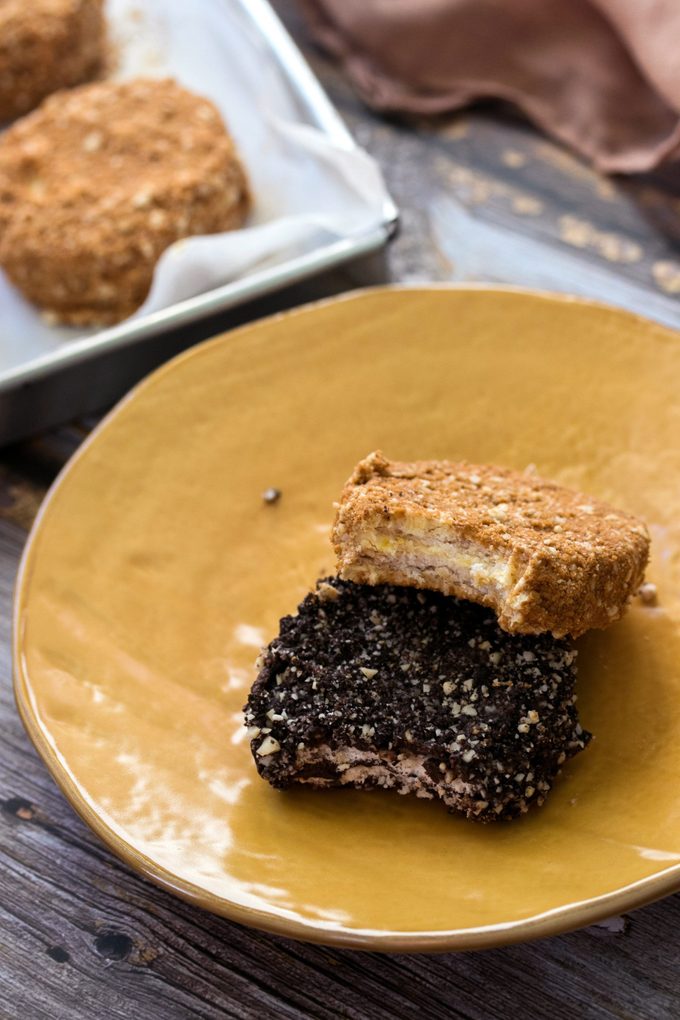
Silvanas, sometimes spelled sylvanas or sylvannas, are a frozen sandwich cookie originating from the Philippines. It has three main components that make it utterly delicious: the cashew meringue cookies, the rich buttercream and the cookie crumb coating.
I found this recipe from The Unlikely Baker, and it produces silvanas that taste really close to our favorite brand. I can’t tell you enough how satisfying that first bite was!
(For another Filipino baked good, learn how to make ube bread, which is a gorgeous purple treat!)
Ingredients
For the meringue cookies:
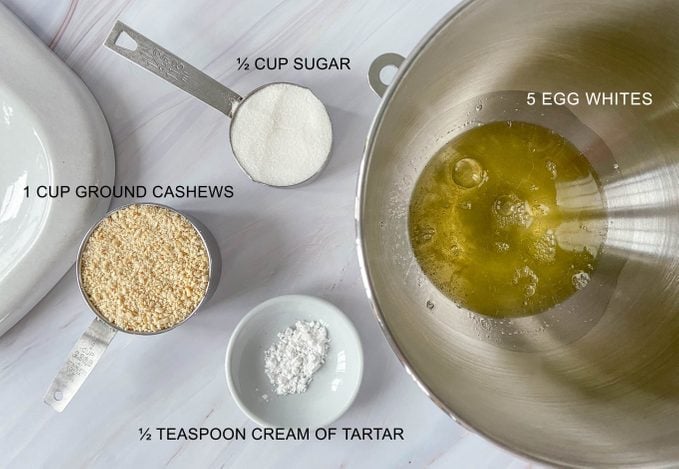
- 5 large egg whites, room temperature
- 1/2 teaspoon cream of tartar
- 1/2 cup granulated sugar
- 1 cup cashews, ground
For the French buttercream:
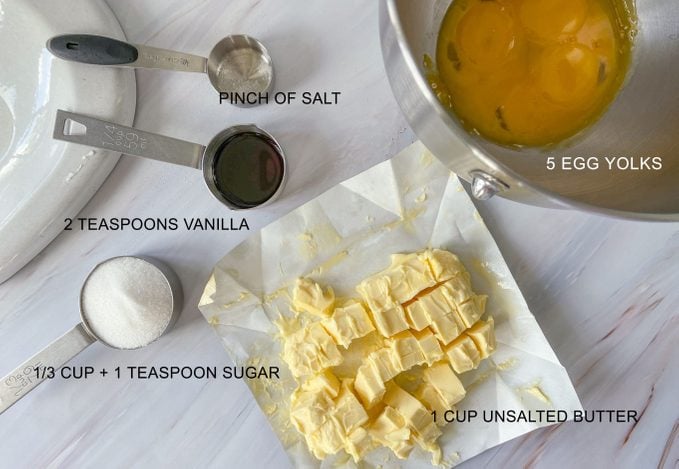
- 5 large egg yolks
- 1/3 cup granulated sugar + 1 teaspoon
- 2 teaspoons vanilla extract
- Pinch salt
- 1 cup butter, cubed and softened
For the assembly:
- 1 cup graham cracker crumbs
- 1/2 cup cashews, ground
Making the Cashew Meringue Cookies
The first thing we need to make are the cashew meringue cookies. Before we start, however, I think it’s wise to create a stencil for the cookies to act as a guide when you get to the piping stage. This will help us achieve cookies that are of the same size, making them easier to pair together later on. I just trace my 2.5-inch cookie cutter on a piece of paper and line them up neatly.
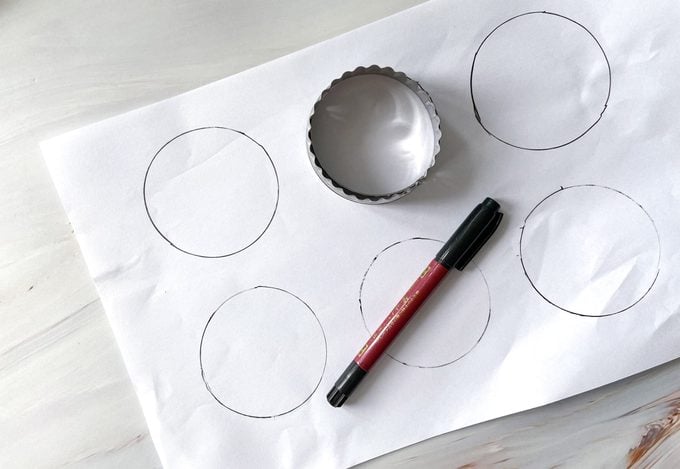
I think 2.5-inch rounds make perfectly sized cookies, with a yield of 13 silvanas. If you make 2-inch cookies, you’ll probably end up with 16 silvanas, while 3-inch cookies will probably yield 11 or 12 silvanas. I don’t recommend making them any bigger.
Now we can get started on the actual meringue. You only need four ingredients here, starting with egg whites. These need to be at room temperature and must have absolutely no trace of egg yolks otherwise they may not whip up to their full volume. (It’s easier to separate the eggs when they’re cold, but leave them on the countertop to come to room temp after.) You can use a hand mixer for this but a stand mixer is always more convenient.
With the wire whisk attached, whip the egg whites on medium-high speed, just until foamy. Add in ½ teaspoons cream of tartar and keep whipping until you reach the soft peak stage.
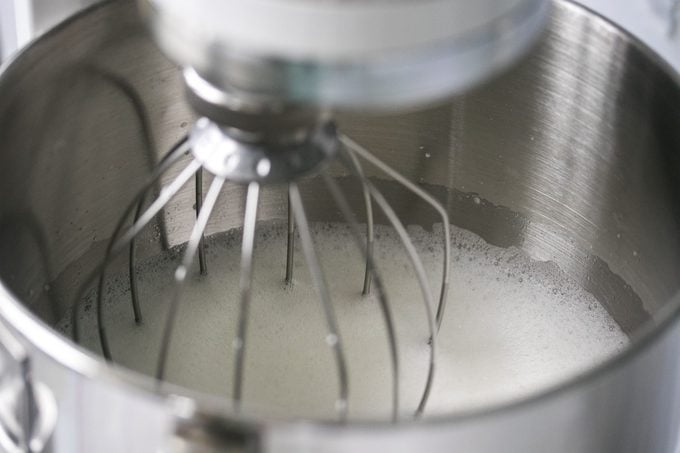
Without stopping the mixer, gradually stream in the sugar. Don’t add it in all at the same time or else it’ll take your egg whites forever to whip up properly. What you’re aiming for at this point are stiff peaks. To check if you’ve reached this stage, dip your whisk attachment into the egg whites and lift up. The egg whites should manage to hold a point that barely falls back or moves, either on the whisk or in the bowl. You can even try and flip the bowl over if you want, and the mixture won’t move at all.
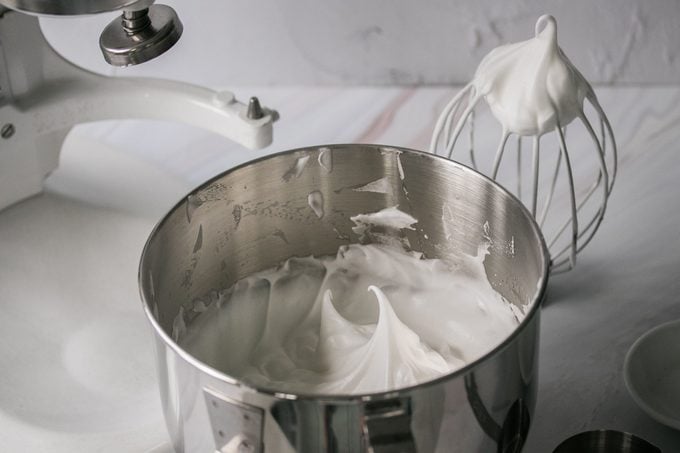
Now that you’ve reached this stage, detach your bowl and grab your spatula. We’re going to add in a cup of ground cashews. I used raw cashews which I toasted briefly, and it produced a very lightly-colored cookie. If you would like darker meringue cookies so that the layers will be more obvious, use roasted cashews that are darker in coloring. Either way, it’ll be delicious. (By the way, if you don’t have a grinder, you can chop the cashews up super finely as I did. It takes a lot of time and energy to get them really fine, so if you can manage to buy them ground, do it.)

You want to gently fold the ground cashews into the stiff egg whites, making sure to scrape the bottom and sides of the bowl as you do. Fold just until the cashew grounds look well distributed. Absolutely do not mix and mix until you deflate the mixture or all your effort will go to waste.
Transfer the meringue into a piping bag and snip off the corner. (You can also use a Ziploc bag of course.) Make sure to leave enough space on top so you can still properly hold the piping bag and apply even pressure as you squeeze. Place your bond paper stencil under the parchment paper on your baking tray and pipe inside the circle. I like to pipe them to about 1/3 to 1/2 inch thick, as evenly as I can. These cookies do not expand much so you can pipe them very closely together, adjusting the stencil as you go. Do not allow the sides of the cookies to touch though, or you may have a difficult time taking them off the parchment.
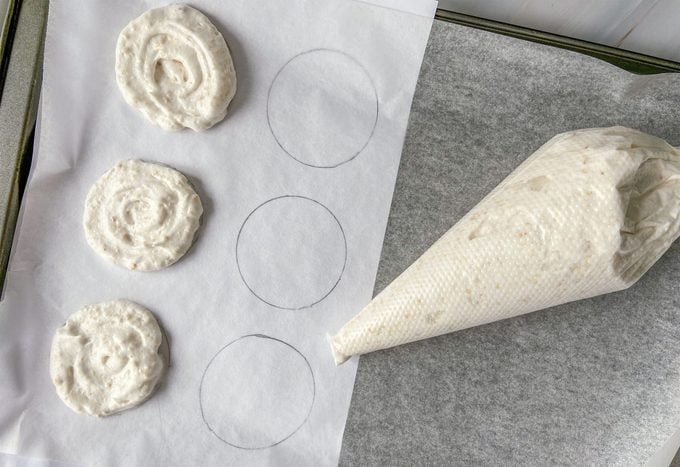
Use a spoon or an offset spatula to even out the tops of the cookies as much as you can. (They won’t bake up evenly in any case so don’t worry about it too much.) Because I only have 13-inch baking sheets and no larger, I needed to use 2 baking sheets for this recipe. As long as your oven is able to properly disperse heat, baking 2 trays at the same time should not be a problem. You may need to bake them a little longer, however.
In my case, I initially baked my cookies in a preheated 300°F (150°C) oven at the recommended 20 minutes. But when I saw they were not yet light brown on the sides, I added about five more minutes, until I was satisfied with the amount of browning I got.
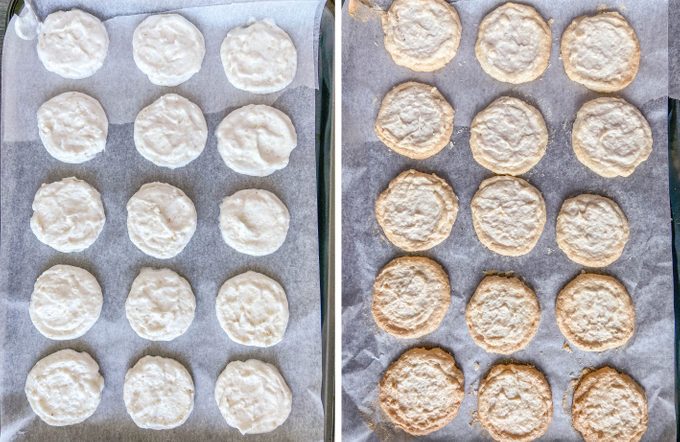
Now it’s time to turn off the oven and leave the cookies inside for about 10 to 12 minutes to dry out further, using the oven’s residual heat. Absolutely do not open the oven door at any point until you’re done with this step! Take them out of the oven and let them cool completely at room temperature.
Making the French Buttercream
While the cookies are cooling, it’s time to make the buttercream. This buttercream recipe makes use of the remaining egg yolks that was separated from the whites for the meringue. Many recipes on the internet make use of regular buttercream made from butter and confectioner’s sugar, but in my opinion, this buttercream is so much better. It tastes better, is more luxurious in the mouth, and you don’t need to add a ridiculous amount of sugar to make it stable. Also, you don’t need to worry about what to do with the five egg yolks you suddenly find yourself with.
The process of making this buttercream is kind of similar to French Buttercream where you cook the egg yolks over simmering water, but also, it’s like a shortcut version. You start by adding in the ⅓ cup + 1 teaspoon sugar, 2 teaspoons vanilla extract, and pinch of salt with the egg yolks, preferably in the bowl of a stand mixer. Whisk them all together. Attach a candy thermometer to the bowl to make it easier to gauge if the yolks are ready.

Bring to a simmer some water inside a pot that’s large enough to hold your bowl, but not too large that the bottom of the bowl will touch the water. We want to use only the steam to cook the egg yolks gently, but if the bottom of the bowl touches the water and it becomes too hot, you run the risk of scrambling the eggs.
Once the water is simmering, set your bowl on the rim of the pot and start mixing or whisking the egg yolks to keep it moving. This is key. You want to constantly stir the eggs, scraping the sides and bottom of the bowl as you go, so they don’t scramble. Mix until you reach 155°F (68°C) on the thermometer. The egg yolks are no longer raw at this point and can safely be used for your buttercream.
Immediately transfer the bowl to your stand mixer fitted with the whisk attachment. Mix at medium-high and soon you will see the egg yolks transform into a light and fluffy cream. Keep whisking until it turns stiff. It will take about 6 to 8 minutes. Before proceeding, touch the bottom of your bowl. It should not be hot anymore.

Keep the mixer running as you slowly add in a cup of butter that’s been softened to cool-room temperature. Add a few cubes of it at a time so as not to overwhelm the buttercream. Once you’ve got all your butter in, the buttercream will look shiny, thick, and creamy.

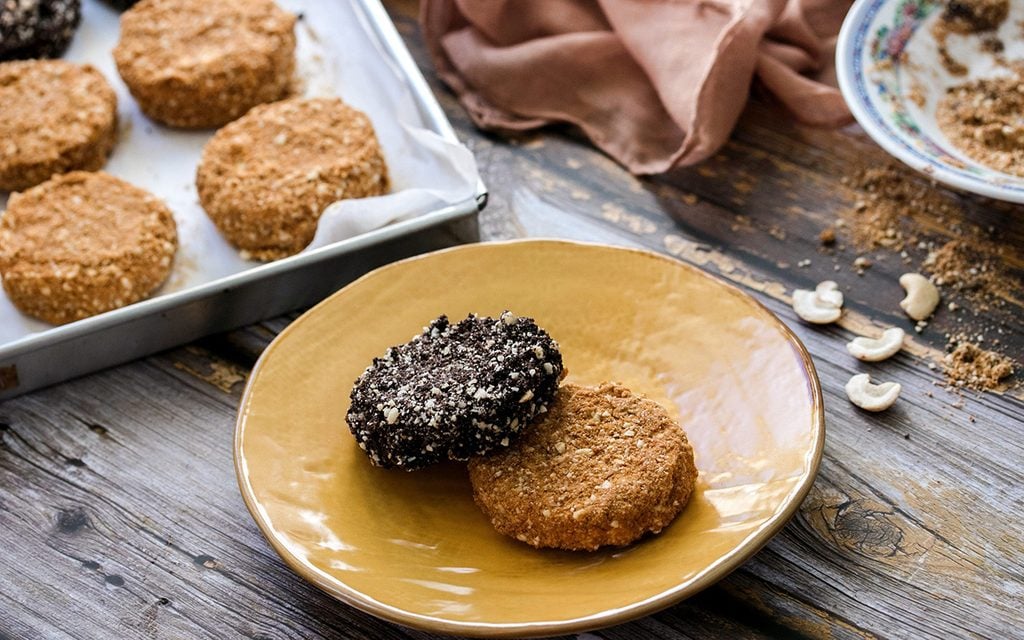
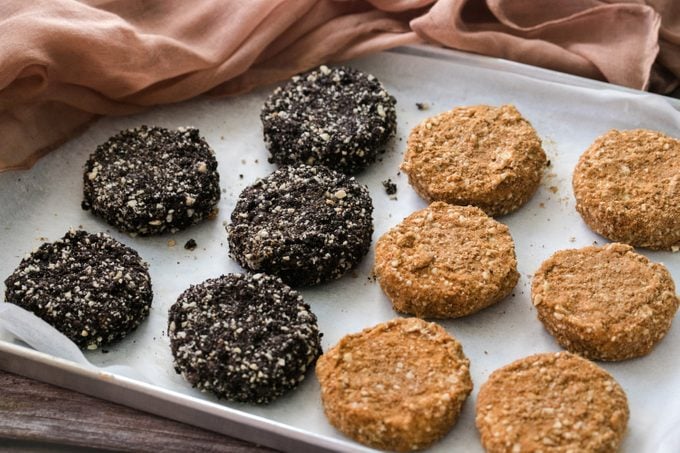
As someone who had been nervous about making silvanas to begin with, I still could not help but feel ambitious. I decided I wanted to do half classic and half chocolate silvana, so I transferred half of the buttercream to another bowl and mixed in ½ cup of cooled melted chocolate. This is totally optional though.

If you’re not using the buttercream immediately, put in the fridge and briefly re-whip to make it spreadable.
Assembling the Silvanas
At this point, you can prepare your cookie topping mixture and just set them aside for later. If you’re making classic silvanas all the way, you will need a cup of crushed graham crackers and ½ cup ground cashews. Mix them together in a bowl and this is your cookie crumb topping.
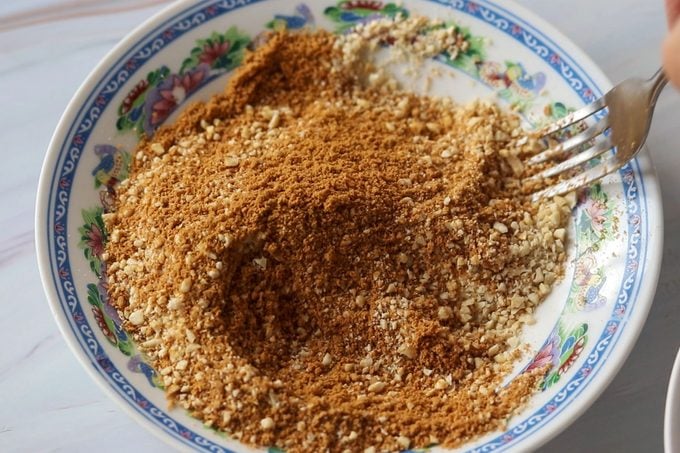
However, if like me you want half classic and half chocolate, you’ll need to divide the ground cashews between the graham cracker crumbs and the chocolate cookie crumbs. So that’s ½ cup crushed grahams with ¼ cup ground cashews in one bowl, and ½ cup chocolate cookie crumbs with ¼ cup ground cashews in another bowl. Mix well to combine. I do believe some people like to use butter cake crumbs and chocolate cake crumbs, but the cookies make perfectly delicious toppings.
Since all your components are ready, it’s time to check on your cashew meringue cookies. You don’t want to keep them out for too long as the meringue will start deteriorating and become brittle. You want to assemble them as soon as they’re no longer hot. Gently detach them from the parchment paper but do not stack them. Just keep them on the parchment.
To assemble the cookies, I highly recommend using plastic gloves. This part is very messy so the gloves help quite a lot. Take one cashew meringue cookie and spread a generous amount of buttercream onto the uneven side, then cover with another cookie, uneven side facing in. The uneven side should always be inside the silvanas, while the smooth side should always be facing out. This is the only way you can get an even top and bottom.
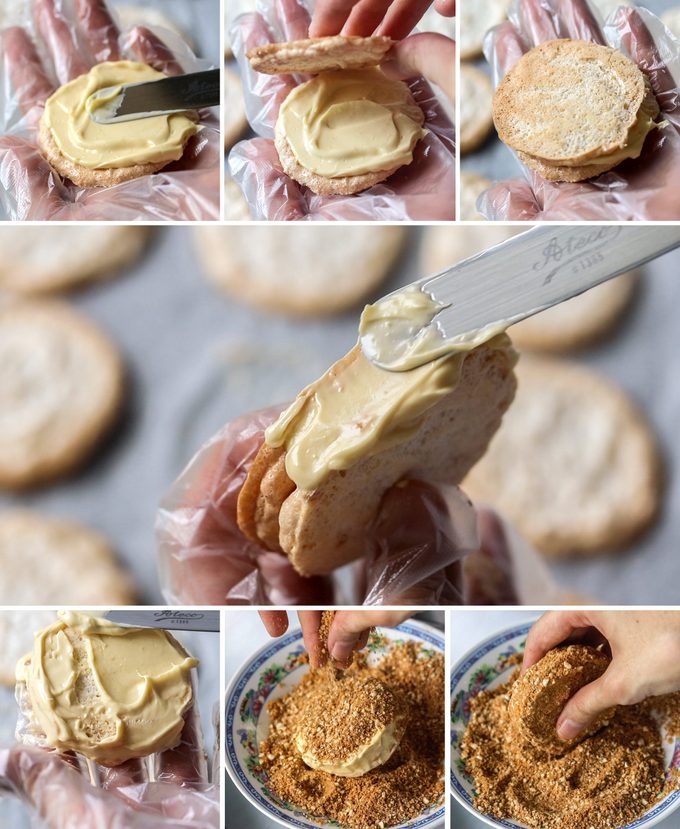
Press the two cookies together gently, then fill in the sides with more buttercream and smooth it out. Spread a layer of buttercream on the rest of the sandwich cookie, making sure to coat everything evenly. It doesn’t need to be thick but don’t be too stingy with the buttercream either. You need to cover the sandwich cookies with just enough buttercream to make the crumb topping stick.
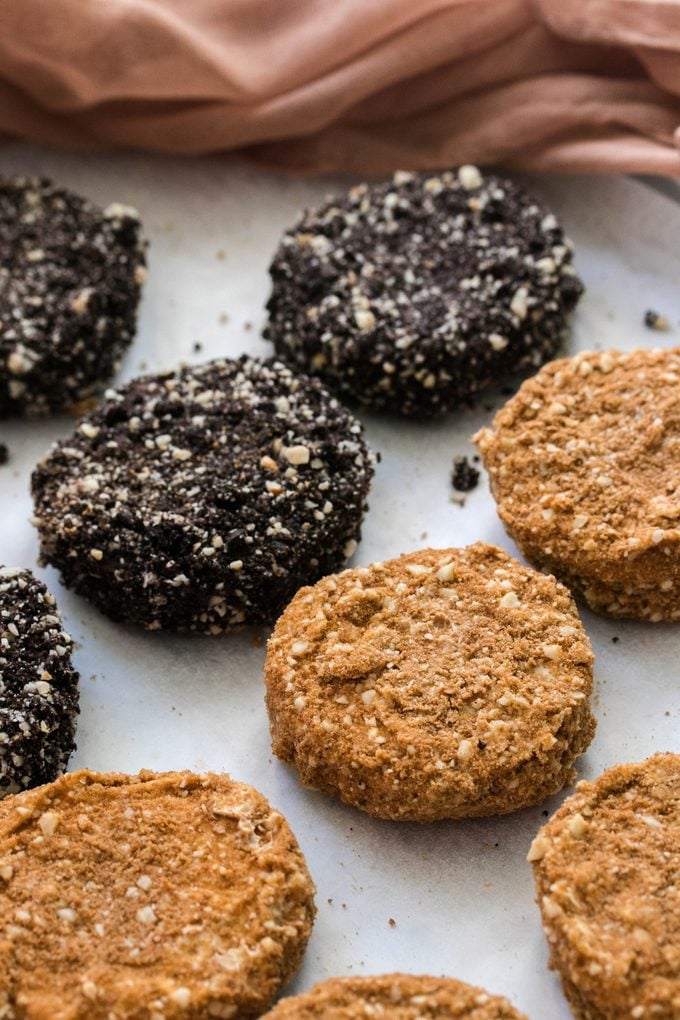
Drop the buttercream-coated cookies into the right crumb mixture and generously coat on all sides. Gently shake out the excess crumbs, and voila, you now know how to make silvanas! Proceed with the rest of the cookies. If you’re making both classic and chocolate, just remember to roll in the right crumb topping. (Unless you intentionally switched it up.)
Freeze the finished silvanas on the tray for at least 30 minutes to set them, then you can transfer them to an airtight container. Stored properly and kept in the freezer, these can last up to 2 weeks. (They never last that long around here though.) Just to be sure they don’t stick together, you can place parchment paper in between the cookies.
When to Eat the Silvanas
If you bite into these babies straight from the fridge, the meringue cookies will be crisp and light, eventually melting in the mouth. But I personally love to eat my silvanas semi-frozen, allowing it to sit for a few minutes on the dining table until the chill recedes a little. The result is a meringue cookie layer that is almost nougat-like. The texture is just delightful!
Originally Published: December 17, 2020