23 No-Carve Pumpkin Painting Ideas
Updated: Aug. 01, 2023

From glittery gourds to adorable monster faces, we've rounded up the craftiest pumpkin painting ideas for you to try this Halloween.
A pumpkin is classic fall decor, but hollowing and carving a jack-o’-lantern can be too time-consuming (and messy!)—especially if you’re busy wrangling trick-or-treaters, whipping up Halloween desserts or preparing for a party with DIY Halloween decor. Luckily, carving isn’t the only way to transform an ordinary pumpkin into the ultimate Halloween decoration. Grab a paintbrush instead of a carving knife and check out these amazing pumpkin painting ideas!
Glitter Glam Painted Pumpkins
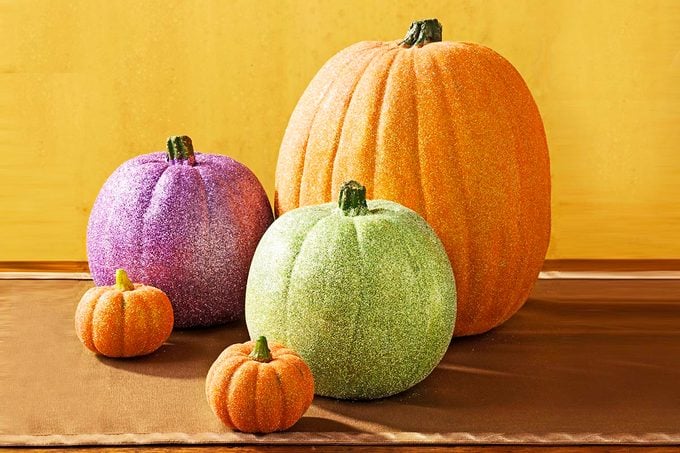
For a sparkly pumpkin painting idea, use a sponge brush to coat your pumpkin with a thin layer of decoupage glue. Before the glue dries, sprinkle the pumpkin with glitter. (If your pumpkin is extra-large, do this in sections!) Shake or blow off any excess glitter. Allow the glue to dry completely before touching.
Black and White Marbled Pumpkins
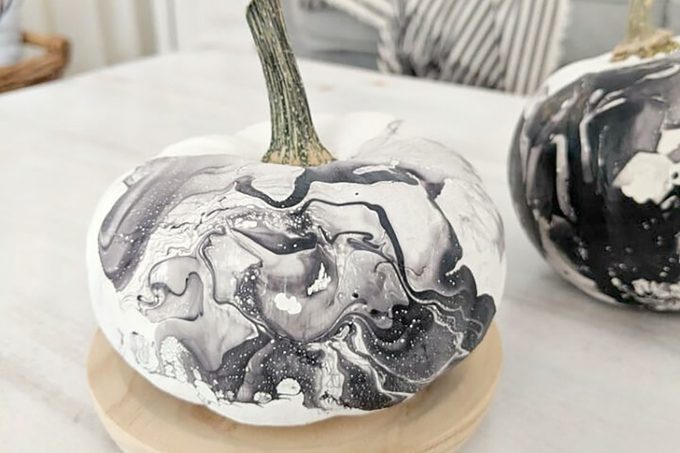
We love pumpkin painting ideas that make use of everyday household items and allow you to get crafty with cute Halloween ideas on a dime, such as this tutorial for a sleek pair of black and white marbled pumpkins by Katrin Fedeler of Northern Feeling. The key ingredients to achieving this gorgeous marbled pattern? Black nail polish, a kebab skewer and some furniture wax!
Don’t have much time to spend on your DIY crafts? Katrin recommends buying white pumpkins instead of orange, so you don’t have to paint the entire gourd white and wait for it to dry.
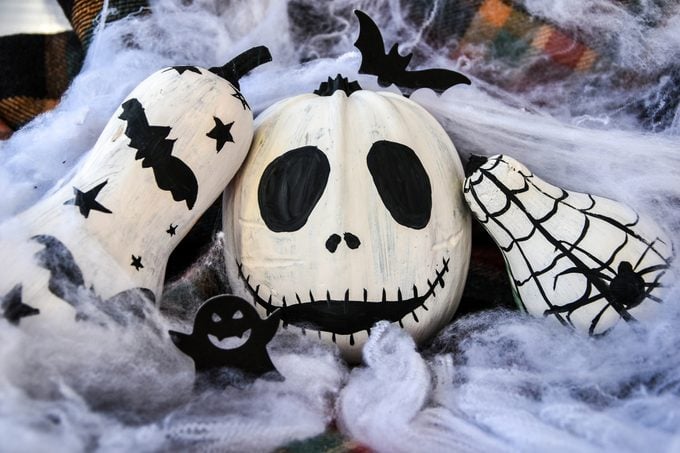
Jack Skellington Pumpkin
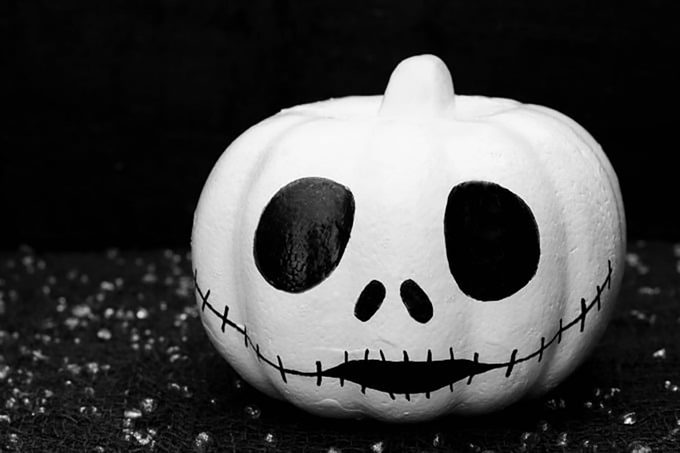
A black Sharpie and a bottle of white acrylic paint are all you need to re-create this kid-friendly pumpkin painting idea for a Jack Skellington pumpkin by Fun Money Mom. Blogger Lisa O’Driscoll shares detailed photos and instructions to getting this iconic character’s eyes, nostrils and mouth just right, including steps to make your own Sally Skellington pumpkin as well.
Patterned Pumpkins

If you’ve got several pumpkins that you want to decorate, painting patterns on them makes decorating easy and quick, yet still eye-catching. A few patterns to choose from include polka dots, stripes, diamonds and checks.
DIY Leopard Print Pumpkin
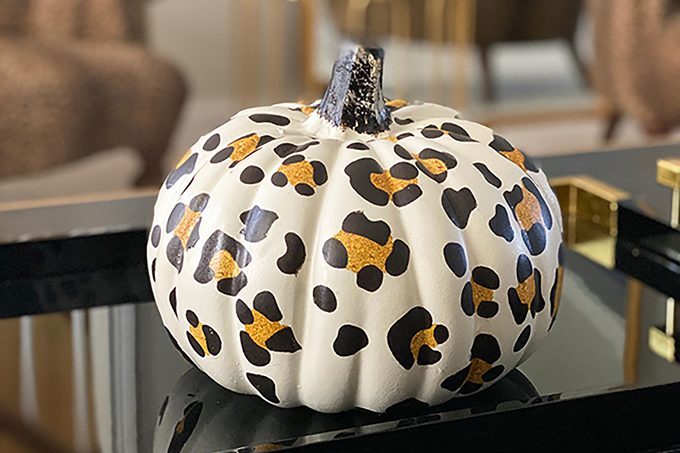
If freehand designing an entire pumpkin scares you from attempting pumpkin painting this Halloween, try out Authentically Emmie’s simple solution: temporary tattoo paper. Print out your desired pattern, cut out the shapes and place them all over your pumpkin. When ready, wipe a damp cloth over the design until the back starts to peel off, much like the process of placing a temporary tattoo on the skin. Blogger Emily Ho even includes a pattern file for download, if you’d like to make the same one.
Want to showcase your pumpkin outdoors? Emily suggests spraying it with a clear coat of Krylon acrylic spray paint to survive the elements. Here are more ways to preserve a pumpkin.
Bejeweled Pumpkins
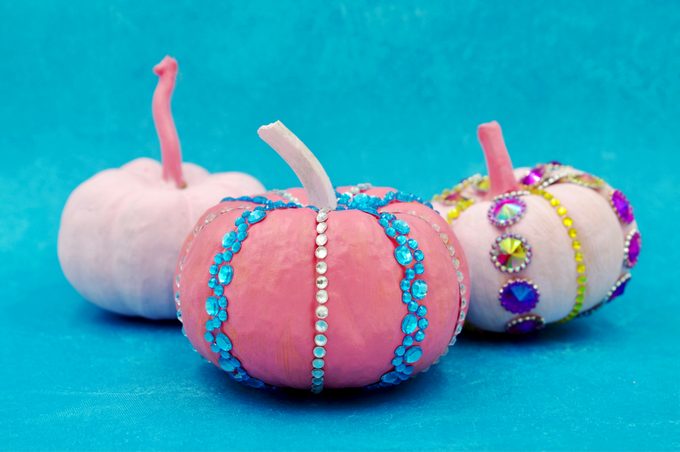
If you still want to get in on the pumpkin decorating fun but want something a little more dazzling, a jeweled pumpkin is the way to go. Paint the pumpkin and the stem in your contrast color of your choice, and then hot glue some sparkly faux jewels down the ridges of the pumpkin—easy as that!
Zigzag Pattern Painted Pumpkins
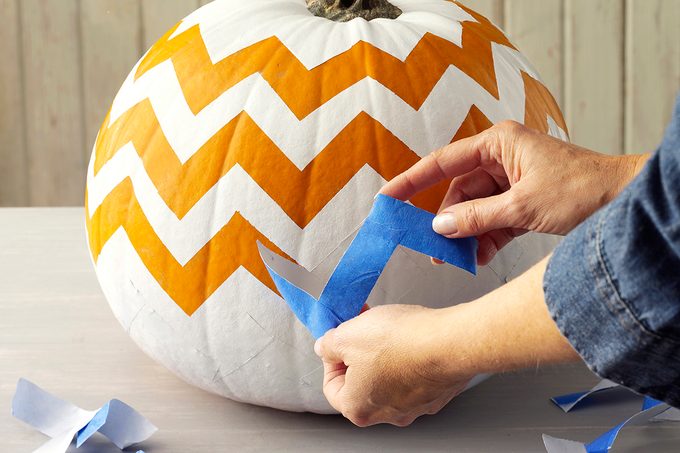
Create a chevron pumpkin by marking and cutting off your desired chevron depth on painter’s tape. For a standard pumpkin, 2 1/2 inches should be about right. Cut enough strips to circle the pumpkin several times. Mark the widest part of the pumpkin with a pencil and position a cut piece of tape on a 45-degree angle, with the bottom corner touching the center guideline. Continue placing tape pieces around the guideline, alternating between upward and downward angles, with the pieces overlapping at the ends.
Once the tape is completely around the pumpkin, mark new guidelines and place the tape above and below the center zigzag, about 1 inch apart. Repeat as many times as needed to complete the chevron design. Cover the stem with painter’s tape to protect it and spray paint the pumpkin with two coats. While the paint is still tacky, remove the tape from the pumpkin and allow the paint to completely dry.
Monster Face Pumpkins
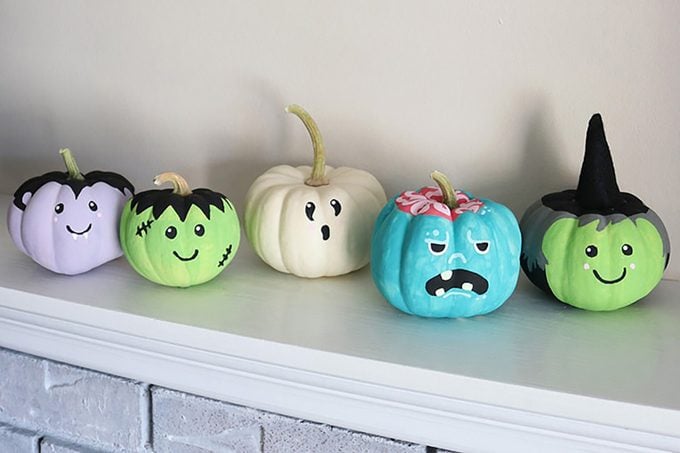
Not good with a paintbrush? Blogger Aubree Smith of Aubree Originals has a slew of pumpkin painting ideas for you in her tutorial on painting simple monster face pumpkins. Using craft paint and a set of all-purpose paintbrushes, the choices include a blue zombie with exposed brains and a grey-haired green witch with a signature black felt hat that’s hot glued on.
Wondering which kind of pumpkin to buy? Look for real white pumpkins if they’re available at your local market. Not only are they cheap, but having a fresh white canvas (as opposed to orange) means you don’t have to paint multiple coats to achieve your desired vibrancy and color.
Happy Harvest Pumpkin
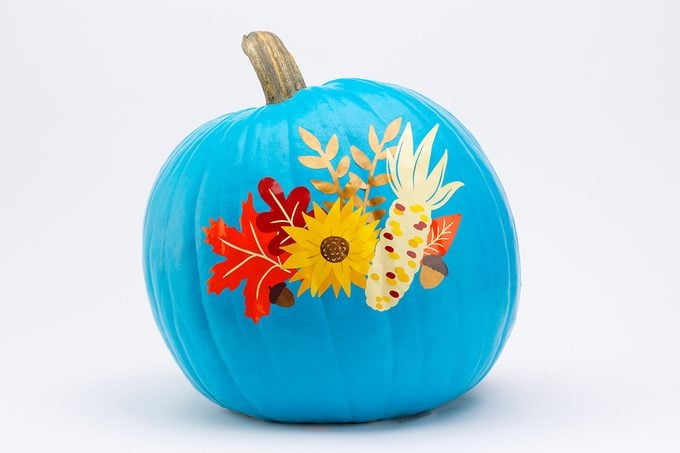
Paint a pumpkin with two or three coats of aqua craft paint. Let it dry thoroughly and then cover it with matte decoupage glue to seal the paint. Upload the template (see below) to your Cricut or another electronic cutting machine. Convert the template to seven layers in the machine’s software, and cut out the individual layers of vinyl craft sheets (red, orange, dark and light brown, light and golden yellow, and ivory) according to the machine’s instructions.
Remove all extra vinyl from each cut sheet, leaving just the pieces for design and markers. Cut a piece of clear contact paper large enough to cover the entire project when finished plus a few inches all around. Peel the backing off and tape down on work surface, smooth side facing up. Set contact paper aside.
Center the brown vinyl layer on the contact paper backing. Using masking tape, adhere the vinyl to the backing. Place the contact paper over the vinyl and use a smooth-edged scraper to press them. Remove the vinyl backing along with the contact paper backing.
Prep the next color by taping it onto the contact paper backing. Using marks on both layers, arrange the brown layer on top of the second color, pressing with the scraper to adhere. Remove backing. Repeat the process until all the colors are lined up. Remove vinyl markers. Replace the contact paper backing on the design, and cut out the design with a craft knife. Remove backing from half of the design and place onto the pumpkin, working from the center out. Repeat with the other side. Carefully peel off contact paper.
Painted Buffalo Plaid Pumpkin
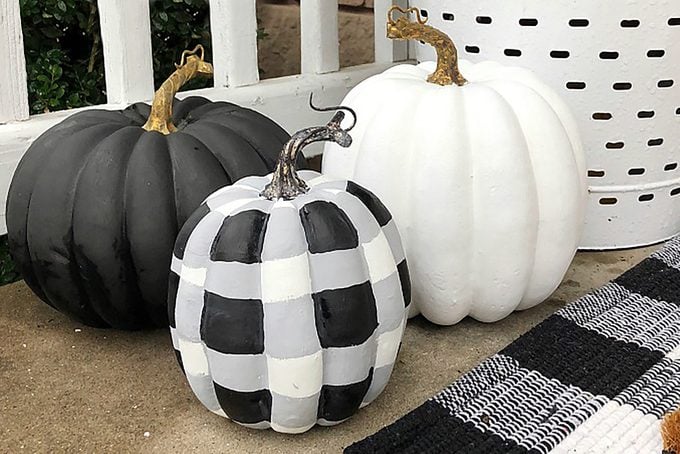
A bottle of black and white acrylic paint and a faux pumpkin are all you need to achieve this DIY buffalo plaid pumpkin painting design by Love of Family and Home.
Looking for more fall-friendly pumpkin painting ideas? Blogger Tonya Diehl suggests using different colors, such as a pumpkin orange bottle of acrylic paint in place of black for a traditional Halloween vibe.
Dip-Dye Pumpkins

While this particular pumpkin painting idea looks like you need to physically dip the pumpkin in a tub of paint, you can simply make it look like it was dipped if you don’t want to pour out that much paint. Use some painters tape to create a straight edge between the painted and unpainted halves of the pumpkin, paint your desired half and peel off the tape once the paint has dried.
Country Quilt Pumpkin
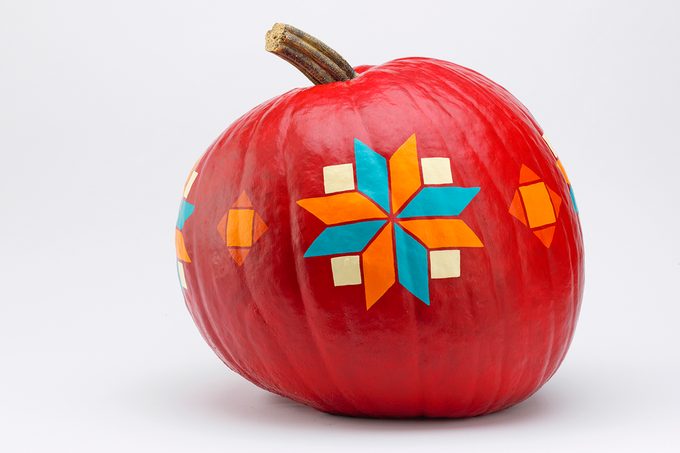
Paint your pumpkin with two or three coats of red craft paint, drying thoroughly between coats. Create a cardstock stencil with an electronic cutting machine or by drawing and tracing by hand and cutting the cardstock with a craft knife.
Place the stencil on the pumpkin, making sure it is straight and centered. Trace the design on the pumpkin with chalk, working from the center out each time to assure the design lines up. Fill in the design with white paint, using a small angled brush. Dry thoroughly and wipe away excess chalk. Paint the design with two or three coats of finish colors, drying between coats. Apply decoupage glue to your pumpkin and allow it to dry.
Marvelous Marble Painted Pumpkin
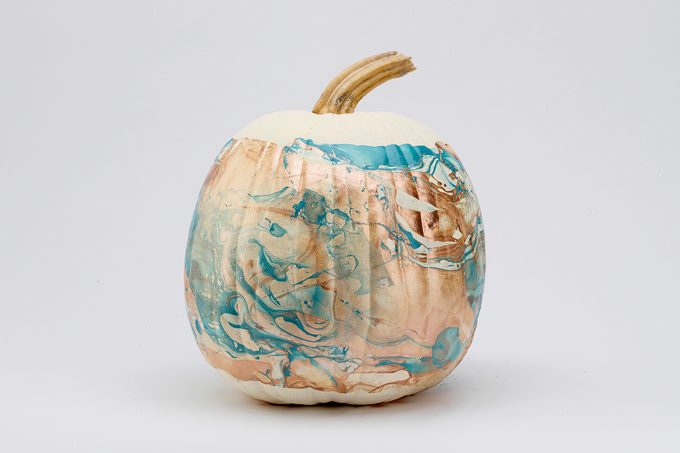
Paint the pumpkin with two or three coats of paint, allowing it to dry between coats. Fill a deep roasting pan or plastic bin with room temperature water to an inch below the top. Drizzle two to three colors of nail polish on the surface. Quickly swirl the polish with a toothpick and immediately roll the sides of the pumpkin onto the water surface. Place the marbled pumpkin on a cookie sheet to dry. If you want to go for a more layered effect, empty the pan and repeat swirling the nail polish, drying between coats.
Wax Resist Pumpkin
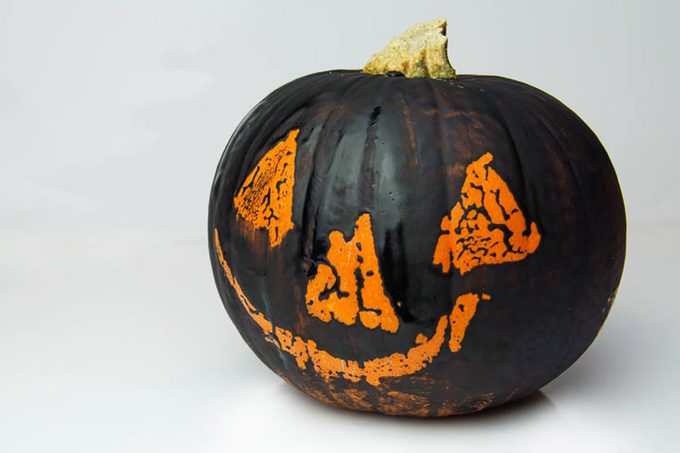
This unique no-carve pumpkin decorating idea by Kids Craft Room makes use of candle wax to “carve” out the pumpkin’s design. It’s called a wax resist pumpkin. Firmly sketch out your design using a tapered white candle before painting the entire pumpkin in a coat or two of black paint. Since the paint cannot adhere to the wax, the bright orange background shows right through your designs.
Struggling to see the white wax designs? Blogger Emma Smith recommends testing out your designs on orange card-shaped cutouts to get a better sense of placement and the final results.
Don’t forget to light up one of the best fall candles alongside your wax resist pumpkin!
Lovely Leaf Decoupage Pumpkins
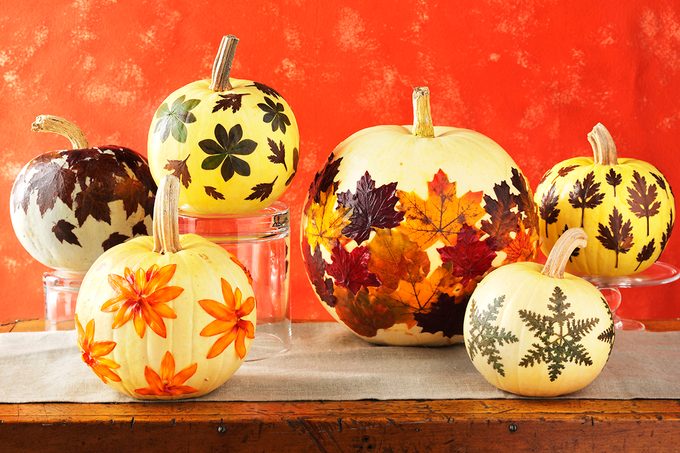
Gather fresh or silk leaves. Using a sponge applicator, brush decoupage glue on an area of the pumpkin slightly larger than a leaf. Apply glue to the back of the leaf. Glue the leaf to the pumpkin, smoothing as needed. If necessary, keep the leaf flat with straight pins inserted slightly into pumpkin. Coat the top of the leaf with decoupage glue. Continue gluing leaves until the design is complete. When dry, remove pins and apply another coat of decoupage glue to the entire pumpkin surface. Get in the autumn spirit with even more easy fall crafts!
Metallic Spray Painted Pumpkins
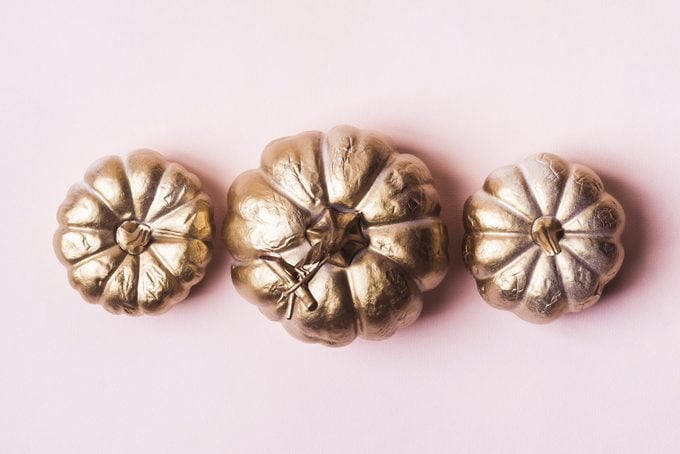
Elevate your pumpkin painting ideas this fall with one simple art supply item: spray paint! From bright reds and striking cobalt blues to muted hues like spiced amber and matte black, spray paints come in an endless variety of color options and textures. For a chic pumpkin this Halloween, opt for brands that have a bold metallic finish, like Rust-Oleum’s Pure Gold Universal Spray Paint or Krylon’s Gold Spray Paint.
DIY Black Rose Pumpkin
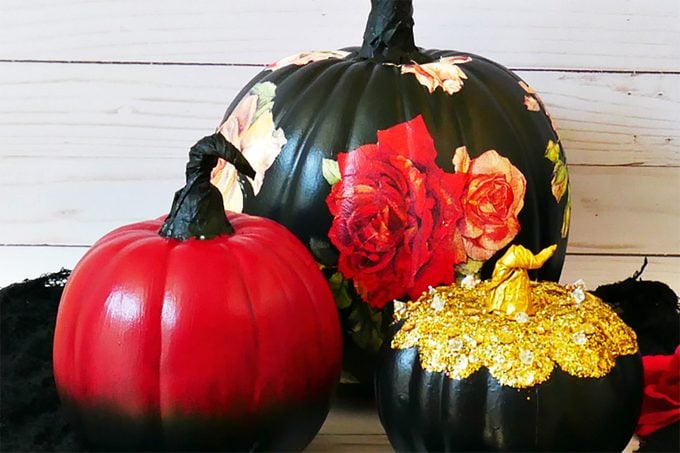
While this intricate black rose pumpkin by My Pinterventures may take a bit of time and effort to accomplish, the results of this fall decoupage design are undoubtedly worth it.
The secret to the vibrancy of this one-of-a-kind pumpkin painting idea? Blogger Erlene Amat suggests applying enough decoupage glue and placing the rose napkin designs down first. Then, carefully paint around with black chalkboard paint to end up with a pumpkin design that’s seriously Instagram-worthy.
Multi-Colored White Pumpkin
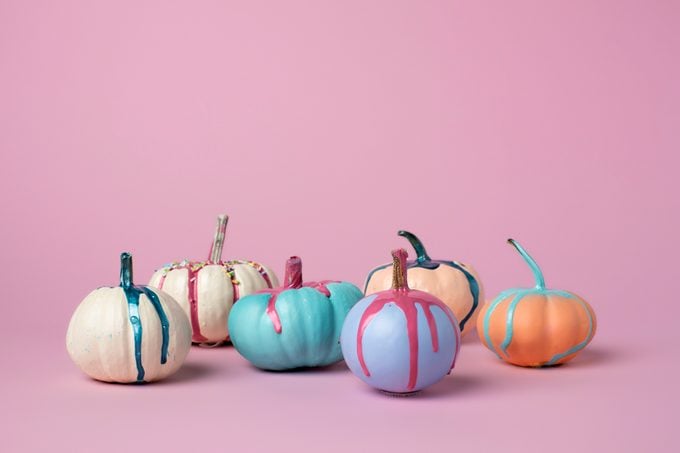
Pick your favorite color (or colors!) of paint, and drip it down from the stem of your pumpkin. If you start with a white pumpkin, you don’t have to worry about what colors will look good with a typical pumpkin orange. Just make sure you do it on newspaper or another covered surface so the paint doesn’t drip down onto your counters!
DIY Ghost and Stars Halloween Pumpkin
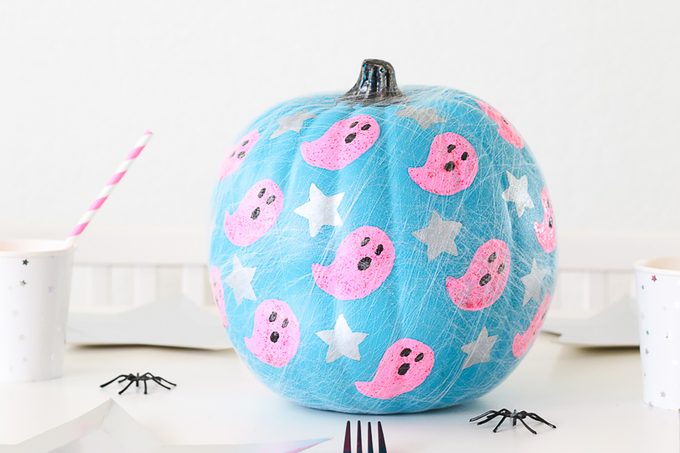
Blogger Andressa Hara of Twinkle Twinkle Little Party has a great pumpkin painting idea for you in her DIY ghost and stars Halloween pumpkin tutorial. Buying a colorful faux pumpkin means you get to skip past the painting and drying stages and go all-in on decorating.
To keep things simple, she first cuts out paper stencils of her designs—in this case, simple outlines of a tear-shaped ghost and five-pointed star—and uses a pencil to trace the shapes onto the pumpkin before painting them in a bunch of equally bright colors.
Want to take your Halloween pumpkin decorating skills up a notch? Andressa uses glow-in-the-dark acrylic paints for a genuinely spooky finish—the perfect centerpiece for your spooktacular Halloween dinner party menu.
Caricature Face Pumpkins
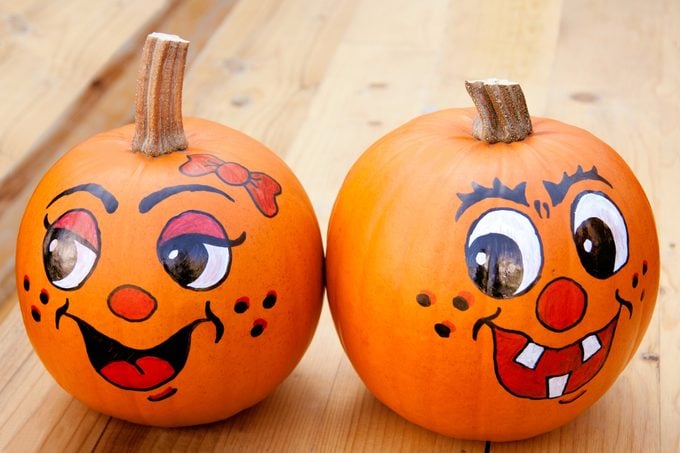
Deviate from the typical spooky faces you find on jack-o’-lanterns by painting caricature-style faces on your pumpkins instead. Not only will kids find them less intimidating, but you’ll probably get some laughs out of the adults too.
Stenciled Bats Pumpkin
Along with ghosts, black cats and more, bats are one of the most common shapes associated with Halloween—so painting bat shapes will definitely be on theme. Take a bat stencil and some black paint, and stencil a few bats around the pumpkin.
This spooky bat cake also makes use of a bat-shaped stencil. Here are some more free pumpkin stencils!
Movie Character Pumpkins
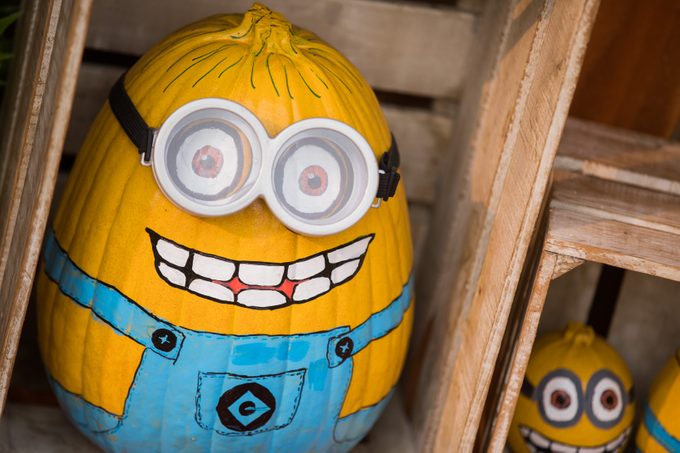
Whether it’s Spiderman, Harry Potter, Pikachu or Olaf, painting your pumpkin like your favorite movie character may be easier than you think. Match your costume to your pumpkin for a perfect picture!
Make one of these recipes inspired by scary movies for something to snack on while you paint!
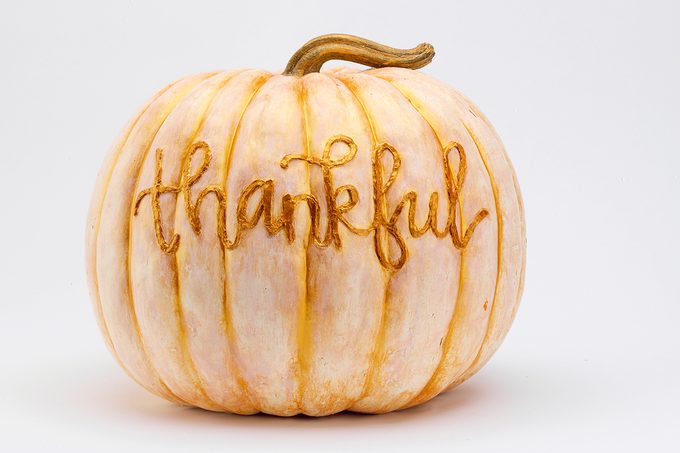
Give Thanks Pumpkin
Using a wide brush, paint your pumpkin with cream paint. Write “thankful” on the pumpkin with chalk and trace over the lettering with hot glue. Let it dry and then paint two or three coats of gold paint over the letters with a small brush. Using a large brush, apply a thin coat of gold paint over the whole pumpkin, increasing the concentration of paint in the pumpkin’s creases. Remove any excess paint with a rag, using small, circular motions.
Next, paint the stem gold and put a thin coat of cream paint over the pumpkin ridges, removing excess. Let it dry, and show it off! Once you’ve finished your pumpkin, check out these other crafty Thanksgiving decorations.
Christabel Lobo, Lori Vanover, Caroline Stanko and Lauren Pahmeier contributed to this article.